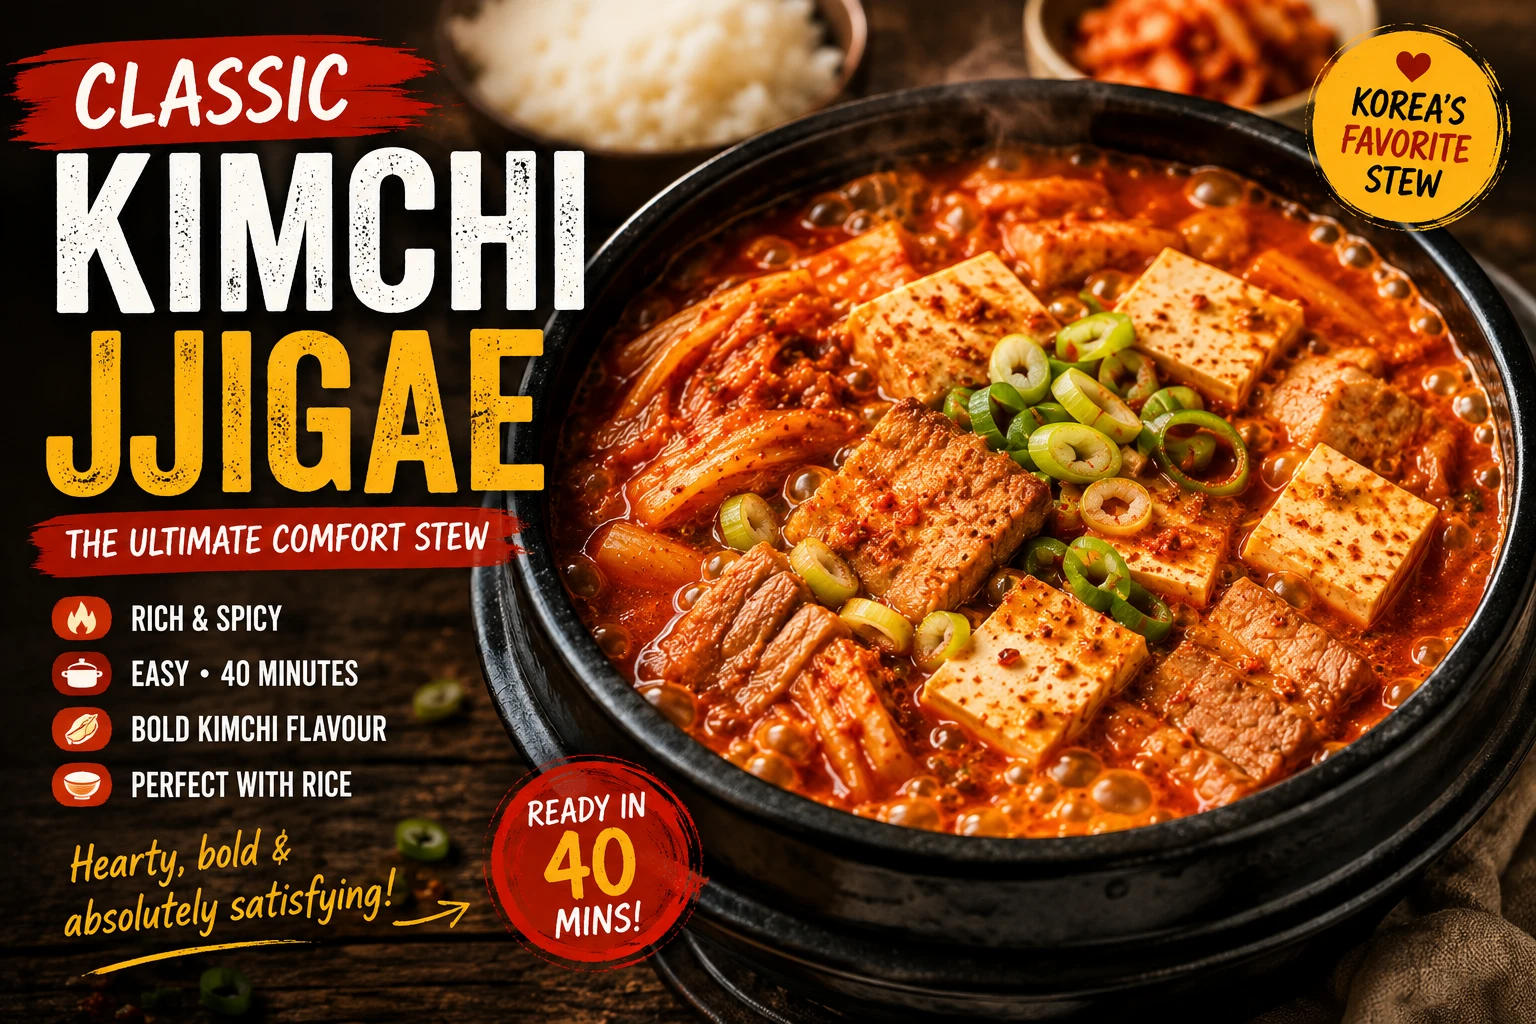
Classic Kimchi Jjigae (김치찌개 — The Original Recipe)
Pork belly seared until its fat renders, aged Stage 3 kimchi, and a classic anchovy-kelp stock, simmered into a thick, deep-red broth. This is the base technique the entire KimchiGuide Kimchi Jjigae family is built on — every other variation on this site links back to this page as the authentic original.


What Is Classic Kimchi Jjigae?
Classic kimchi jjigae — 김치찌개 — is the original, most common form of this Korean stew: pork belly seared until its fat renders, aged Stage 3 kimchi sauteed in that fat, and a classic anchovy-kelp stock, simmered together with tofu into a thick, deep-red broth. Two things decide whether a home version tastes authentic: using pork belly, not a lean cut, and giving the kimchi real fermentation time before it goes in the pot. This is the base recipe — every other variation on this site, from Beef to Vegan to the Instant Pot version, adapts this exact technique for a different protein or format. Serves 4 in 40 minutes at approximately 320 calories and 18g protein per serving.
Why This Recipe Works — The Original Technique, Explained
Most online recipes list the same ingredients but skip the reasoning behind the order they go in the pot. Here’s what each core step is actually doing, and why the whole family of variations on this site protects this same sequence.
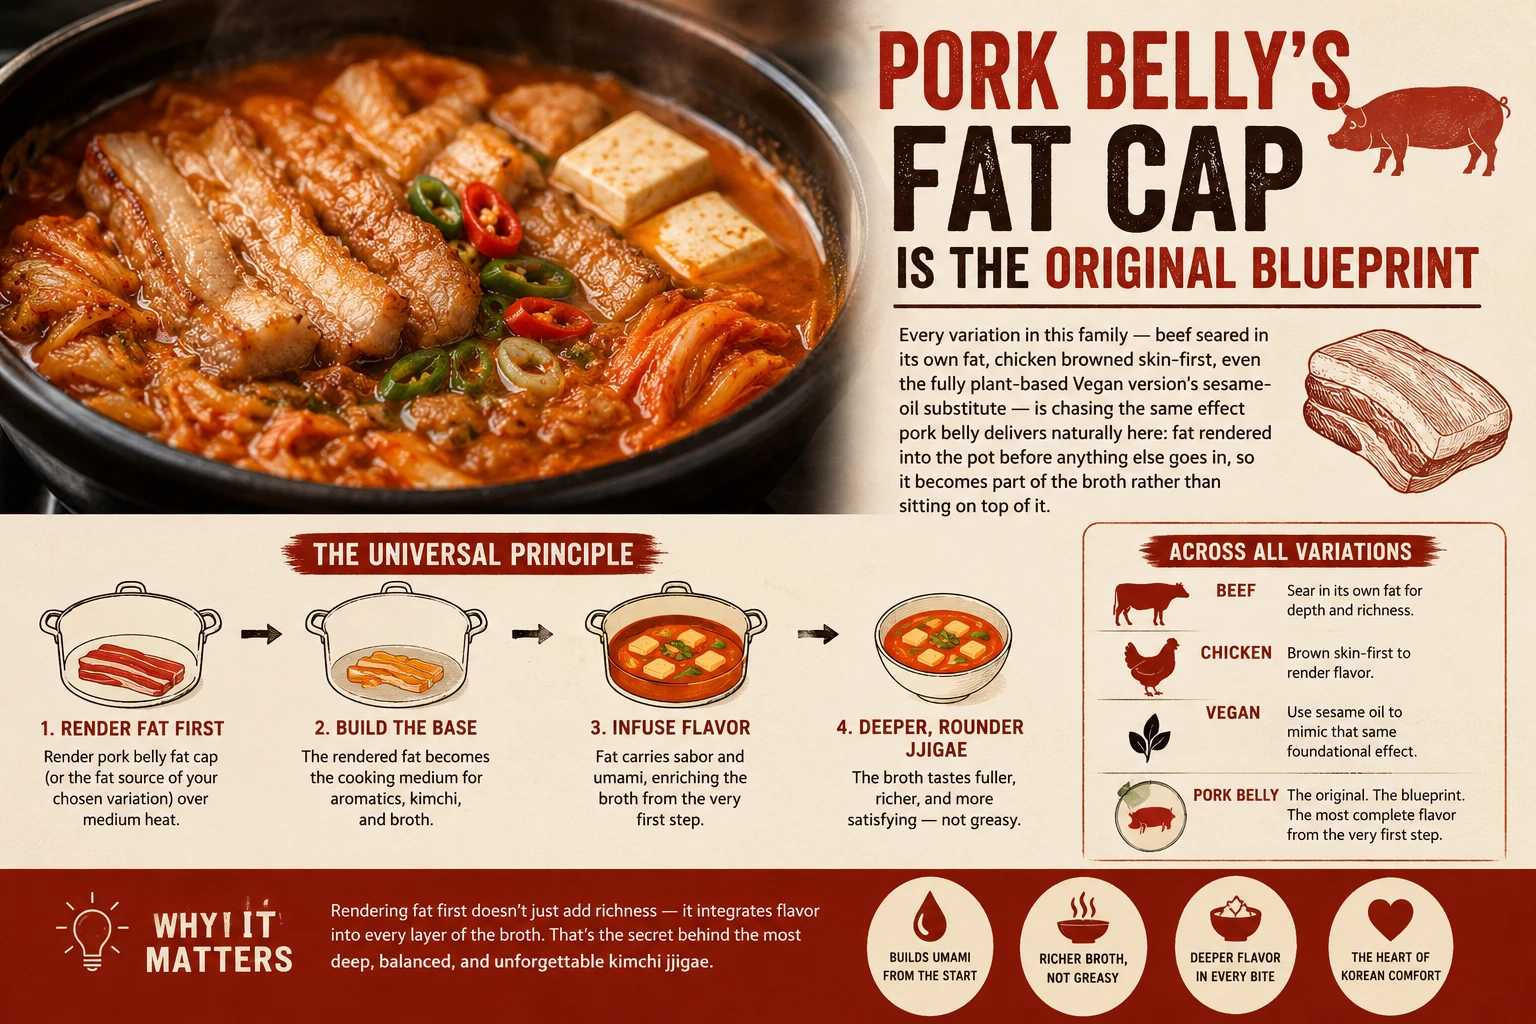
Every variation in this family — beef seared in its own fat, chicken browned skin-first, even the fully plant-based Vegan version’s sesame-oil substitute — is chasing the same effect pork belly delivers naturally here: fat rendered into the pot before anything else goes in, so it becomes part of the broth rather than sitting on top of it.
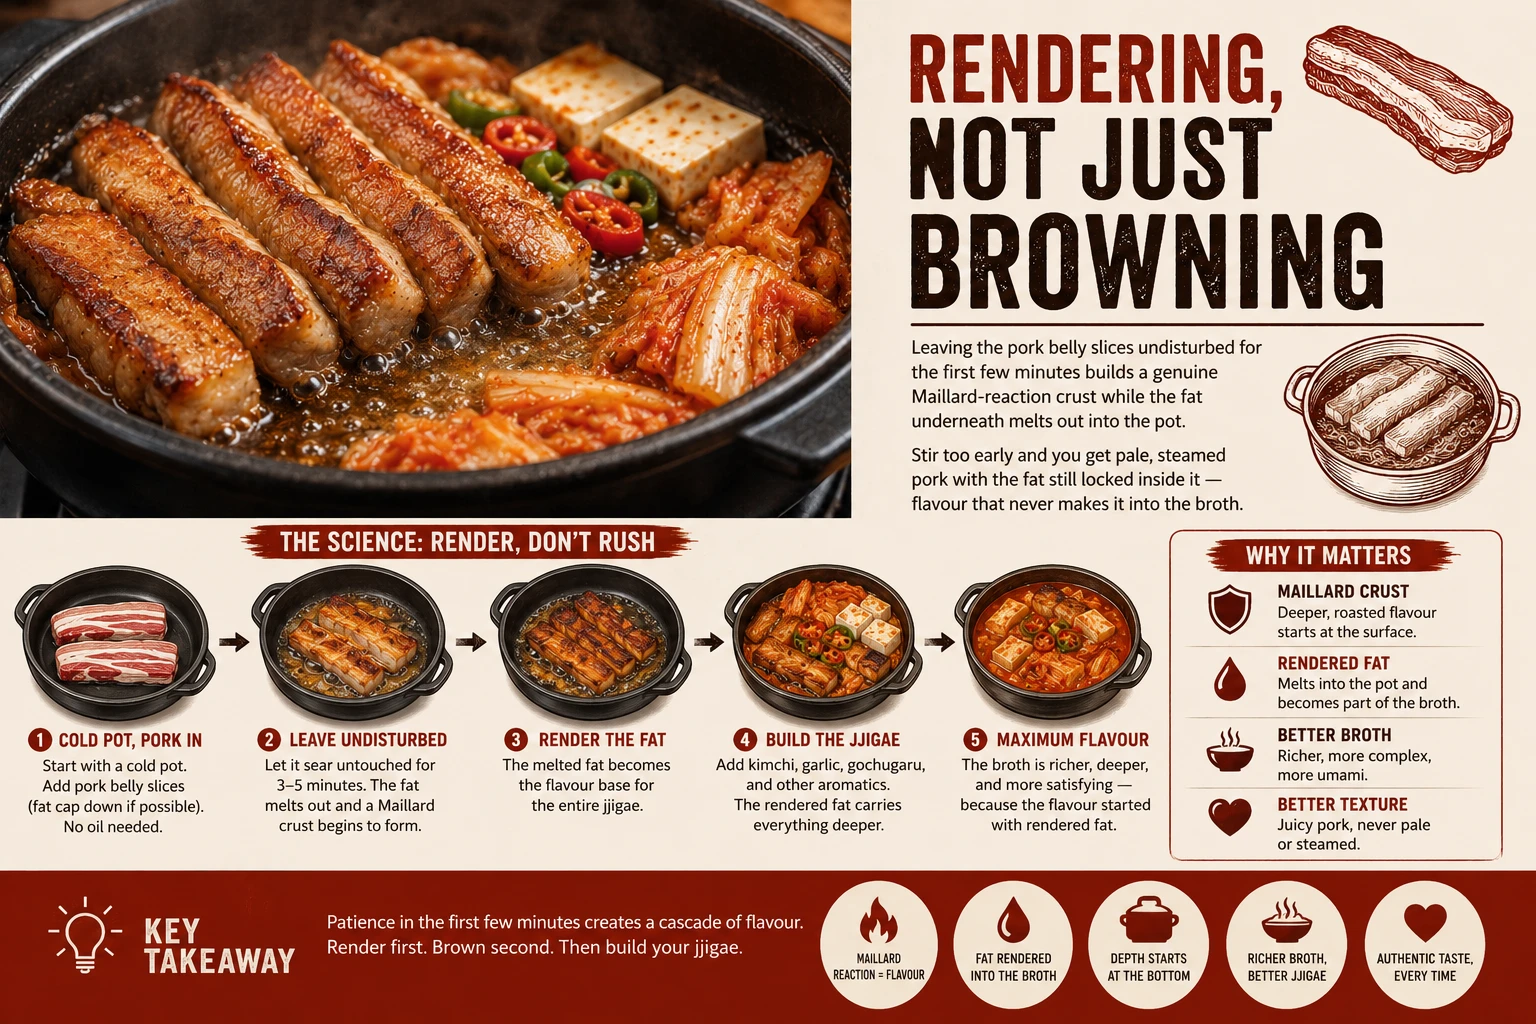
Leaving the pork belly slices undisturbed for the first few minutes builds a genuine Maillard-reaction crust while the fat underneath melts out into the pot. Stir too early and you get pale, steamed pork with the fat still locked inside it — flavour that never makes it into the broth.
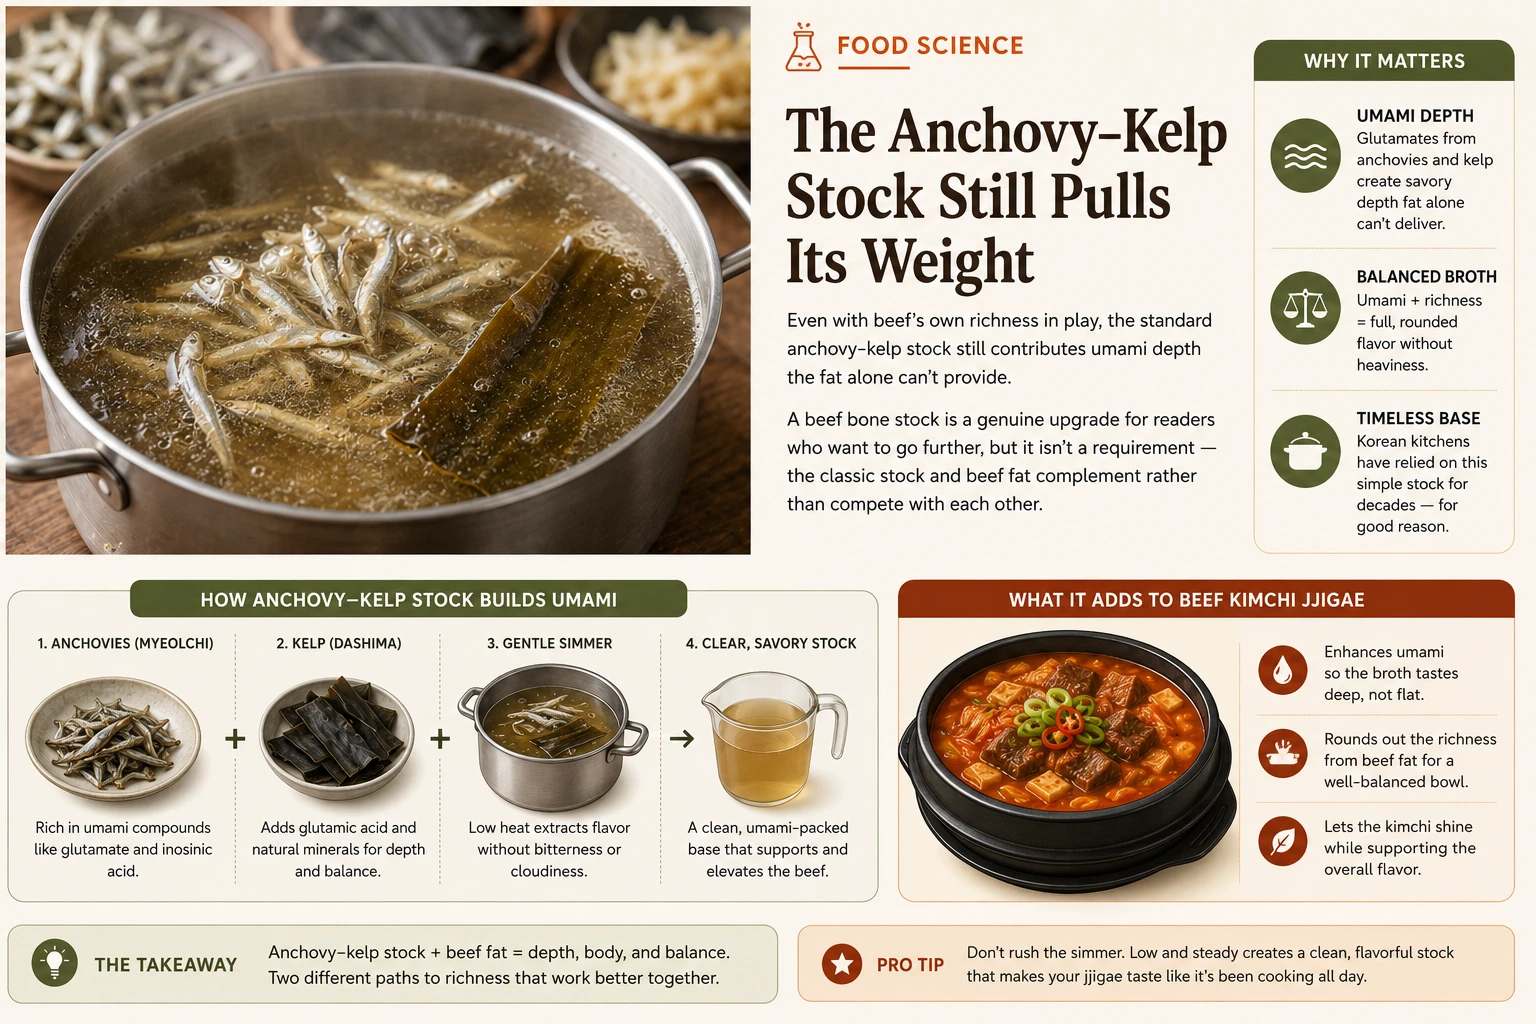
Myeolchi yuksu adds a separate layer of umami — glutamates from the kelp and inosinates from the dried anchovy — that neither the pork fat nor the kimchi alone can provide. This exact stock is the shared backbone of nearly every recipe in the family, from Seafood to Chicken to this original version.
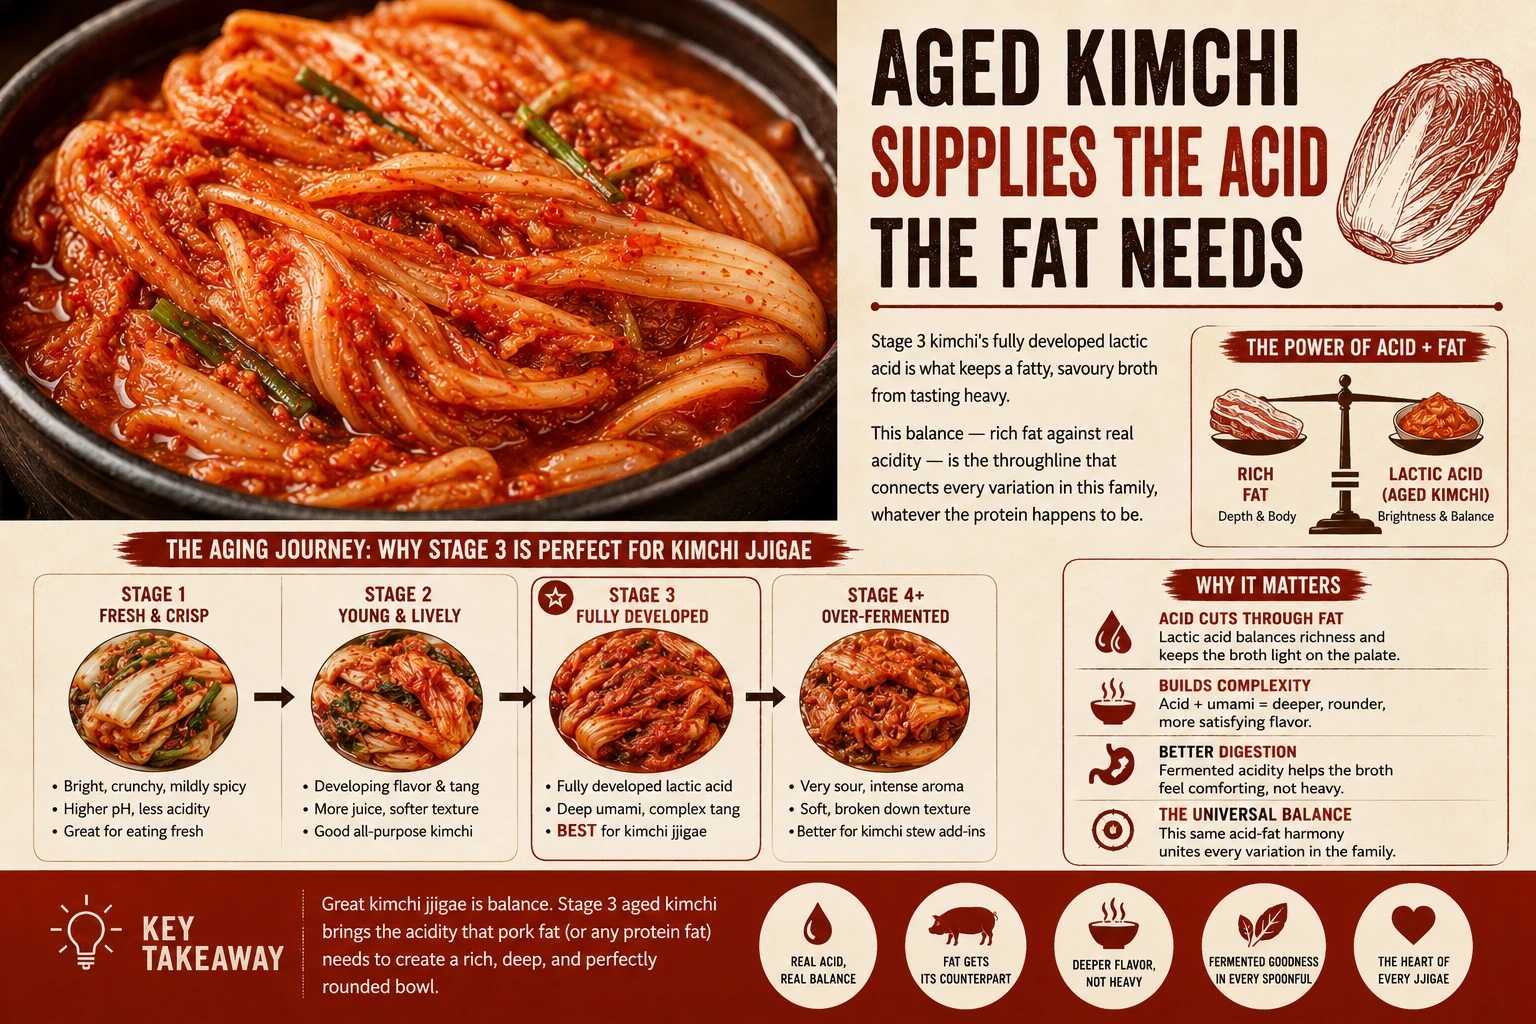
Stage 3 kimchi’s fully developed lactic acid is what keeps a fatty, savoury broth from tasting heavy. This balance — rich fat against real acidity — is the throughline that connects every variation in this family, whatever the protein happens to be.
The Origin of Kimchi Jjigae
Kimchi itself is far older than the spicy, red version most people picture today — and kimchi-jjigae as a dish only became possible once that spicy version existed.
Kimchi’s roots trace back roughly two thousand years, to a much simpler salted, pickled vegetable dish with no chili at all — some food historians connect the word kimchi itself to an older term for salted, pickled vegetables. For most of that history, kimchi looked nothing like the deep-red, gochugaru-laced version eaten today. That changed only after chili peppers reached the Korean peninsula, most likely during or shortly after the Imjin War of the 1590s, when Japanese forces are believed to have brought peppers that had themselves arrived from the Americas by way of Portuguese traders. Kimchi-jjigae as a dish is generally understood to have emerged from that same mid-to-late Joseon-era shift — once chili-spiced, well-fermented kimchi existed as an everyday pantry staple, cooking it down into a hearty stew with whatever protein a household had on hand was a natural next step.
Jjigae, the broader category this dish belongs to, simply means a Korean stew — thicker and more strongly seasoned than guk (soup), and traditionally served bubbling in the pot it was cooked in, meant to be shared at the table rather than portioned out individually. Kimchi-jjigae’s defining trait, distinct from other jjigae like doenjang-jjigae (soybean-paste stew) or sundubu-jjigae (soft tofu stew), is that it’s built specifically around older, riper kimchi — the stronger, more sour flavour of well-fermented kimchi holds up to a long simmer in a way fresh kimchi simply doesn’t. If your own jar is still young, see Fresh vs Aged Kimchi for how to tell the difference before you cook with it, and browse Types of Kimchi for how this red, cabbage-based version fits into the wider kimchi family.
Pork Belly vs Shoulder — Two Cuts Compared
Pork belly is the standard for a reason, but it’s not the only traditional option. We tested both across 4 batches — here’s how they differ.
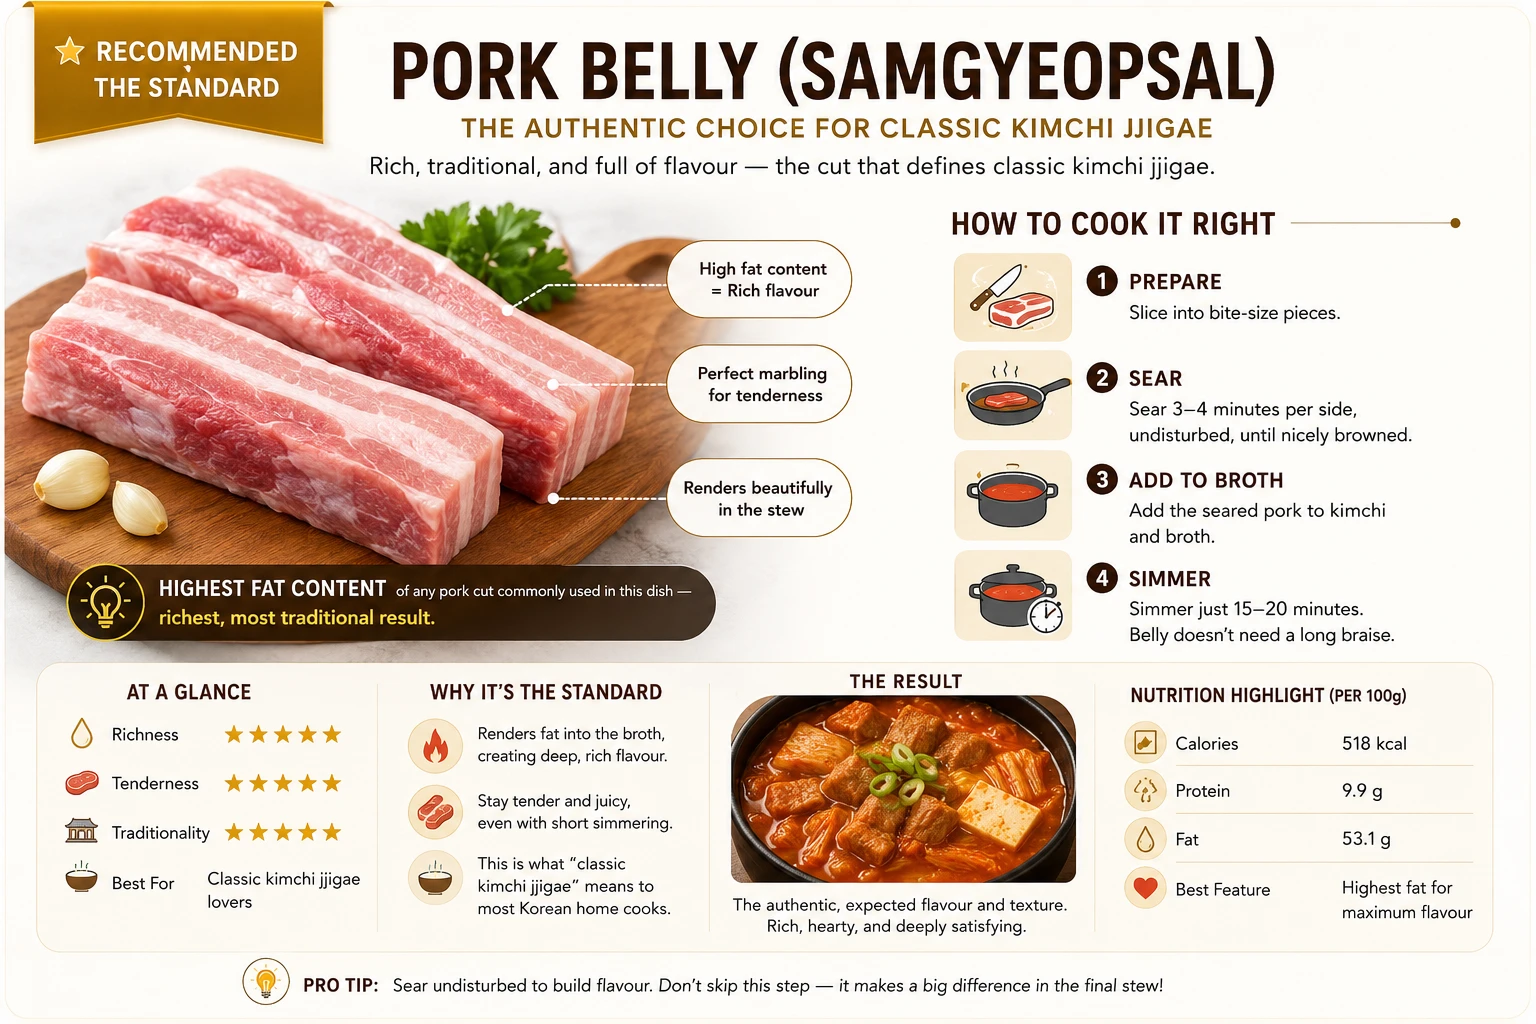
- Sliced into bite-size pieces, skin removed
- Sear 3-4 min per side, undisturbed, before adding to broth
- Simmer just 15-20 minutes — belly doesn’t need a long braise
- Highest fat content of any pork cut used in this family — richest, most traditional result
Result: The authentic, expected flavour and texture. This is what “classic kimchi jjigae” means to most Korean home cooks.
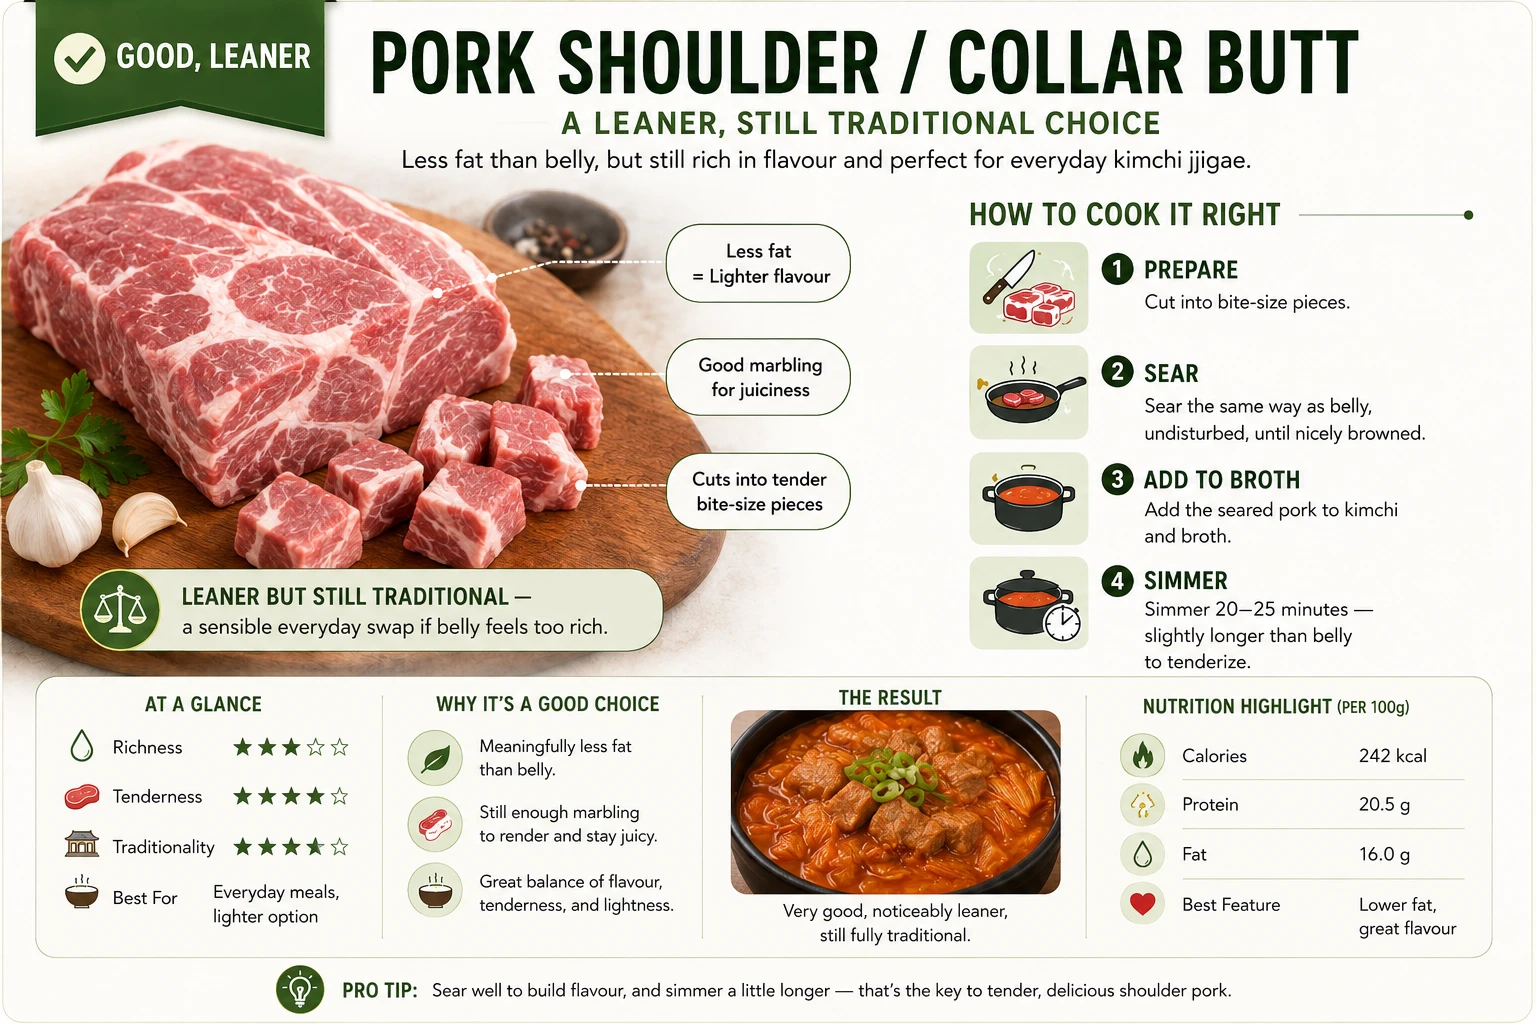
- Cut into bite-size pieces
- Sear the same way as belly, undisturbed
- Simmer 20-25 minutes — slightly longer than belly to tenderize
- Meaningfully less fat than belly, still enough marbling to render properly
Result: Very good, noticeably leaner, still fully traditional. A sensible everyday swap if belly feels too rich.
Cut Comparison at a Glance
| Cut | Texture Result | Ideal Simmer Time | Richness | Verdict |
|---|---|---|---|---|
| Pork Belly ⭐ | Tender, deeply rich, traditional | 15-20 min | Highest | The standard, most authentic choice |
| Shoulder / Collar Butt | Tender, leaner | 20-25 min | Moderate | Good everyday alternative |
Key Terms — Language & Food Science Entities
These are the core terms used throughout this family of recipes — this page defines them in the most depth since it’s the shared reference point for every variation.
The Whole Family — How 13 Versions Differ From This Recipe
Every recipe below starts from this exact page’s technique — render the fat, saute the kimchi in it, build the broth, simmer, finish. What changes is the protein, the format, or the diet. Use this table to jump straight to the version that fits what you have on hand. Working from the same kimchi in the fridge, see our Kimchi Fried Rice Guide for a completely different, stir-fried format built on the same fermentation principles, or Kimchi Pork Belly Fried Rice if you specifically like the pork-belly-and-kimchi pairing used here.
| Version | What Changes | Simmer Time | Best For |
|---|---|---|---|
| Classic (Pork) ← This Page | The base technique itself | 15-20 min | Everyone — the reference point for the whole family |
| Chicken | Chicken thigh, browned skin-first | 18-20 min | Leaner, highest protein in the family |
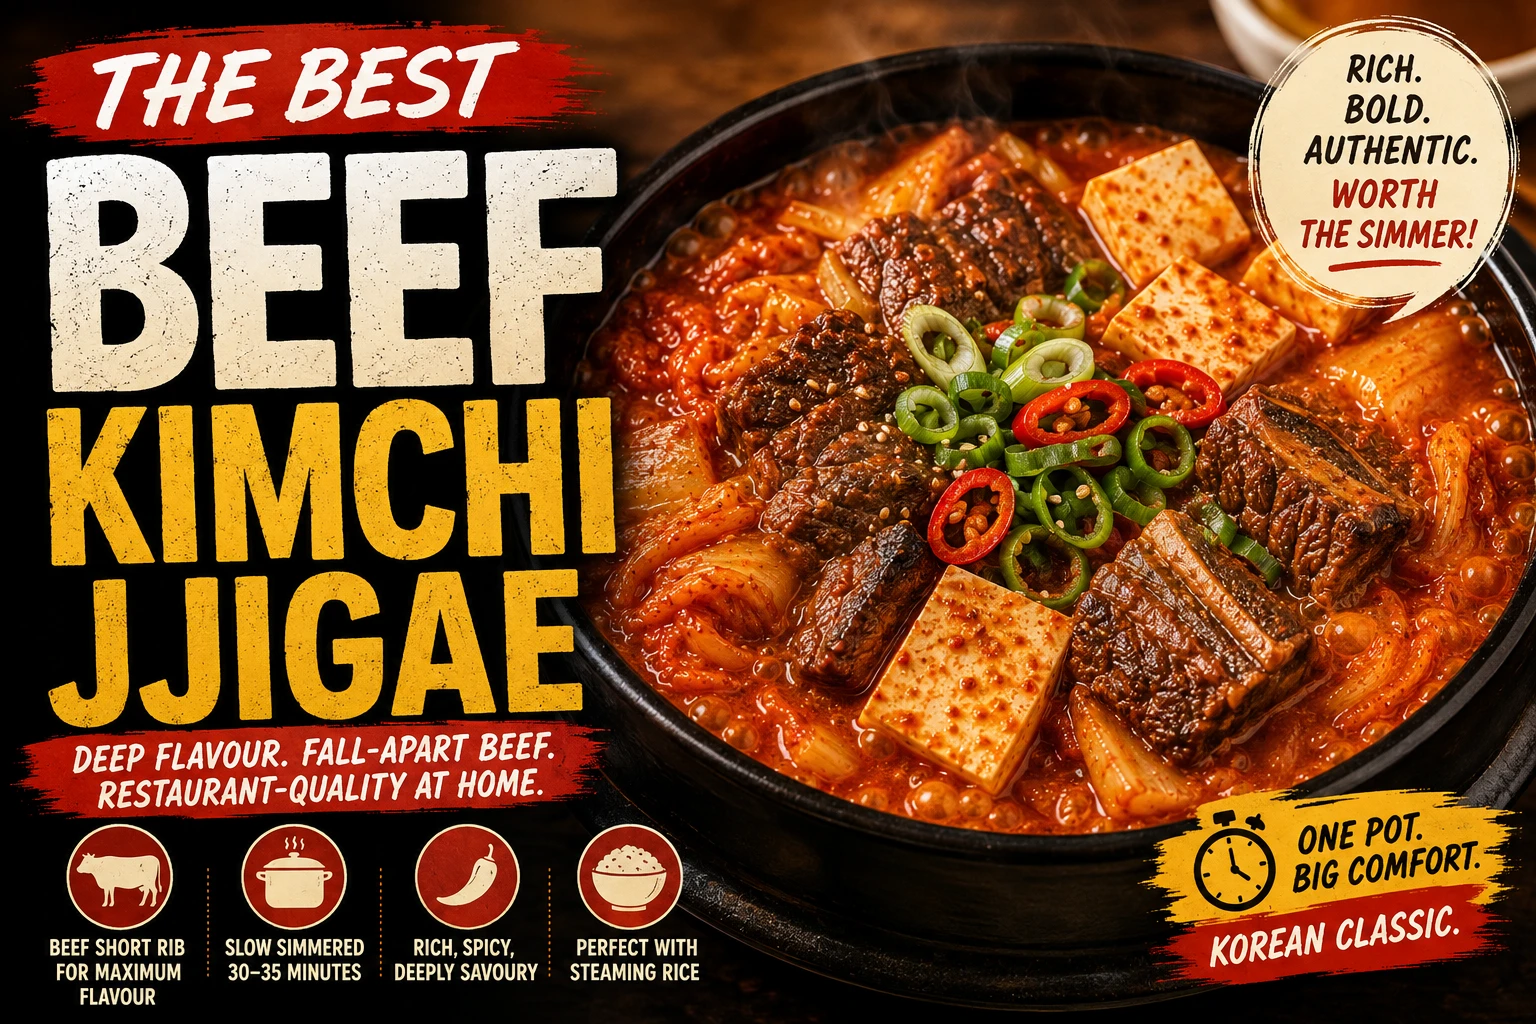
| Beef | Short rib or chuck, longer braise | 30-35 min | Richest, most indulgent broth |
| Seafood | Shrimp, mussels, clams added last | 5-8 min (seafood only) | Leanest jjigae-format option |
| Soondubu | Silken tofu replaces firm, no draining | 10-12 min | Soft, custardy texture, highest search demand |
| Vegetarian | Mushroom + tofu + egg replace meat | 12-15 min | Meatless, egg and dairy still allowed |
| Vegan | Mushroom + tofu, no egg, fish-sauce-free kimchi required | 12-15 min | Fully plant-based |
| Tuna (Chamchi) | Canned tuna, added near the end | 10 min | Budget, pantry-friendly, camping trips |
| Spam | Pan-seared Spam cubes replace pork | 10-12 min | Simple comfort food, distinct from Budae |
| Budae Jjigae | Spam, sausages, baked beans, instant noodles, cheese | 15 min | Korean War-era army-base combo stew |
| Mackerel (Godeungeo) | Oily canned fish replaces pork | 10-12 min | Niche but authentic home-cooking variant |
| Kimchi Guk | Thinner broth, less salt, soup format | 12-15 min | Lighter everyday side, not a main-dish jjigae |
| Instant Pot & Slow Cooker | Same pork-belly recipe, hands-off appliance methods | Varies by method | Weeknight convenience, minimal supervision |
How Classic Kimchi Jjigae Varies by Household
There’s no single “correct” version of this dish — it’s one of the most personalized staples in Korean home cooking, varying by region, generation, and simply what a household has on hand.
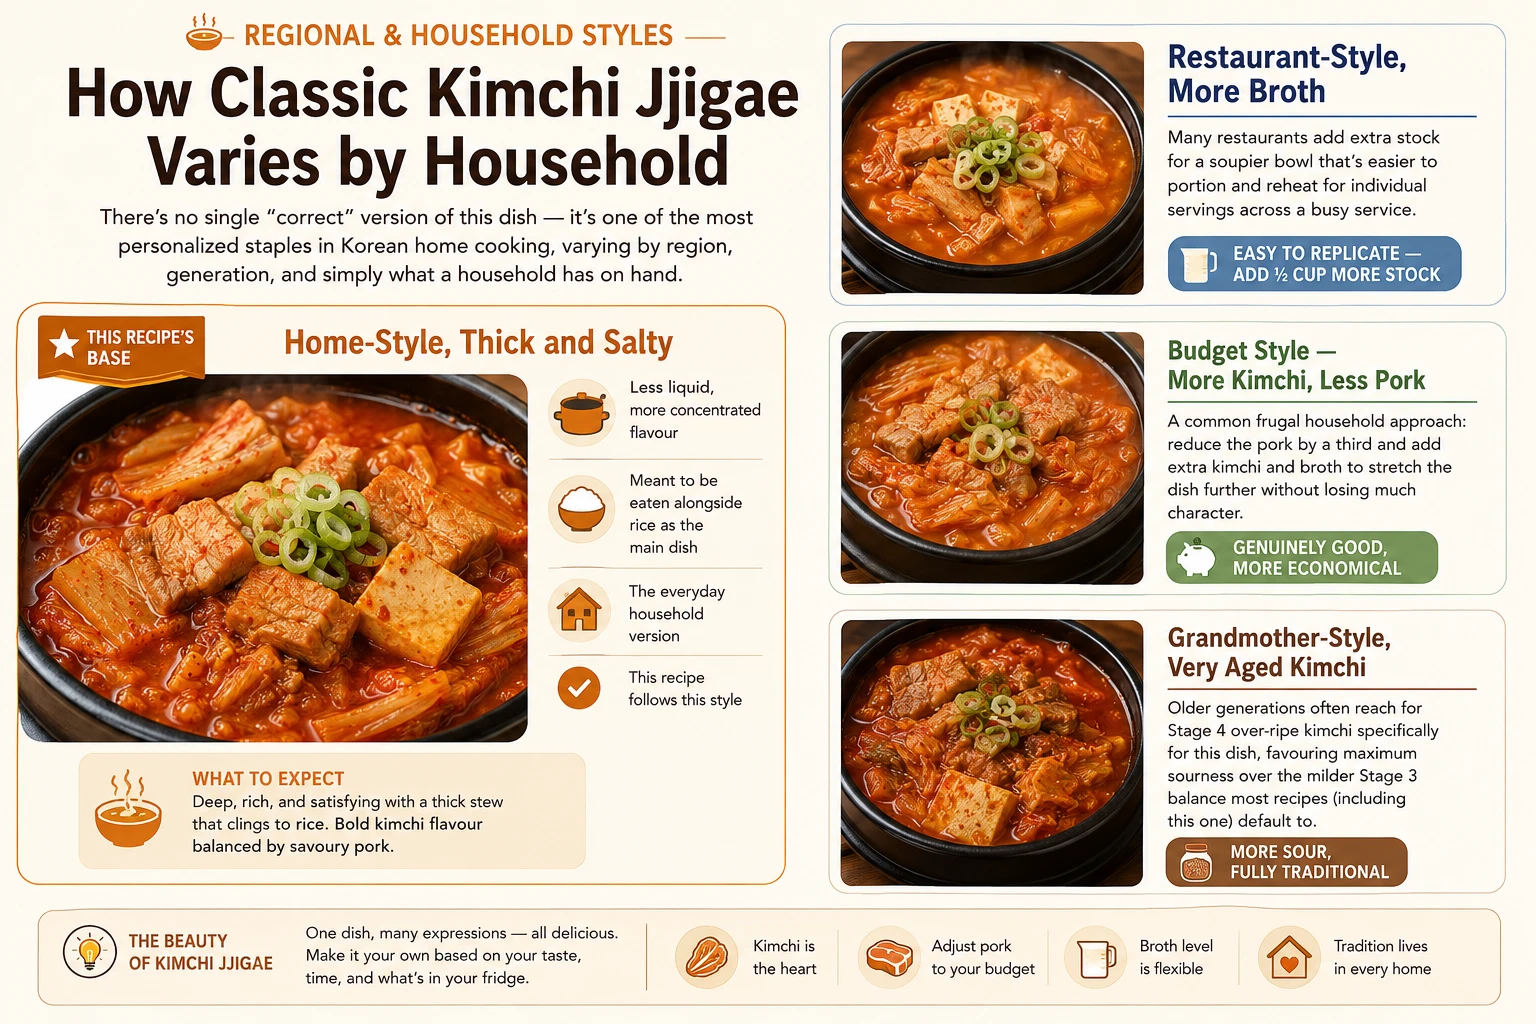
The everyday household version — less liquid, more concentrated flavour, meant to be eaten alongside rice as the main dish. This recipe follows this style.
This Recipe’s Base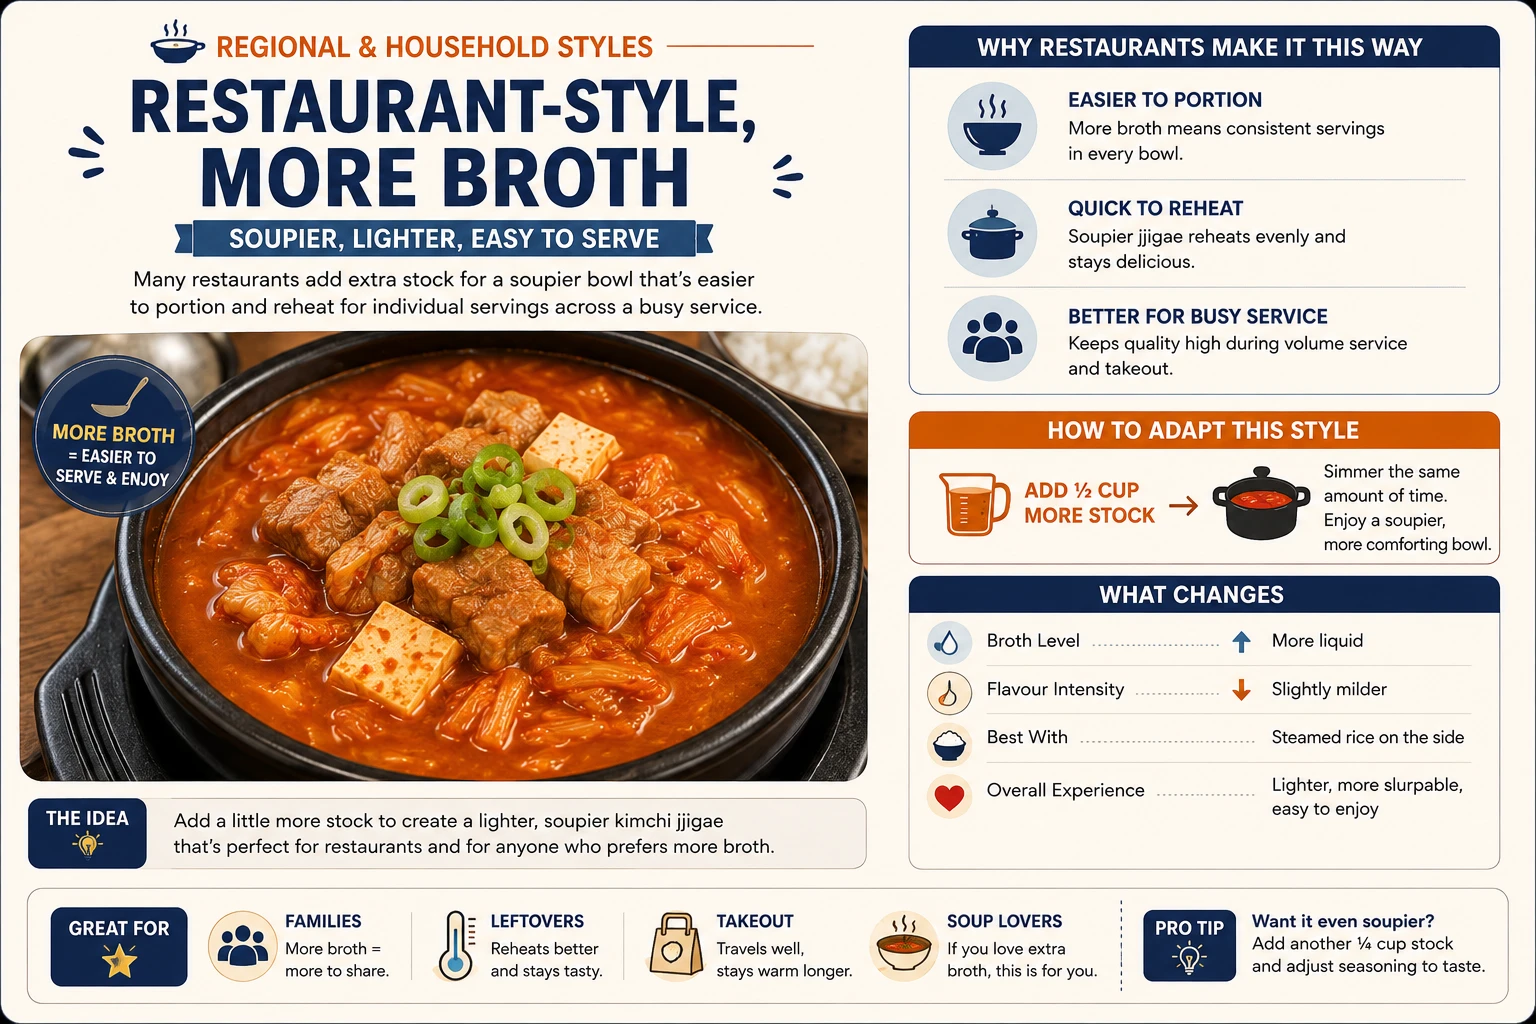
Many restaurants add extra stock for a soupier bowl that’s easier to portion and reheat for individual servings across a busy service.
Easy to Replicate — Add ½ Cup More Stock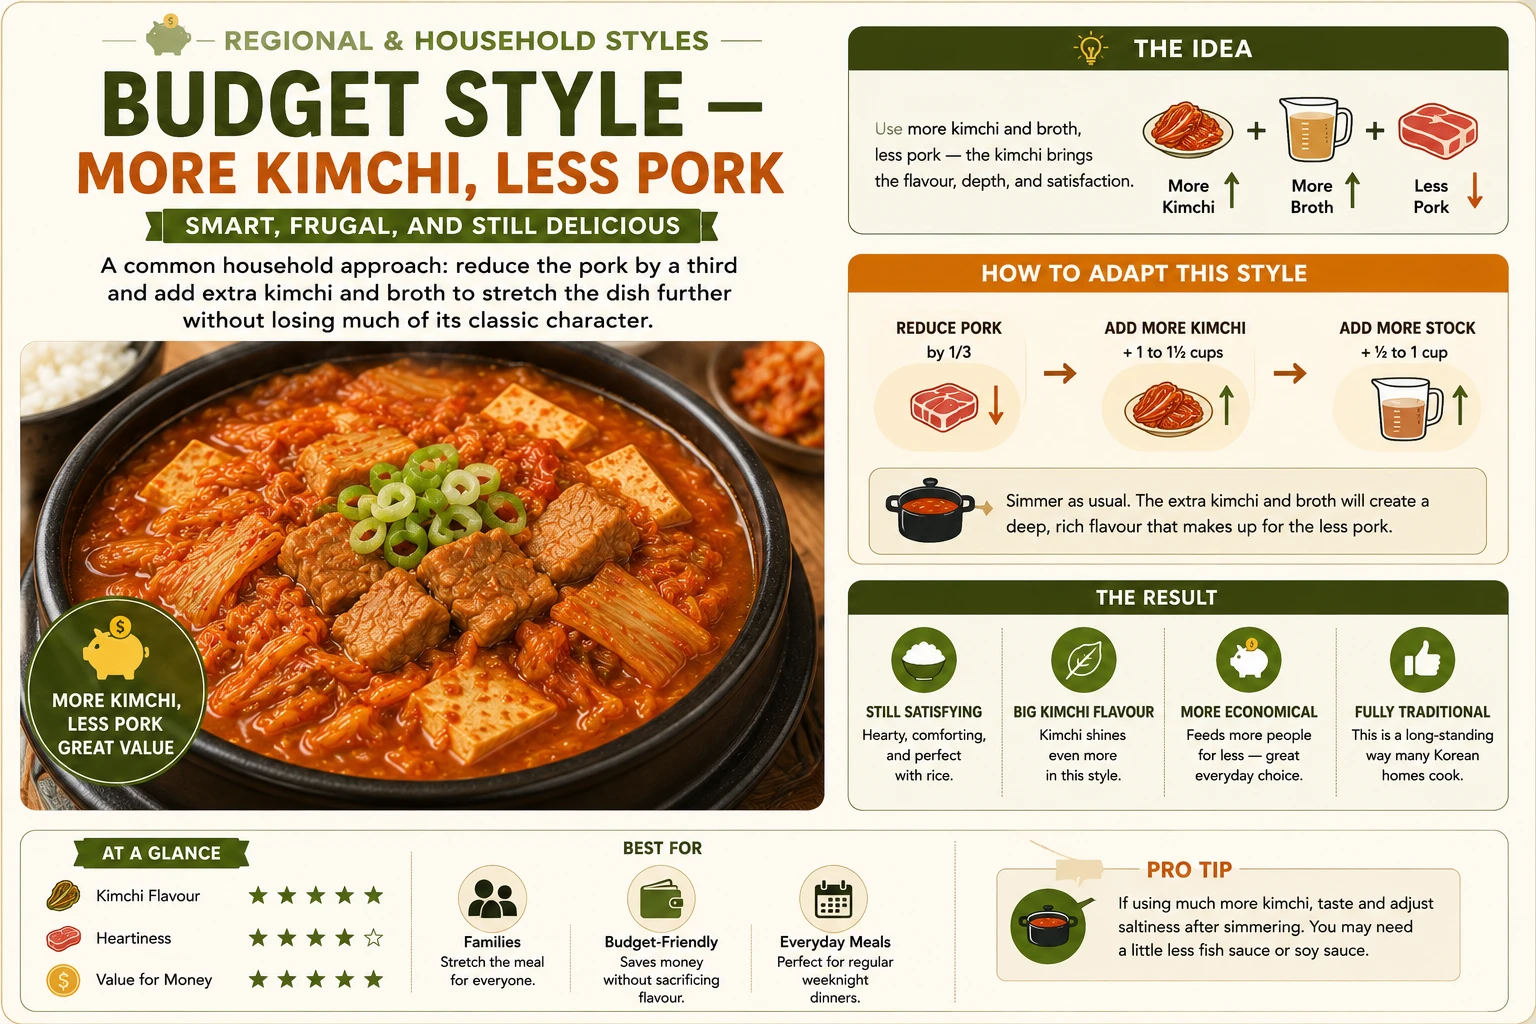
A common frugal household approach: reduce the pork by a third and add extra kimchi and broth to stretch the dish further without losing much character.
Genuinely Good, More Economical
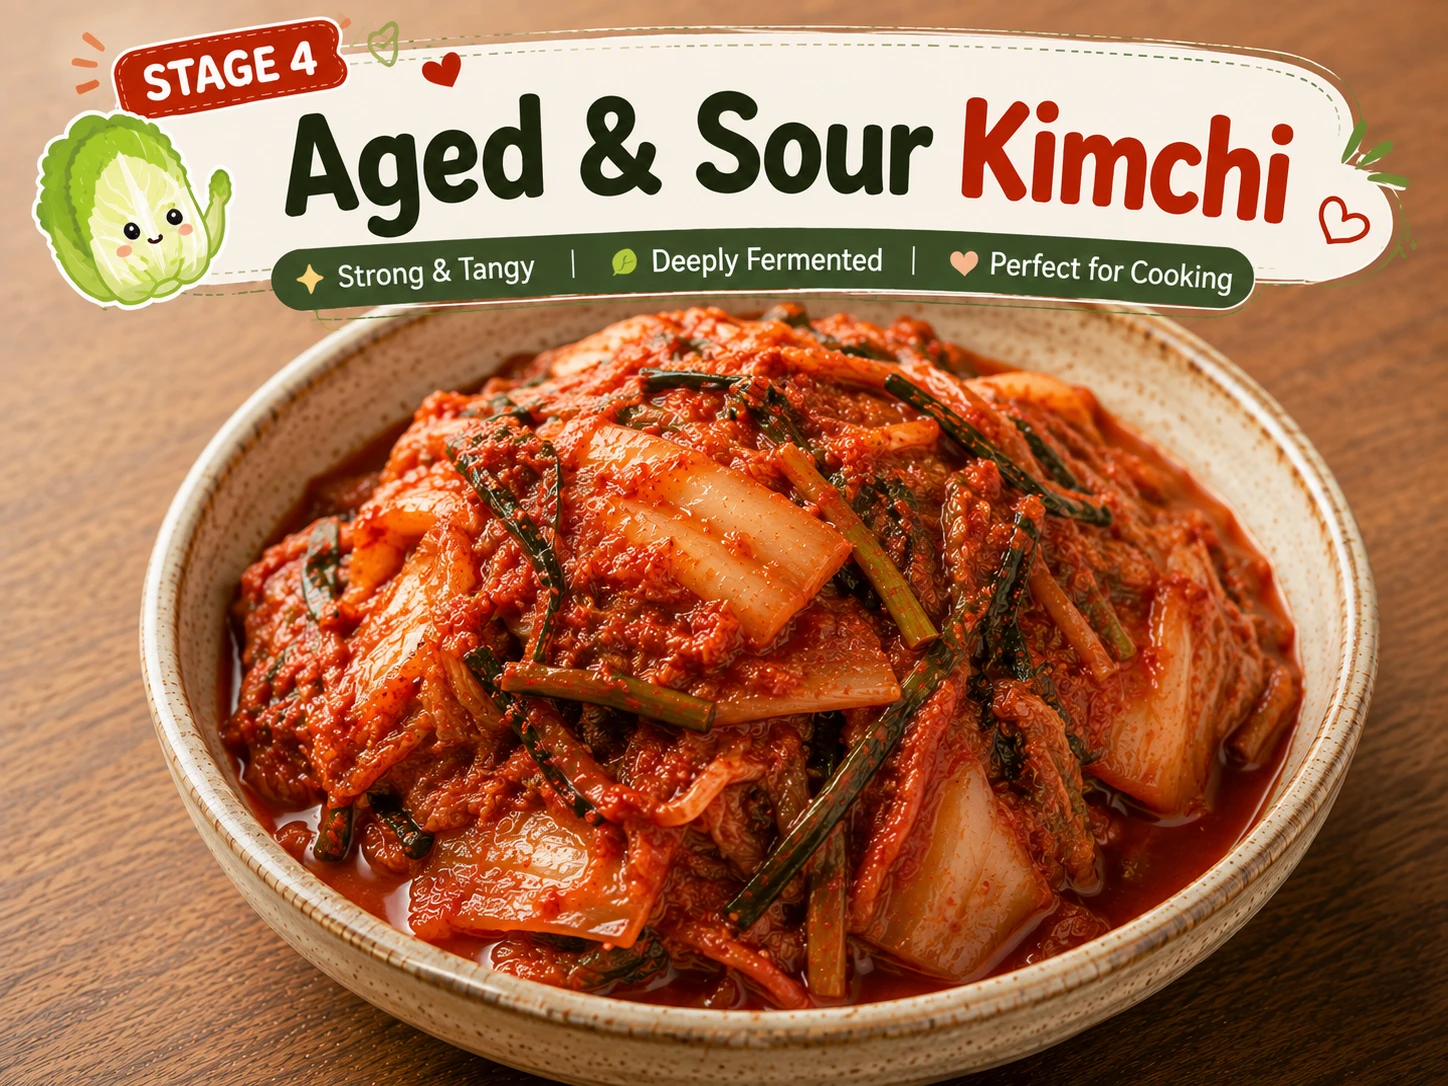
Older generations often reach for Stage 4 over-ripe kimchi specifically for this dish, favouring maximum sourness over the milder Stage 3 balance most recipes (including this one) default to. If your kimchi has gone further than you meant it to, our What to Do With Sour Kimchi guide has more ways to use it.
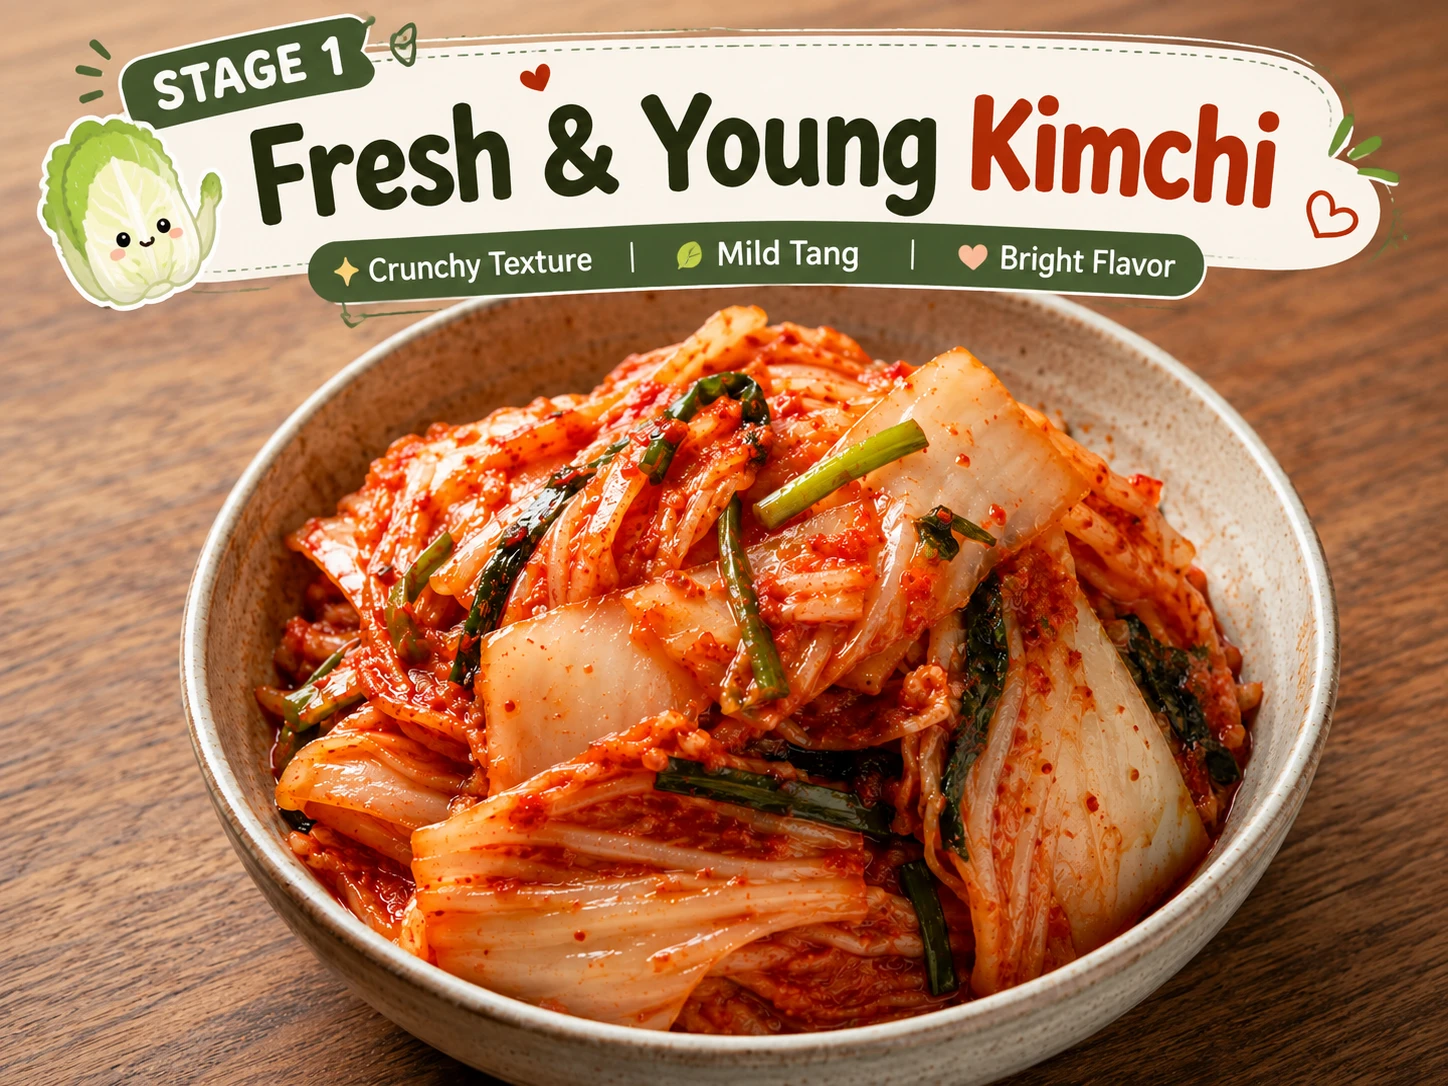
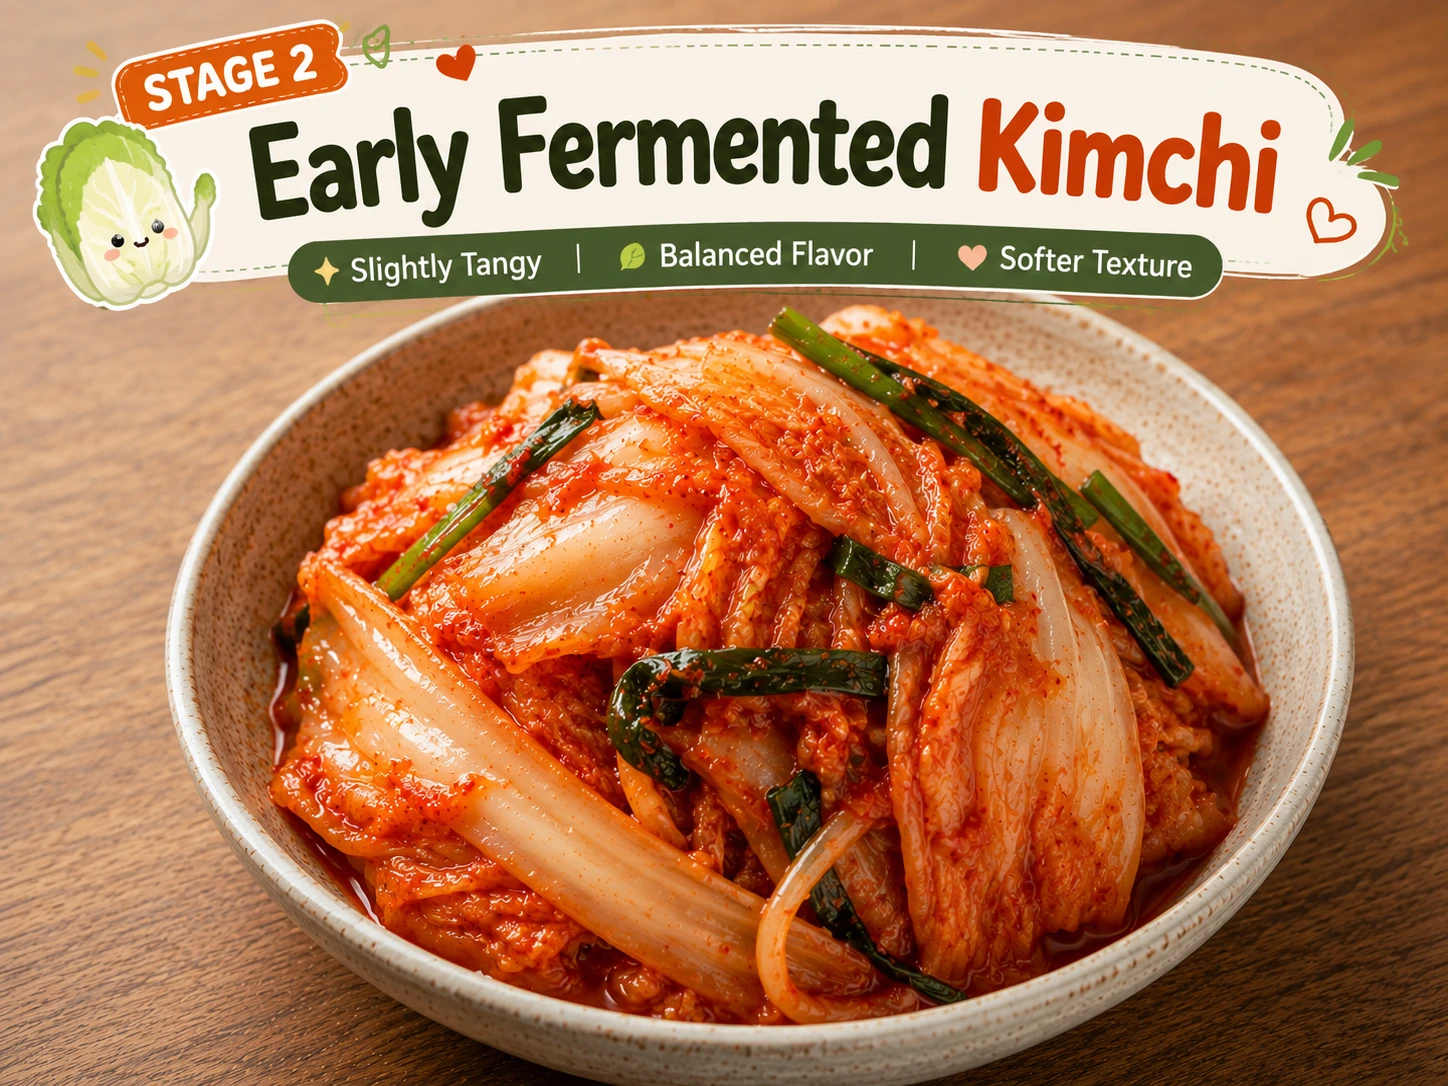
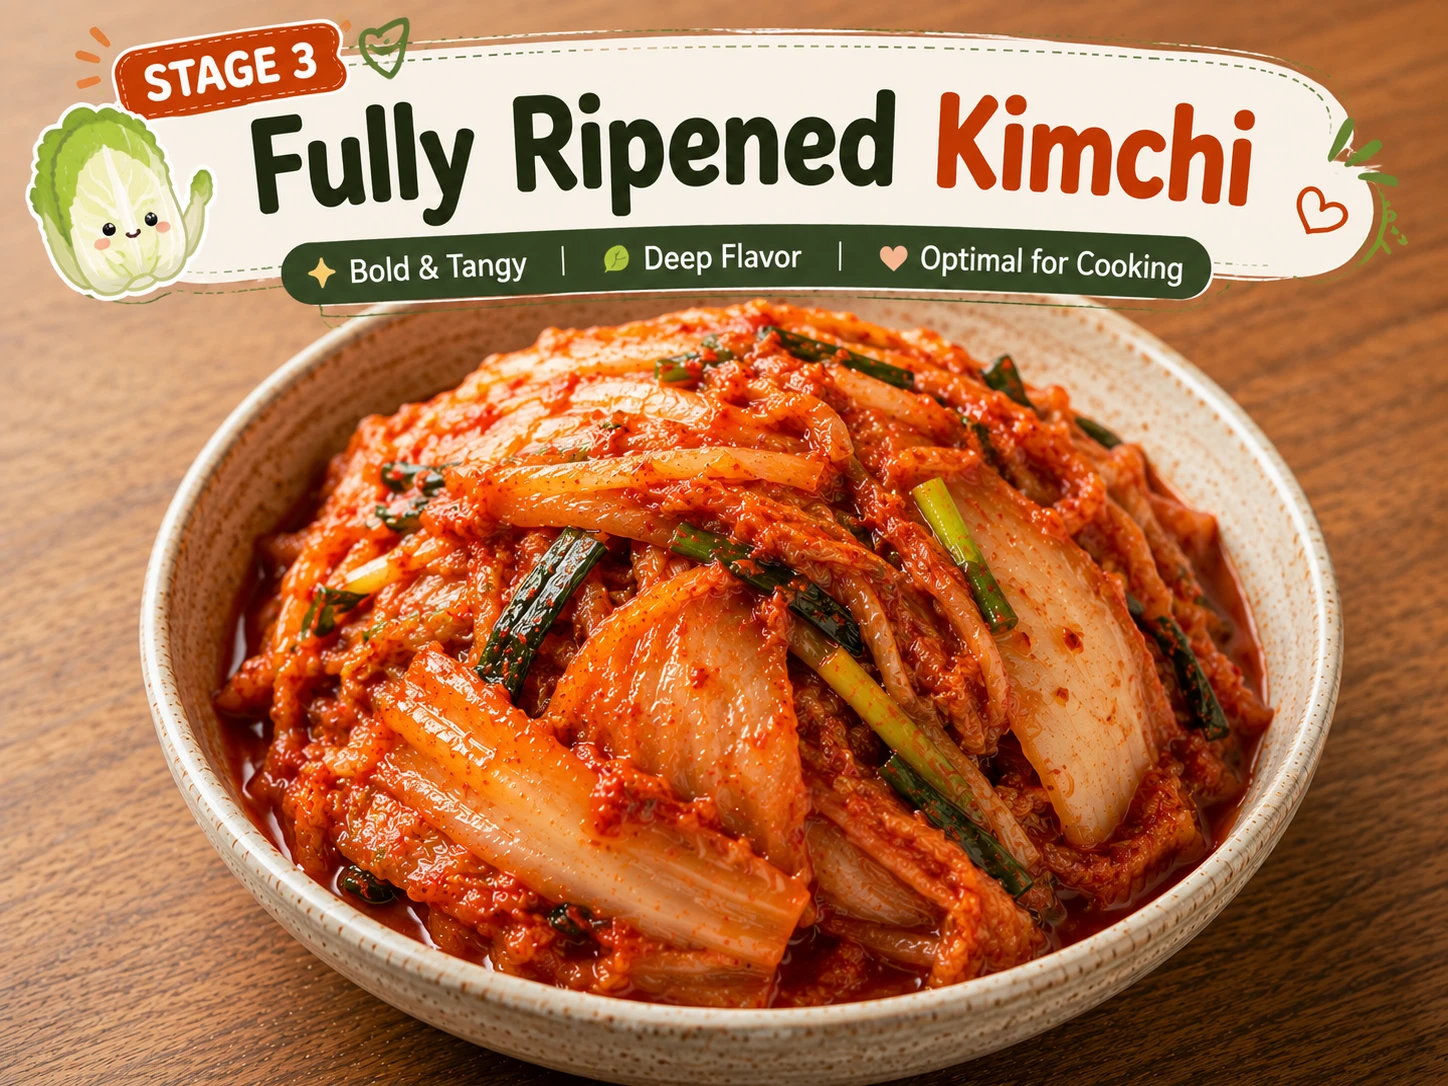
More Sour, Fully TraditionalKimchi Fermentation — The Complete 4-Stage Guide
Every variation page on this site links back to this exact section for the full picture — here it is in full, not the shortened quick-reference version used elsewhere in the family.
Speeding Up or Slowing Down Fermentation at Home
Room temperature accelerates fermentation significantly — kimchi left on the counter can move through these stages in days rather than weeks, while refrigeration slows the process to a near-crawl, which is why store-bought refrigerated kimchi can sit at a similar stage for a long time. If your kimchi is fermenting faster than you’d like, refrigerate it sooner; if you need Stage 3 kimchi in a hurry, a day or two at room temperature can meaningfully speed things along. If you’re starting from scratch rather than ageing a store-bought jar, see How to Make Kimchi from Scratch for the full process.
Seasonal Adjustments — Summer vs Winter
The core recipe doesn’t change by season, but your kimchi’s fermentation pace does — and this is genuinely a year-round dish, unlike some of the richer variations.
- Kimchi ferments noticeably faster in summer heat — check it 3-5 days earlier than the timeline above suggests
- Pork shoulder over belly is a natural lighter summer swap if the richness feels heavy in hot weather
- Unlike Beef or Budae Jjigae, this recipe’s shorter cook time and moderate richness make it genuinely fine to eat year-round, including summer
Result: No real recipe changes needed — just watch your kimchi’s fermentation timeline more closely.
- Kimchi ferments more slowly in cold storage — Stage 3 (3-6 weeks) is a reliable timeline, and over-ripe Stage 4 kimchi is far more common on hand in winter households
- This is traditionally when jjigae is eaten most often in Korean households — a hot, bubbling pot suits cold weather naturally
- Pork belly’s fat is especially welcome in winter — consider the richer Beef version too if you want something even more warming
Result: Winter is this dish’s traditional home season, though it works well any time of year — that’s part of what makes it the family’s most versatile recipe.
How Difficult Is This Recipe?
Genuinely the best starting point in the whole family — the shortest simmer time, the most forgiving technique, and the fewest ways to go wrong.
Equipment — Ttukbaegi vs Regular Pot vs Instant Pot
You don’t need a traditional stone pot to make this well, but it does change the eating experience — here’s how the three most common options compare. See the full Ttukbaegi Buying Guide for sizing and care details if you’re considering buying one.
| Equipment | Heat Retention | Serving Style | Best For |
|---|---|---|---|
| Ttukbaegi (뚝배기) ⭐ | Excellent — stays bubbling at the table for 10+ minutes | Serve directly in the pot, communal-style | Authentic texture and presentation; worth the investment if you cook Korean stews often |
| Heavy Dutch Oven or Enamelled Pot | Good, retains heat well through the simmer | Ladle into individual bowls to serve | Most households — the easiest option if you don’t already own a ttukbaegi |
| Instant Pot / Electric Pressure Cooker | N/A — used for the broth and searing stage only, not final serving | Transfer to a pot or bowl to serve | A fully hands-off version — see the dedicated Instant Pot & Slow Cooker guide |
Ingredients + Scaler
Pork belly and Stage 3 aged kimchi are the two non-negotiables. Everything else is the same base logic every variation in this family follows.
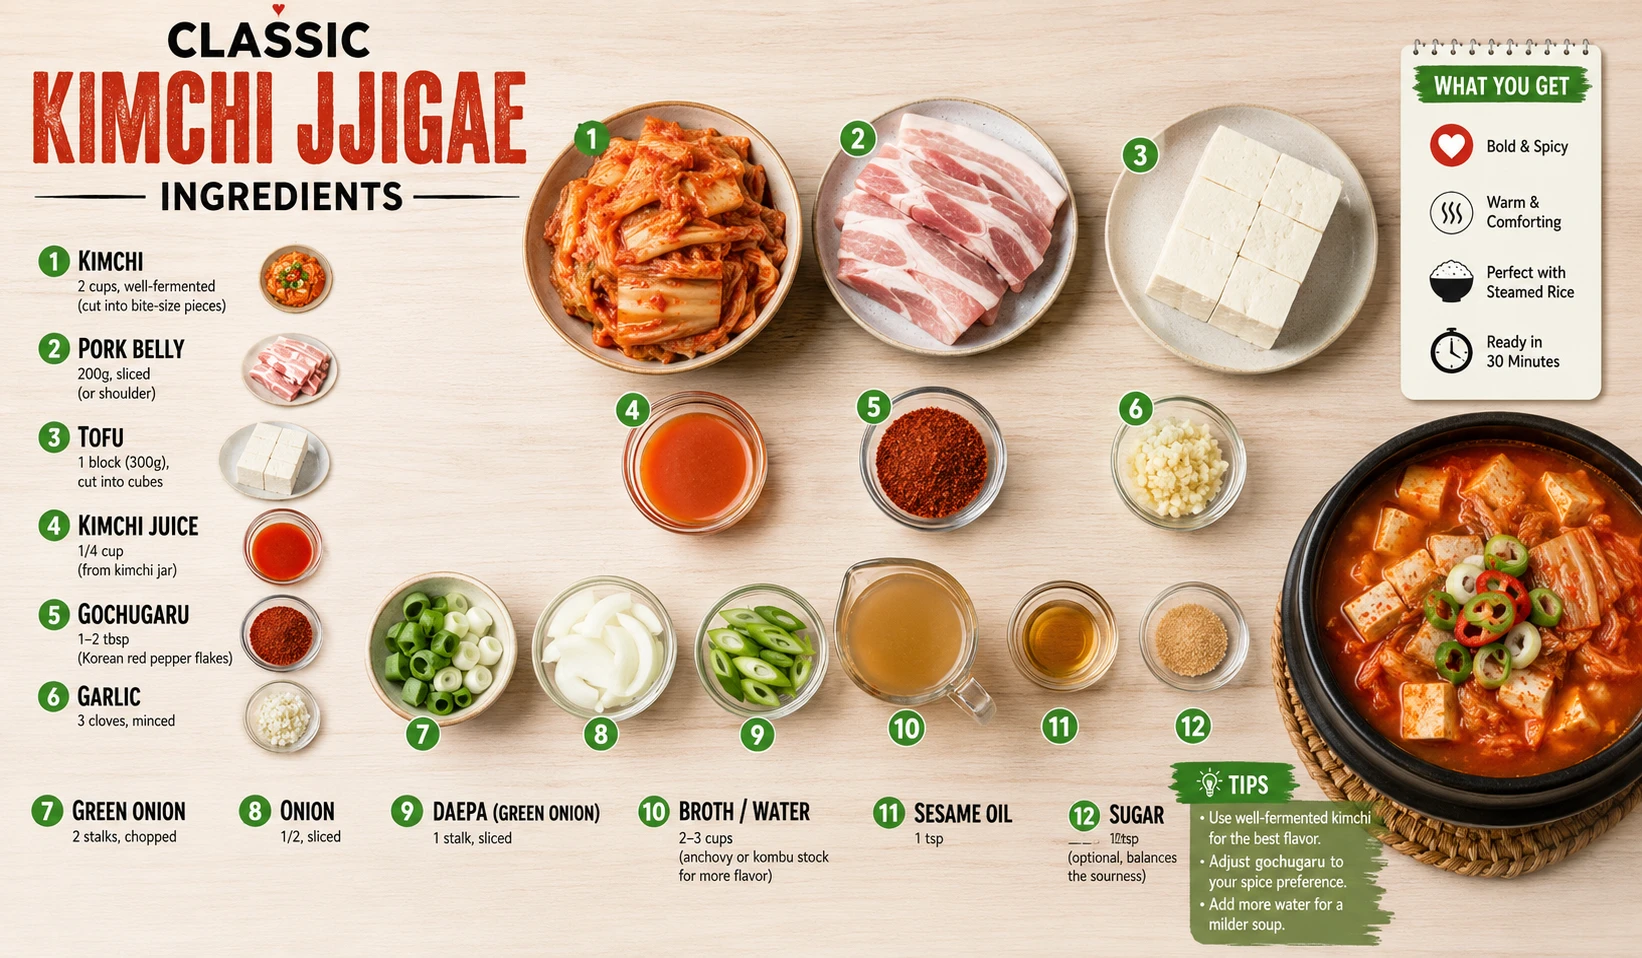
Substitutions & Allergen Notes
Because this is the base recipe, most substitution requests are actually best answered by pointing to a dedicated variation page built specifically for that need, rather than a quick swap here.
Sourcing Guide — Finding Ingredients Outside Korea
Every ingredient in this recipe is genuinely easy to find outside Korea — this is the most accessible recipe in the entire family to shop for.
How to Make Classic Kimchi Jjigae — 5 Steps
Five steps. This is the shortest, most straightforward method in the whole family — the same sequence every variation adapts, at its simplest form.
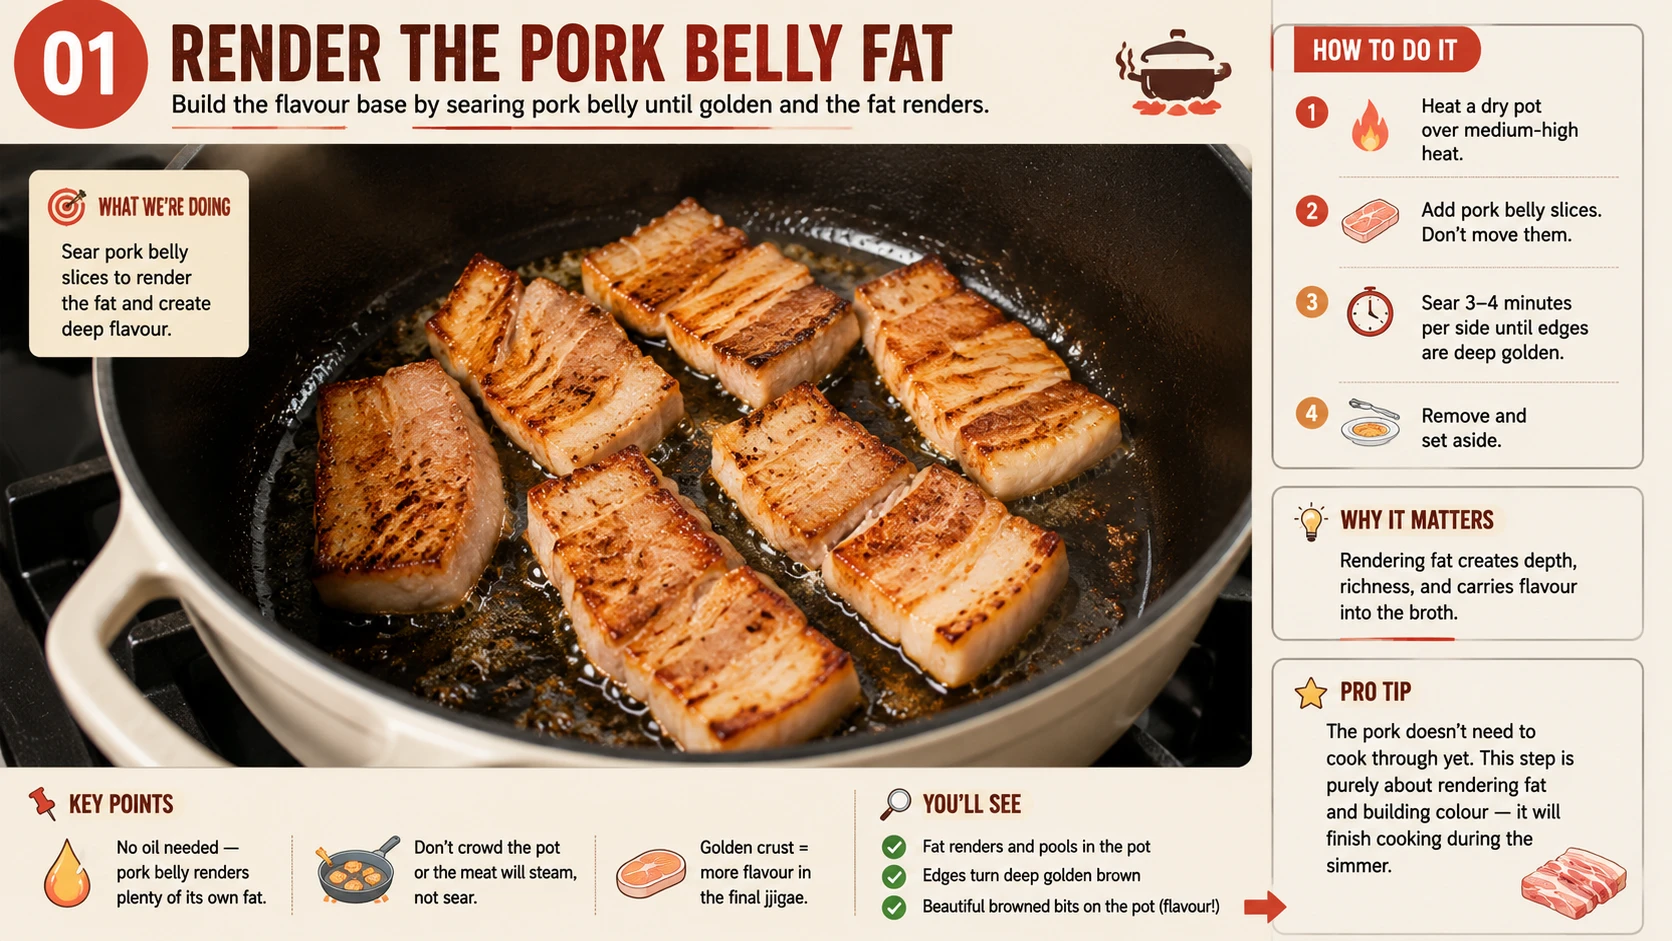
Sear pork belly slices in a dry pot over medium-high heat, without moving them, until the fat renders and the edges turn deep golden, about 3-4 minutes per side. Remove and set aside.
No oil is needed — pork belly renders plenty of its own fat. Don’t crowd the pot; if the slices are touching, they’ll steam rather than sear, and you’ll miss the crust and rendered fat that carry into the broth later. Work in two batches if your pot is on the smaller side rather than piling the pork in all at once — a few extra minutes here pays off in the finished broth.
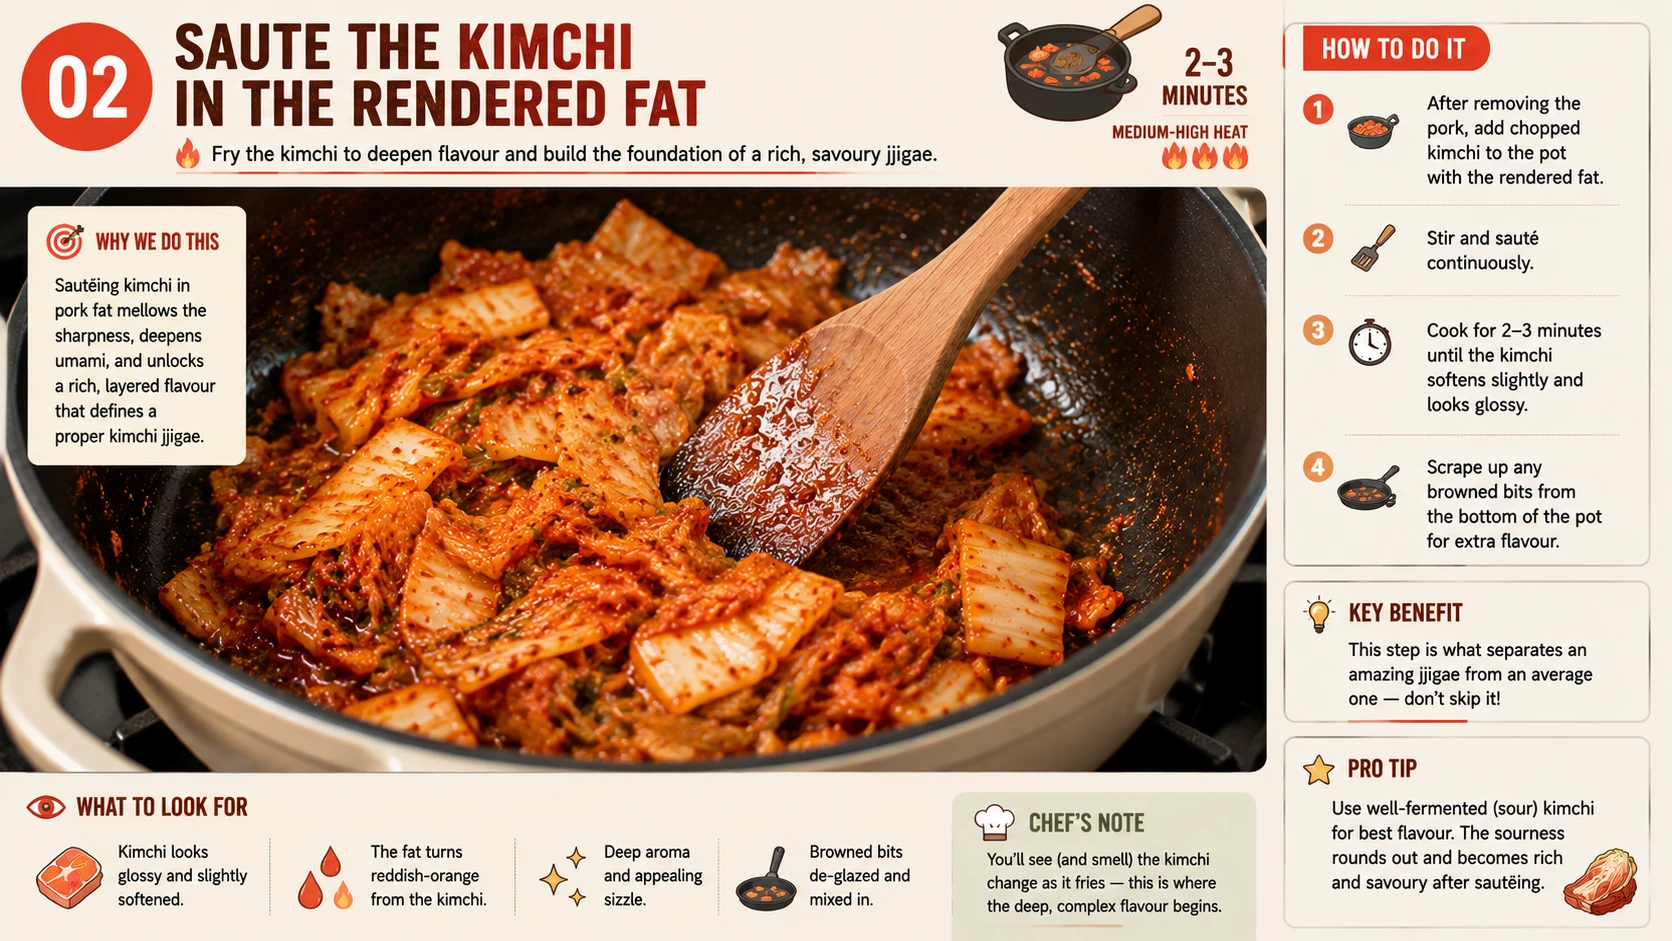
In the same pot, using the rendered pork fat, saute the chopped kimchi for 2-3 minutes to deepen its flavour, scraping up any browned bits left by the pork.
This is the step that defines whether the finished dish tastes like a proper jjigae or just a simmered soup — the kimchi genuinely changes character as it fries briefly in the fat, mellowing slightly and taking on real depth before any liquid is added. You’ll notice the kimchi darken slightly and the sharp raw-cabbage smell soften into something closer to the finished broth’s aroma — that’s your cue it’s ready for the next step, not a fixed clock you need to watch closely.
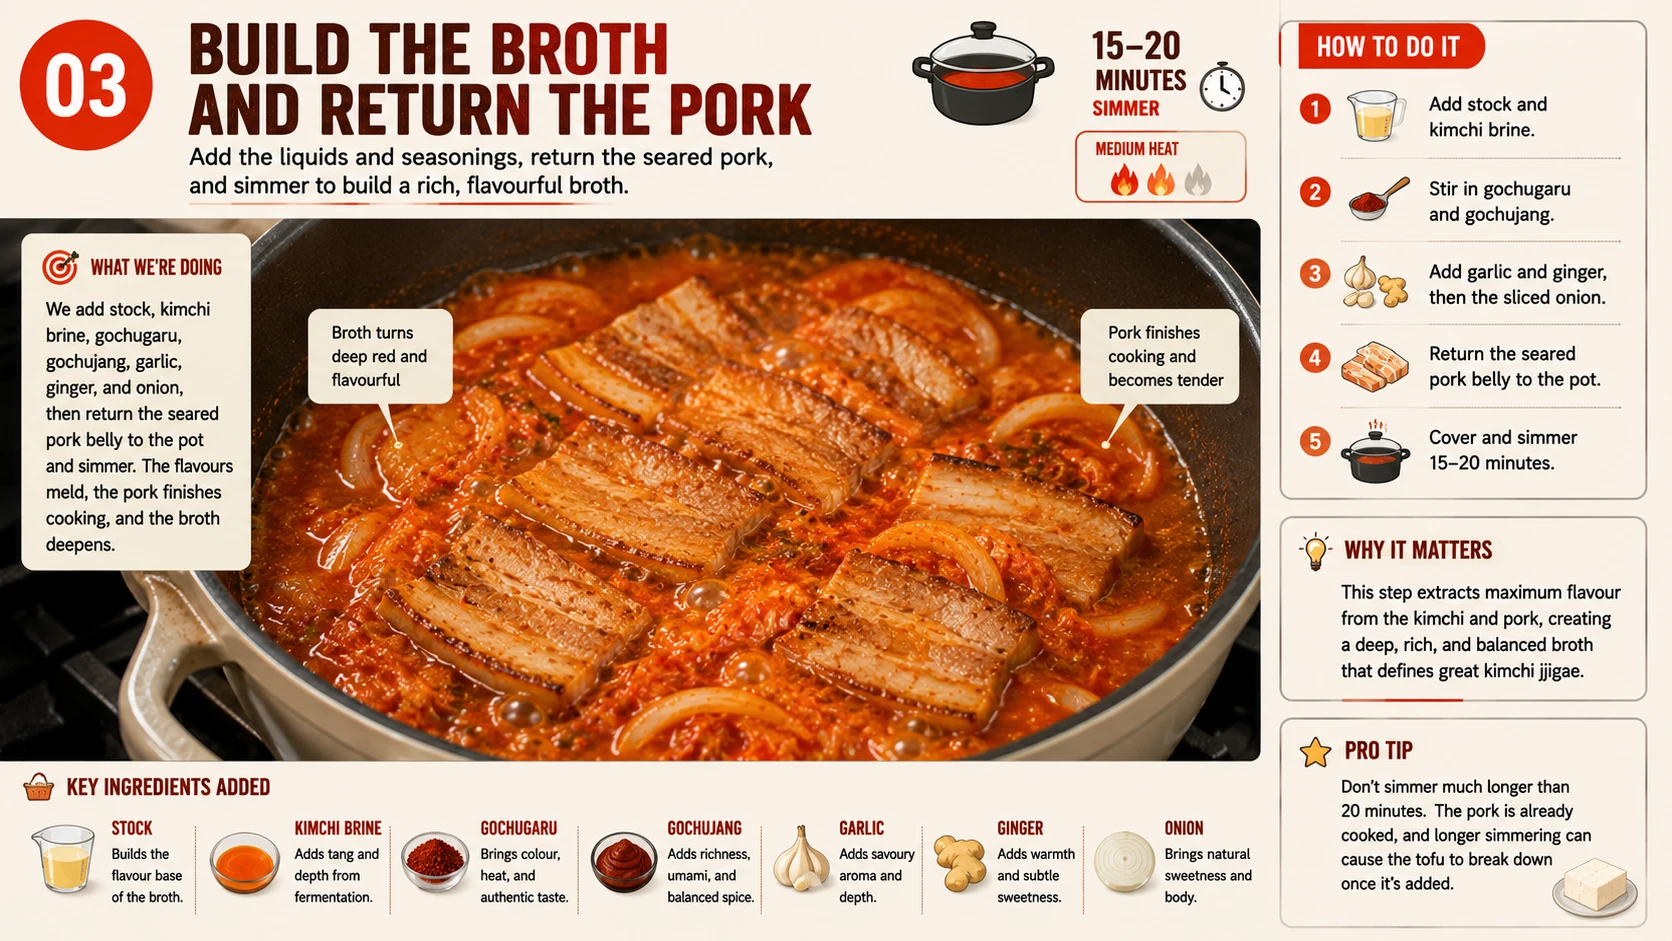
Add stock, kimchi brine, gochugaru, gochujang, garlic, ginger, and onion. Return the seared pork belly to the pot, cover, and simmer for 15-20 minutes.
Unlike the Beef version’s 30-35 minute braise, pork belly doesn’t need nearly as long — its fat has already rendered, and the meat itself cooks through well within this window. Resist simmering much longer than 20 minutes; it won’t hurt the pork, but it can start to break the tofu down too much once it’s added. Keep the lid mostly on with a small gap for steam to escape — this holds the simmer at a gentle, steady bubble rather than a hard boil that can toughen the pork and cloud the broth.
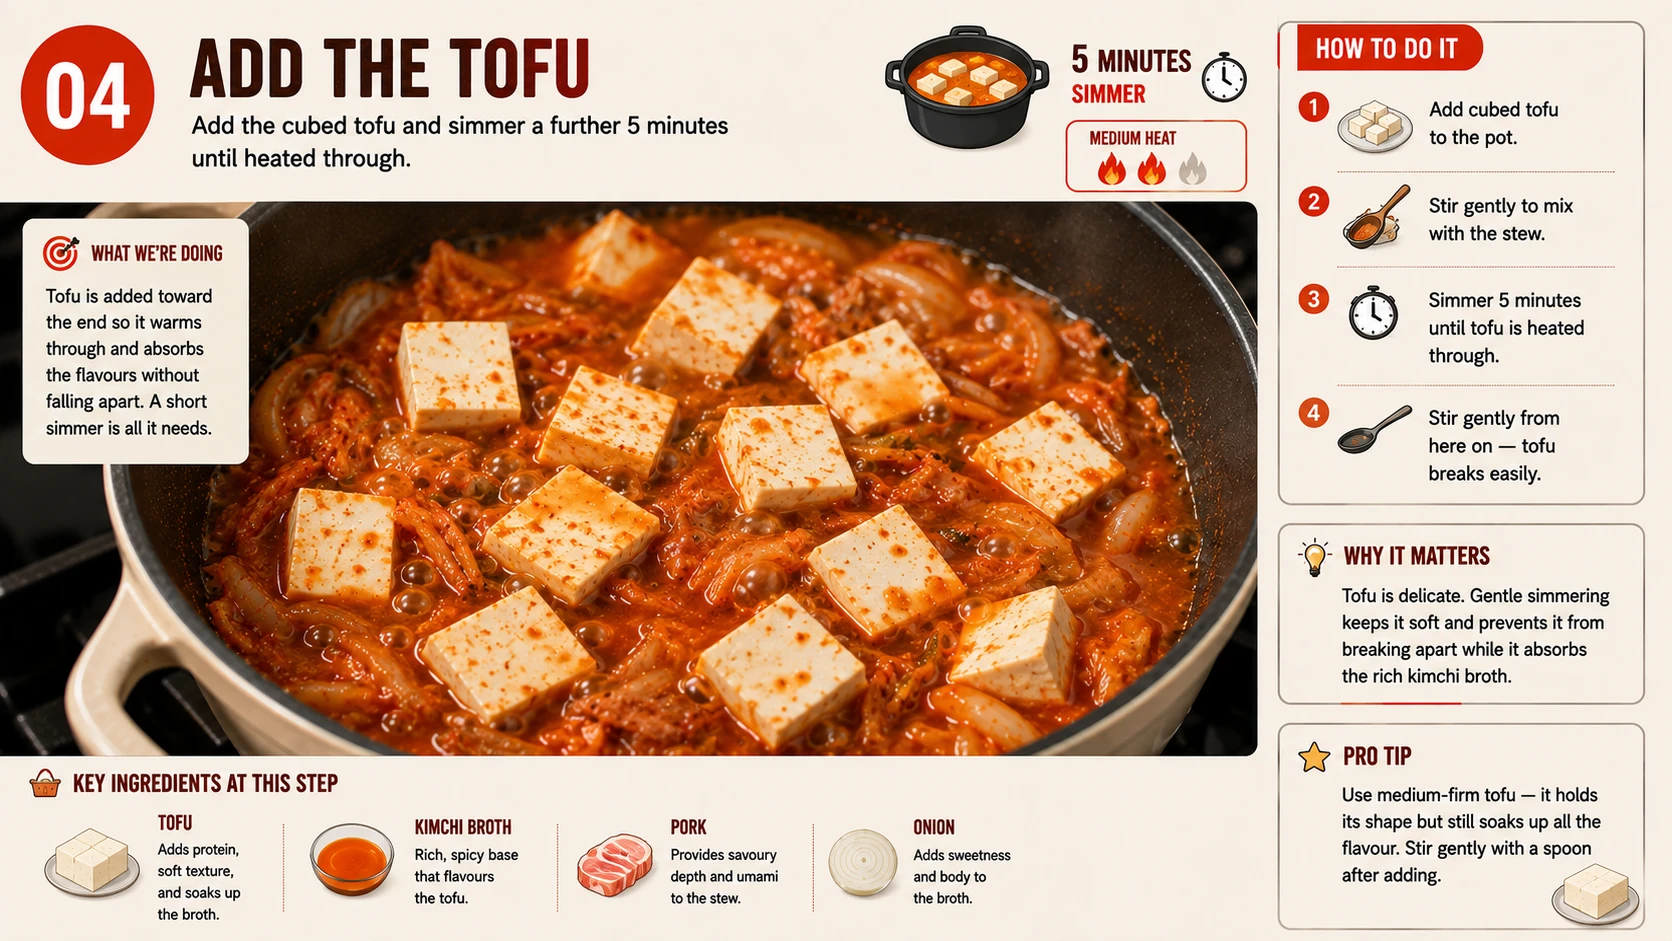
Add the cubed tofu and simmer a further 5 minutes until heated through.
Stir gently from here on — tofu breaks apart easily once it’s warmed through and starts absorbing the broth. A few gentle folds with a spoon is all it needs. If you’d rather not stir at all, you can also nestle the cubes into gaps around the pork and let the simmering broth do the work of heating them through on its own.
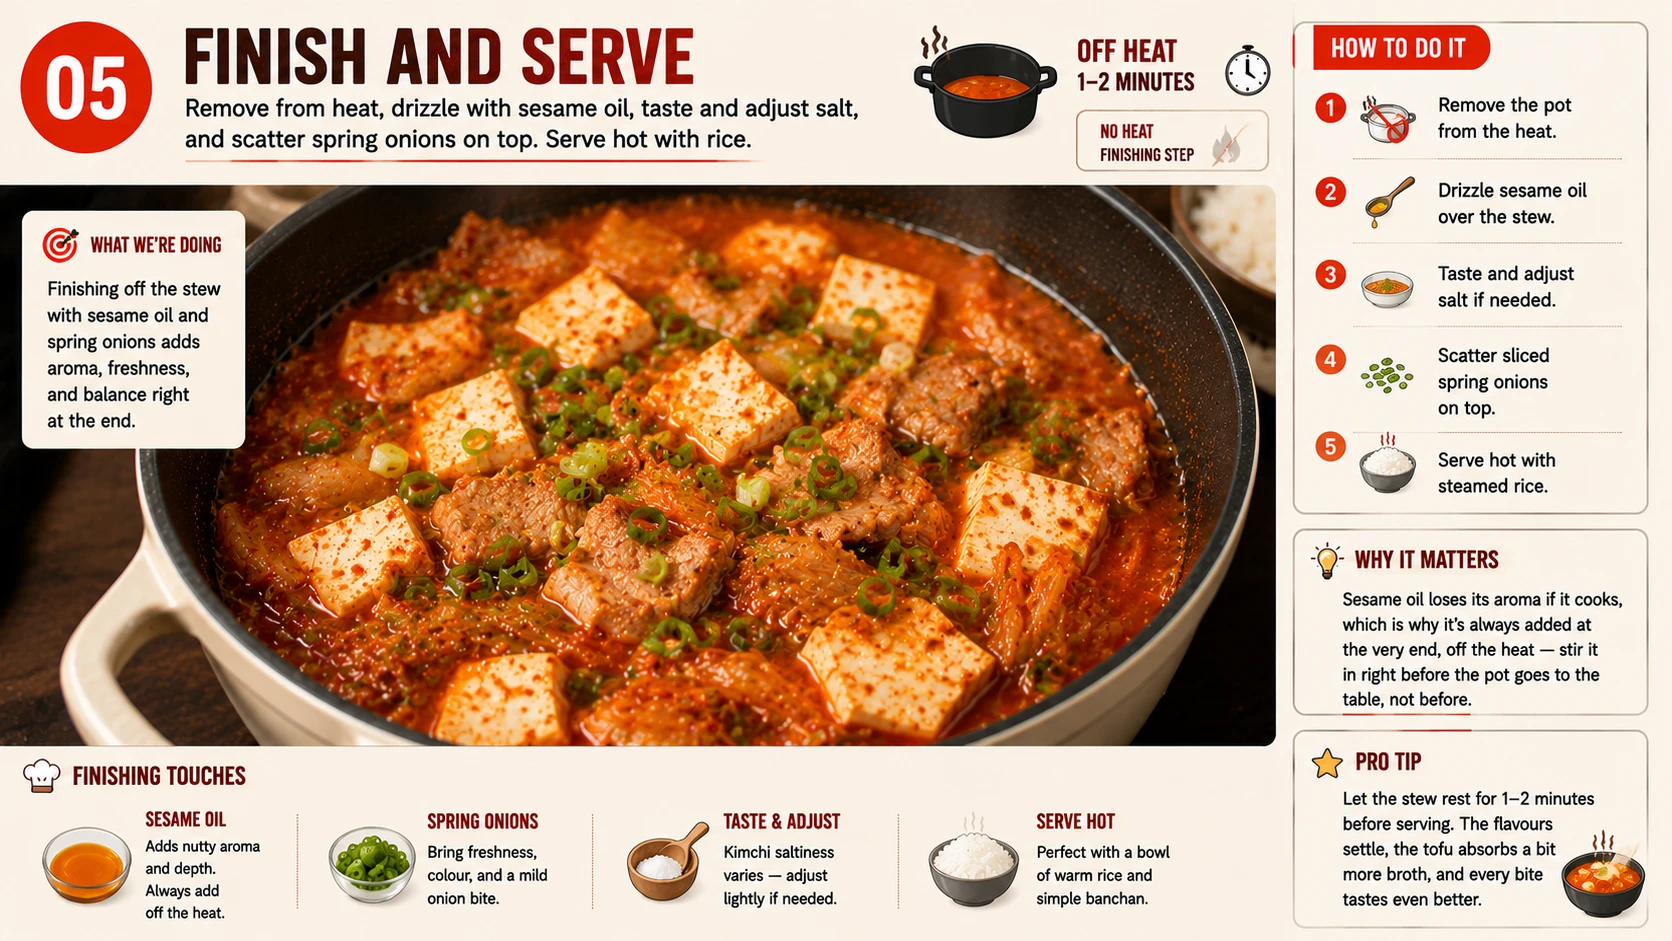
Remove from heat, drizzle with sesame oil, taste and adjust salt, and scatter spring onions on top. Serve hot with rice.
Sesame oil loses its aroma if it cooks, which is why it’s always added at the very end, off the heat — stir it in right before the pot goes to the table, not before. If you’re serving straight from a ttukbaegi, it will keep bubbling gently at the table for several more minutes, so bring the rice and banchan out first so everyone’s ready to eat as soon as it arrives.
The Science of Kimchi Jjigae
Three food-science mechanisms are doing most of the work in this dish. Understanding them explains why the technique above is written the way it is — and why every variation in this family protects the same core steps.
Fermentation: Why Aged Kimchi Tastes Fundamentally Different
Fresh kimchi and aged kimchi aren’t just “the same thing at different sourness levels” — they’re chemically different foods. As kimchi ferments, lactic acid bacteria (dominated by strains like Lactobacillus kimchii) convert sugars in the cabbage and seasonings into lactic acid, steadily dropping the pH from around 5.5 in fresh kimchi to roughly 4.2 by the time it reaches the Stage 3 sweet spot this recipe calls for. That acid doesn’t just add sourness — it also breaks down some of the cabbage’s structure, softening the texture, and the fermentation process itself generates new aromatic compounds that simply aren’t present in fresh kimchi. Cooking kills the live bacteria, but the acid and flavour compounds they already produced remain fully intact in the finished broth.
The Maillard Reaction: Why Searing Matters More Than It Seems
The deep golden crust that forms on pork belly during an undisturbed sear is the Maillard reaction — a chemical cascade between amino acids and sugars that only happens at high, dry heat, not in a wet, simmering pot. This is why step 1 asks you to sear the pork before any liquid touches the pot: once broth is added, the temperature drops below the point where this reaction can occur, and that opportunity is gone for the rest of the cook. The hundreds of new flavour compounds created during those few minutes of searing are a meaningful part of what separates a rich jjigae from a flat one.
Umami Layering: Three Separate Sources, Not One
This dish’s savoury depth comes from at least three distinct umami sources stacked on top of each other, not one dominant ingredient: glutamates from the kelp in the anchovy-kelp stock, inosinates from the dried anchovy itself, and additional glutamates released from the fermented kimchi and gochujang. Food science research on umami consistently shows that glutamate and inosinate combine synergistically rather than just additively — meaning the stock and the fermented ingredients genuinely amplify each other’s savouriness beyond what either would deliver alone. This is the underlying reason the anchovy-kelp stock stays in the recipe even for the richer, fattier variations like Beef, where it might seem redundant.
What We Tested for the Classic Version
As the master recipe for the whole family, this page got an extra batch of testing beyond the usual three — here’s what we found.
Across four batches, the only variable that reliably wrecked the result was under-fermented kimchi — searing technique and simmer time both had a real but smaller impact, and pork belly’s own fat content covers for minor searing mistakes better than leaner proteins like chicken or seafood do. If you’re new to this dish, get the kimchi stage right first; everything else is comparatively forgiving.
Troubleshooting — Common Mistakes & How to Fix Them
Most problems with this recipe trace back to one of four issues below — here’s what causes them and how to correct course.
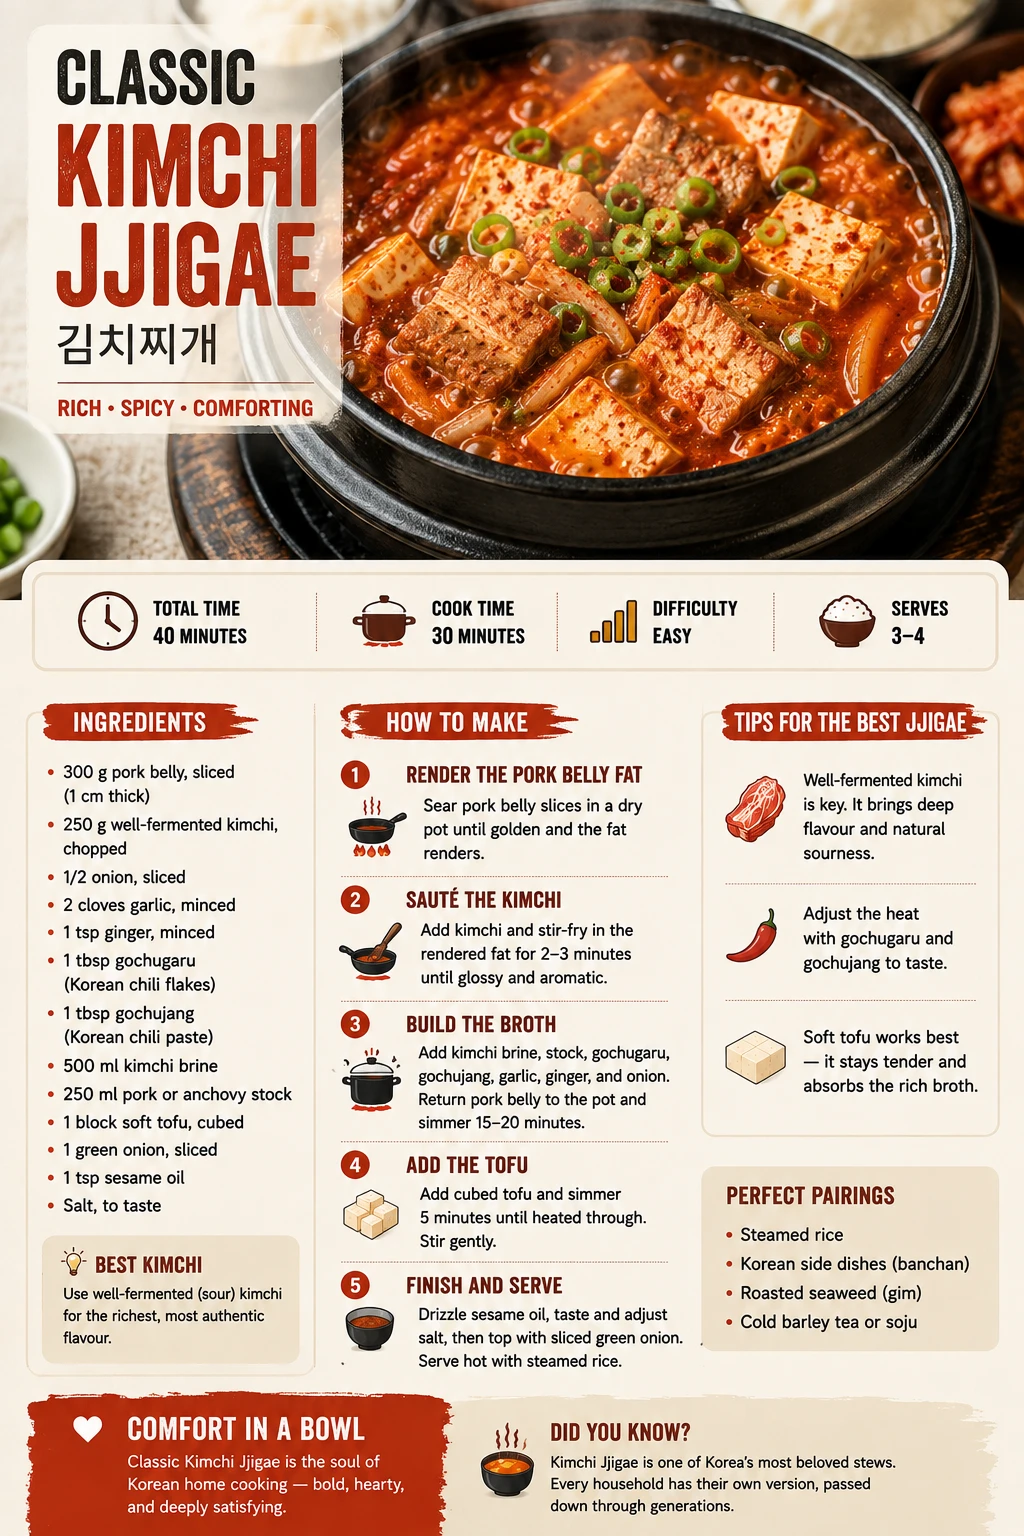
Classic Kimchi Jjigae (김치찌개)
Render-first method · Stage 3 kimchi · 40 min · ~320 calories, 18g protein
- 4 cups anchovy-kelp stock
- 1.5 cups aged kimchi (Stage 3), chopped
- 3 tbsp kimchi brine
- 1 tbsp gochugaru
- 1 tbsp gochujang
- 3 cloves garlic, minced
- 1 tsp ginger, minced
- ½ onion, sliced
- 300g pork belly, sliced into pieces
- 200g firm tofu, cubed
- 2 spring onions, sesame oil, salt to taste
- Sear pork belly undisturbed, 3-4 min per side. Remove, set aside.
- Saute kimchi in rendered fat 2-3 min, scraping up browned bits.
- Add stock, brine, gochugaru, gochujang, garlic, ginger, onion. Return pork. Cover, simmer 15-20 min.
- Add tofu, simmer 5 min.
- Remove from heat, drizzle sesame oil, season, top with spring onions. Serve hot with rice.
The Kimchi Jjigae Family — 13 Variations
This is the pillar page of a growing 13-recipe family, and everything else branches from the technique above. The Kimchi Jjigae Variations — All 13 Types Compared → page has a decision tool to help you pick.




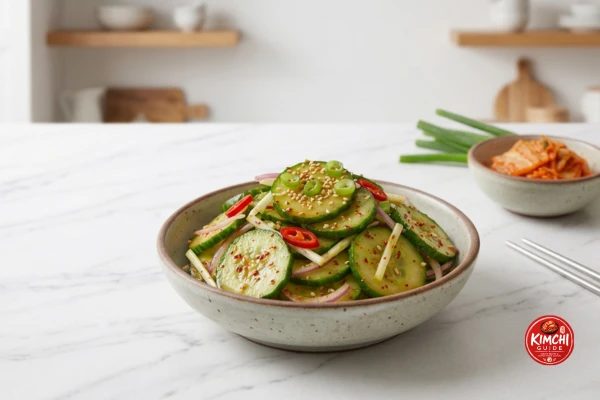
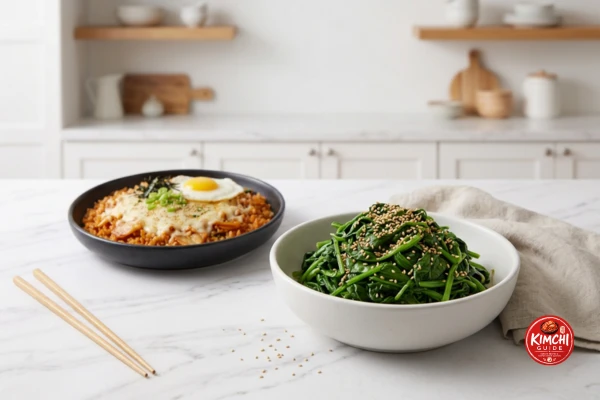
Pairing Guide — Classic Version
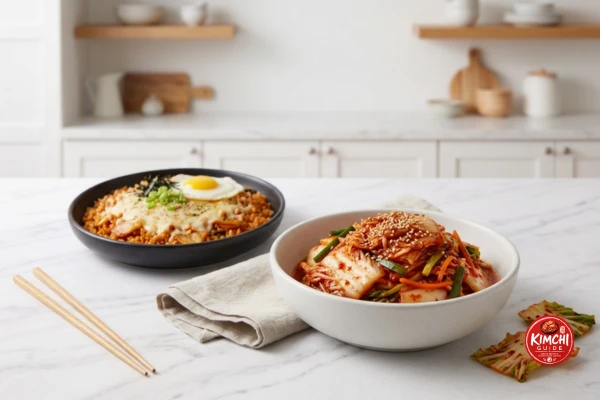
Simple, classic banchan work best here — nothing needs to compete with the broth, just round it out.
Restaurant vs Homemade Classic Kimchi Jjigae
This is one of the most commonly ordered dishes on Korean restaurant menus, and also one of the easiest to genuinely replicate at home.
| Factor | Restaurant Version | This Homemade Recipe |
|---|---|---|
| Kimchi Used | Often very aged, restaurant-batch kimchi with a strong, established flavour | You control the exact stage — Stage 3 by default, Stage 4 if you prefer more sourness |
| Searing Step | Variable — high-volume kitchens sometimes skip a proper sear to save time | Always seared undisturbed, which is what gives this version real depth |
| Broth-to-Solid Ratio | Often soupier, for easier individual portioning across a busy service | Thicker, more concentrated — the traditional home-style ratio |
| Sodium Level | Typically higher — restaurant broths are seasoned assertively for immediate impact | Adjustable to taste; nutrition figures above reflect a moderate seasoning level |
| Cost per Serving | $10-16 per bowl in most Western cities | Roughly $3-4 per serving — the most affordable jjigae in the family to cook at home |
Storage & Reheating — Classic Version
Like most kimchi jjigae variations, this genuinely improves after a day in the fridge as the flavours continue to meld.
Meal Prep — Batch-Cooking This Recipe for the Week
The short simmer time makes this easy to fit into a weeknight, but it also scales up cleanly for a weekend batch-cooking session.
Detailed Nutrition Comparison — All 13 Published Versions
A complete per-serving breakdown, reviewed by Dr. Sarah Mitchell RD, PhD, alongside how this recipe compares to every other version currently published in the family.
Nutrition Facts
Per serving — recipe makes 4 servings
How the Classic Compares to the Rest of the Family
| Variation | Calories | Protein | Sat. Fat | Sodium | Best For |
|---|---|---|---|---|---|
| Kimchi Guk | 130 | 9g | 1g | 620mg | Lightest, lowest-sodium option in the family |
| Vegan | 200 | 12g | 1.5g | 650mg | Lowest saturated fat, fully plant-based |
| Seafood Jjigae | 210 | 20g | 1.5g | 780mg | Leanest jjigae-format option |
| Vegetarian | 220 | 13g | 2.5g | 710mg | Meatless without going fully vegan |
| Soondubu | 240 | 14g | 3g | 760mg | Soft, custardy texture, highest search demand |
| Tuna (Chamchi) | 260 | 24g | 3g | 780mg | Highest protein-to-calorie ratio in the family |
| Chicken | 280 | 25g | 3g | 820mg | Highest protein, significantly leaner than pork |
| Mackerel | 290 | 21g | 3.5g | 760mg | Omega-3 rich, authentic pantry fish |
| Instant Pot & Slow Cooker | 310 | 19g | 6g | 940mg | Same as Classic — hands-off appliance convenience |
| Classic (Pork) ← This page | 320 | 18g | 7g | 810mg | The reference point — moderate on every measure |
| Beef | 340 | 24g | 8g | 870mg | Richest meat-based option before Spam |
| Spam | 380 | 16g | 11g | 1420mg | Richest, saltiest — an occasional indulgence |
Sources & Further Reading
The history, food-science, and nutrition claims on this page are cross-checked against the following references.
Classic Kimchi Jjigae FAQ — 20 Questions
Classic kimchi jjigae is the original, most common form of this Korean stew — pork belly seared to render its fat, aged Stage 3 kimchi, tofu, and an anchovy-kelp stock, simmered until the flavours meld into a thick, deep-red broth. It’s the base recipe the whole KimchiGuide Jjigae family builds on.
Pork belly (samgyeopsal) is the standard and recommended cut — its fat cap renders into the broth as it sears, which is the single biggest contributor to this dish’s depth. Pork shoulder or collar butt is a leaner, still-traditional alternative — see the cut comparison above.
Searing renders the pork belly’s fat into the pot and builds a Maillard-reaction crust — both of which get carried into the broth when the kimchi is sauteed in that same fat afterward. Skipping this step is the single most common reason a home version tastes flat.
Stage 3 aged kimchi (roughly 3-6 weeks fermented, pH approximately 4.2) is correct for this recipe. It has developed enough lactic acid to give the broth real depth, without the extreme sourness of Stage 4. See the full fermentation stages section above.
You can, but the result will taste noticeably flatter and sweeter rather than deep and tangy — fresh kimchi hasn’t yet developed the lactic acid that gives jjigae its signature sourness. It’s genuinely worth waiting for kimchi to age, or using a store-bought aged jar — see Fresh vs Aged Kimchi for how to tell them apart.
About 40 minutes total — 15 minutes prep and roughly 25 minutes cooking, including a 15-20 minute simmer once the broth is assembled. It’s one of the faster recipes in the whole jjigae family.
No. Jjigae is thicker, saltier, and served as a shared main dish, while guk (soup) is thinner and milder, generally eaten alongside rice rather than as the centrepiece. See the Kimchi Guk page for the lighter version.
Pork has historically been the most common protein for kimchi-jjigae in home cooking, and this recipe follows the standard technique — sear the fat, saute the kimchi in it, build the broth, simmer, finish with tofu — that every other variation in this family adapts for a different protein or format.
Moderately, from the standard gochugaru and gochujang combination. Use the spice level adjuster above to scale it from no-spice to Korean-hot.
Gochugaru is dried, coarsely ground Korean chili flakes, used for both heat and a bright red colour. Gochujang is a fermented, thick chili paste that adds heat plus a deeper savoury-sweet umami note. This recipe uses both together. See the full Gochugaru vs Gochujang guide.
Not by simply omitting the pork — the rendered fat and most commercial kimchi’s fish sauce both need addressing. See the dedicated Vegetarian Kimchi Jjigae (egg and dairy allowed) or Vegan Kimchi Jjigae pages for versions built specifically for those diets.
Yes — both are traditional, recognized base proteins for this dish, not substitutions. See the dedicated Chicken Kimchi Jjigae and Beef Kimchi Jjigae pages, each built around the technique that suits that protein specifically.
No — a heavy pot or Dutch oven works fine. A ttukbaegi retains heat longer and keeps the stew bubbling at the table, which is part of the traditional presentation, but it’s not required to get an authentic-tasting result.
It can be — use a gluten-free gochujang brand and confirm your kimchi doesn’t contain wheat-based ingredients. Pork, tofu, and the anchovy-kelp stock are all naturally gluten-free.
Approximately 18g of protein per serving — moderate compared to the leaner Chicken (25g) and richer Beef (24g) versions, since pork belly itself is lower in protein relative to its fat content.
Yes — like most kimchi jjigae variations, this genuinely tastes better the next day as the flavours continue to meld. Refrigerate and reheat gently on the stovetop.
Yes, for up to 2 months. Freeze without the tofu if possible for the best texture on reheating, or expect the tofu to soften slightly — it’s still perfectly good to eat.
Too much unrendered fat was left on the pork, or the fat wasn’t skimmed before serving. Trim excess fat before searing, and skim the surface with a spoon near the end if needed — see Troubleshooting below.
Almost always one of two causes: the pork wasn’t seared long enough to render its fat, or the kimchi is under-fermented (younger than Stage 3). See the Troubleshooting section for the full fix.
Steamed white rice is essential, plus one or two banchan (side dishes) — cucumber salad, spinach namul, or a small portion of fresh kimchi all pair well. See the Pairing Guide above for the full list.

Questions & Comments
Belly or shoulder? Leave a question below — Ji-Young reads and responds to every comment.
Your email will not be published. All comments are reviewed before appearing.