Kimchi Rice Burger Recipe Pressed Rice Buns, Crisping Technique & Naturally Gluten-Free — Lotteria Style
Most “rice bun” recipes just pack rice into a mold and hope it holds. This one tests which rice type actually binds, how hard to pack the mold, how long to chill before frying, and exactly when to brush on the soy glaze — plus the MOS Burger-style nori trick most home recipes skip — so the buns survive being picked up, not just plated for a photo.

What Is a Kimchi Rice Burger?
A kimchi rice burger uses the exact same smash patty, gochujang mayo and kimchi slaw as the classic build — but replaces the bread bun with two pressed, pan-fried rice cakes made from short-grain sticky rice. The format was invented by Japan’s MOS Burger chain and later adapted by Korean fast food chains like Lotteria. Done right, the rice cakes fry up with a crisp, lightly soy-glazed crust that holds together through the whole sandwich — and the whole build is naturally gluten-free.
How to Make a Kimchi Rice Burger
A kimchi rice burger takes 40 minutes: press and chill rice cakes, smash a beef patty, melt cheese on top, fry the rice cakes crisp with a soy glaze, and assemble with gochujang mayo and kimchi slaw.
- Rice: cook, season, and press warm sticky rice into two bun-shaped cakes; chill 20 min.
- Sauce: whisk Kewpie mayo, gochujang, sesame oil, rice vinegar.
- Slaw: squeeze the kimchi, toss with cabbage.
- Smash: smash the patty hot and fast; melt cheese on top.
- Fry & glaze: pan-fry the chilled rice cakes until crisp, brush with soy in the final seconds.
How to Press & Crisp Rice Buns Without Them Falling Apart
A pressed rice bun lives or dies on four decisions made before it ever hits the pan. Get these right and the bun holds together through the whole burger — get any one wrong and it crumbles apart.
The MOS Burger Nori Trick — a Moisture Shield, Not Just Garnish
Every batch above was tested without any seaweed. This section is for anyone whose rice buns held together fine in the pan but still went soft or split open once the mayo and slaw hit them — a different failure point that packing and chilling alone can’t fully solve.

This is the same trick behind Japan’s original MOS Burger rice buns: after shaping and chilling each rice cake, press a roughly bun-sized piece of roasted nori (gim) onto the side that will face the filling, then fry as normal with the nori side down first. The nori toasts and crisps right along with the rice, and once assembled it acts as a barrier between the cake and the mayo, cheese and kimchi moisture — so the bun holds its structure for longer instead of softening from the inside out. It’s entirely optional and changes the flavour slightly (a light seaweed note against the beef), but it’s the single upgrade worth trying if you’ve had a bun fall apart mid-bite despite doing everything else right.
What Changes When Rice Replaces Bread
Beyond the obvious gluten-free win, swapping in rice buns changes real things about texture, timing, and how forgiving the recipe is of small mistakes.

Bread’s gluten network stretches and holds shape almost regardless of the flour blend used, which is part of why bun recipes are so forgiving. Rice has no such safety net — its ability to hold a pressed shape depends entirely on starch composition. Sushi rice and Korean short-grain rice, both high in sticky amylopectin starch, pressed into cakes that survived flipping and biting intact. Jasmine and other long-grain rice varieties, lower in that starch type, crumbled apart within the first minute of frying regardless of how firmly they were packed beforehand.

Toasting a bread bun doesn’t require any packing step at all, so this is genuinely new technique territory for anyone used to the bunned recipes in this family. Rice packed gently, the way you might mound rice onto a plate, leaves air pockets that collapse the moment the cake is lifted or flipped. Packing with deliberate, sustained pressure — pressing until the surface resists slightly rather than springing back — closes those air pockets and produces a cake dense enough to survive handling.

A bread bun recipe’s resting step is about yeast fermentation and gluten relaxation before baking. A rice bun’s resting step is doing something completely different — letting the starch structure firm up in the cold so the cake holds its shape under the direct heat of frying. Skipping this chill and frying straight from warm, freshly-pressed rice is the single most common point of failure in home attempts at this format.

Unlike a buttered bread bun, where the fat goes on before toasting begins, the soy glaze on a rice bun is added only in the final 30 seconds of frying. Soy sauce contains sugars that caramelise quickly and burn if exposed to hot oil for too long — brushing it on early produces a bitter, scorched exterior instead of the glossy, lightly caramelised crust the technique is meant to achieve.
Key Terms — Rice Bun & Food Science Entities
Understanding these terms clarifies exactly why the rice-bun technique works the way it does.
How Difficult Is a Kimchi Rice Burger?
The beef patty technique is identical to the classic build. The new skill is entirely about the rice cakes — packing, chilling and frying them correctly, which takes one or two attempts to get a feel for.
← This Recipe
Which Kimchi Stage to Use — Visual Guide
Fermentation stage selection is identical to the classic build — Stage 3 remains the correct choice regardless of what the bun is made from. See KimchiGuide’s full kimchi fermentation stages guide for how each stage tastes and when to reach for it.
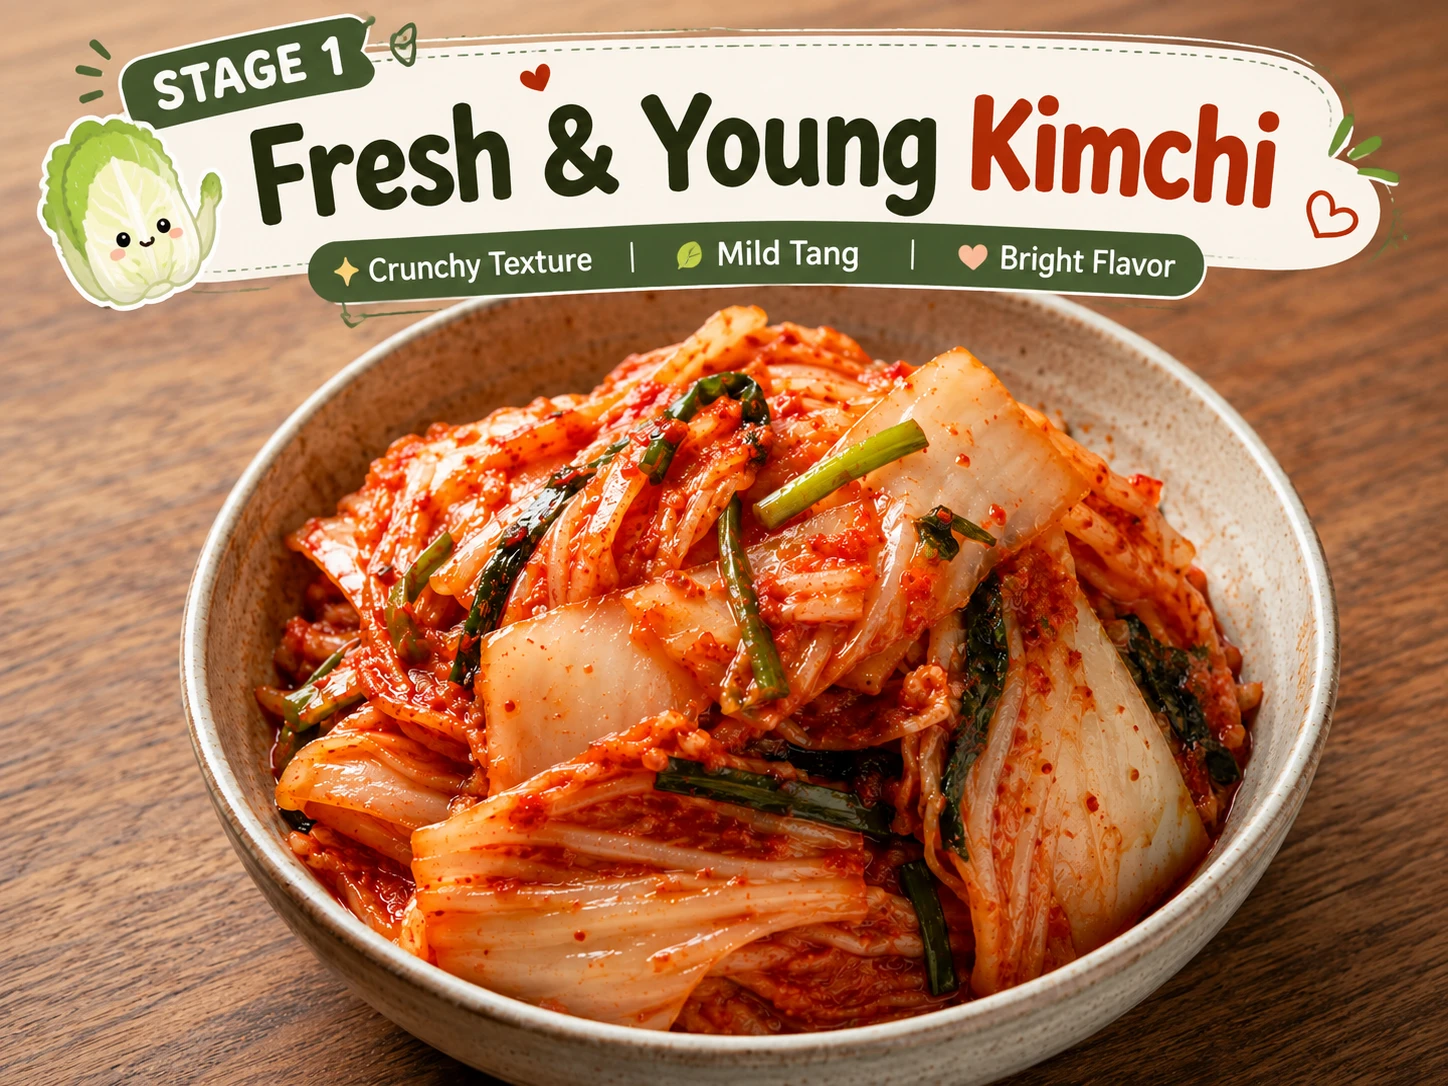
Tastes like spiced cabbage, with almost no acidity to cut through the richness of the mayo and cheese.
✗ Not Recommended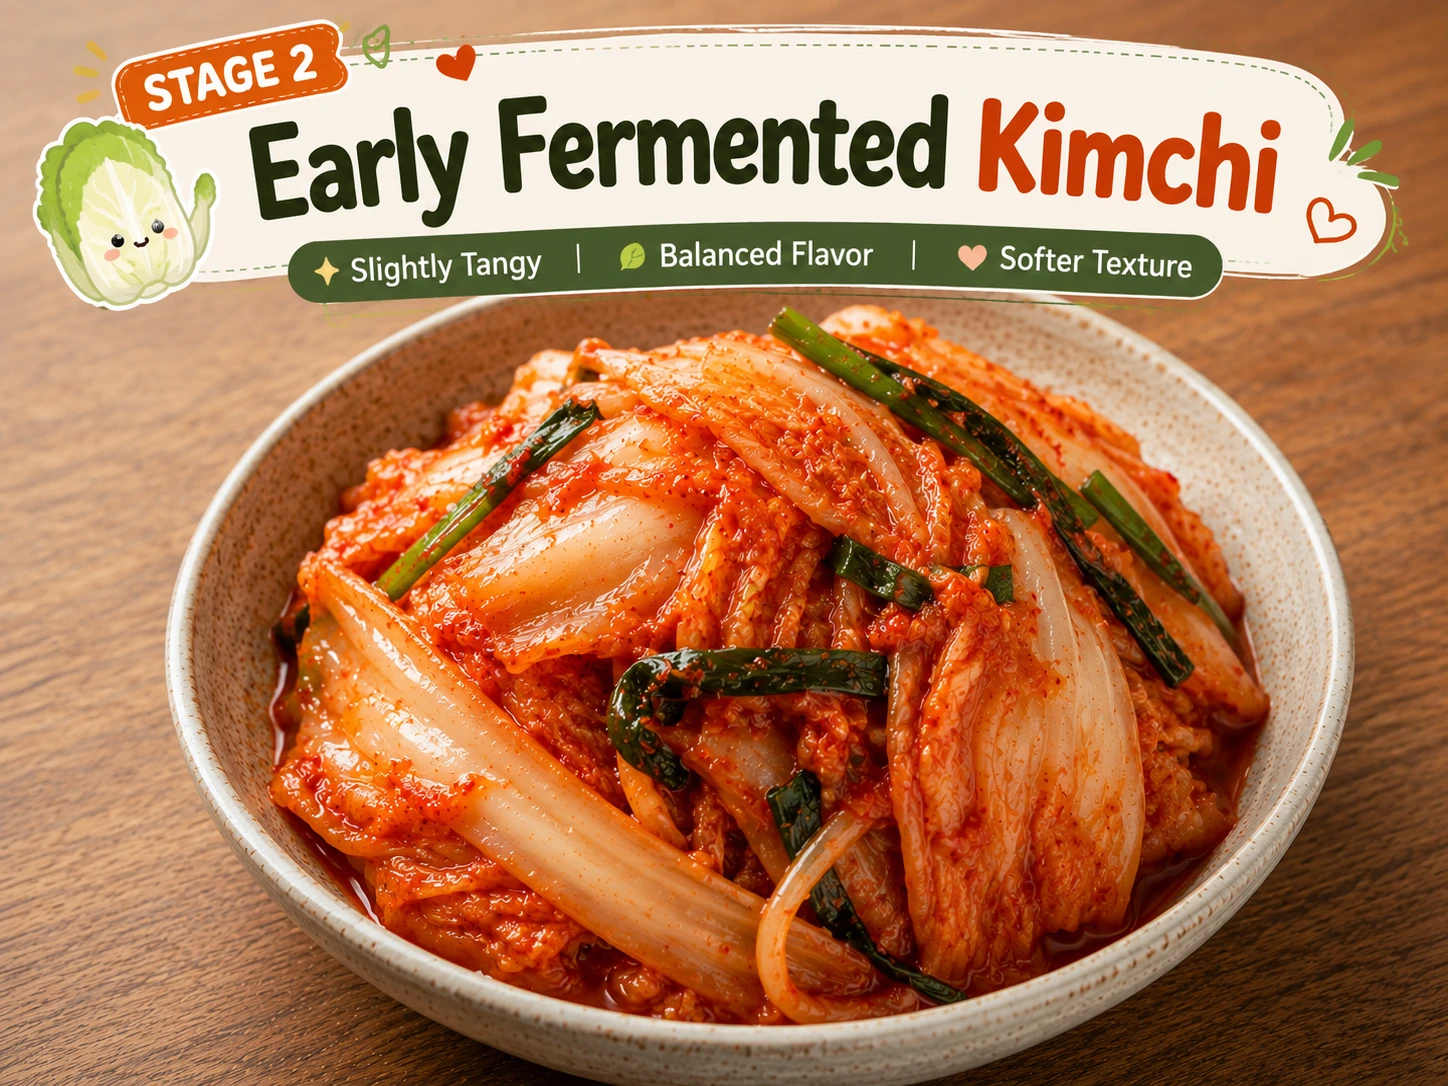
Acceptable if ripe kimchi is unavailable, though the flavour balance is noticeably milder than the tested build.
△ Acceptable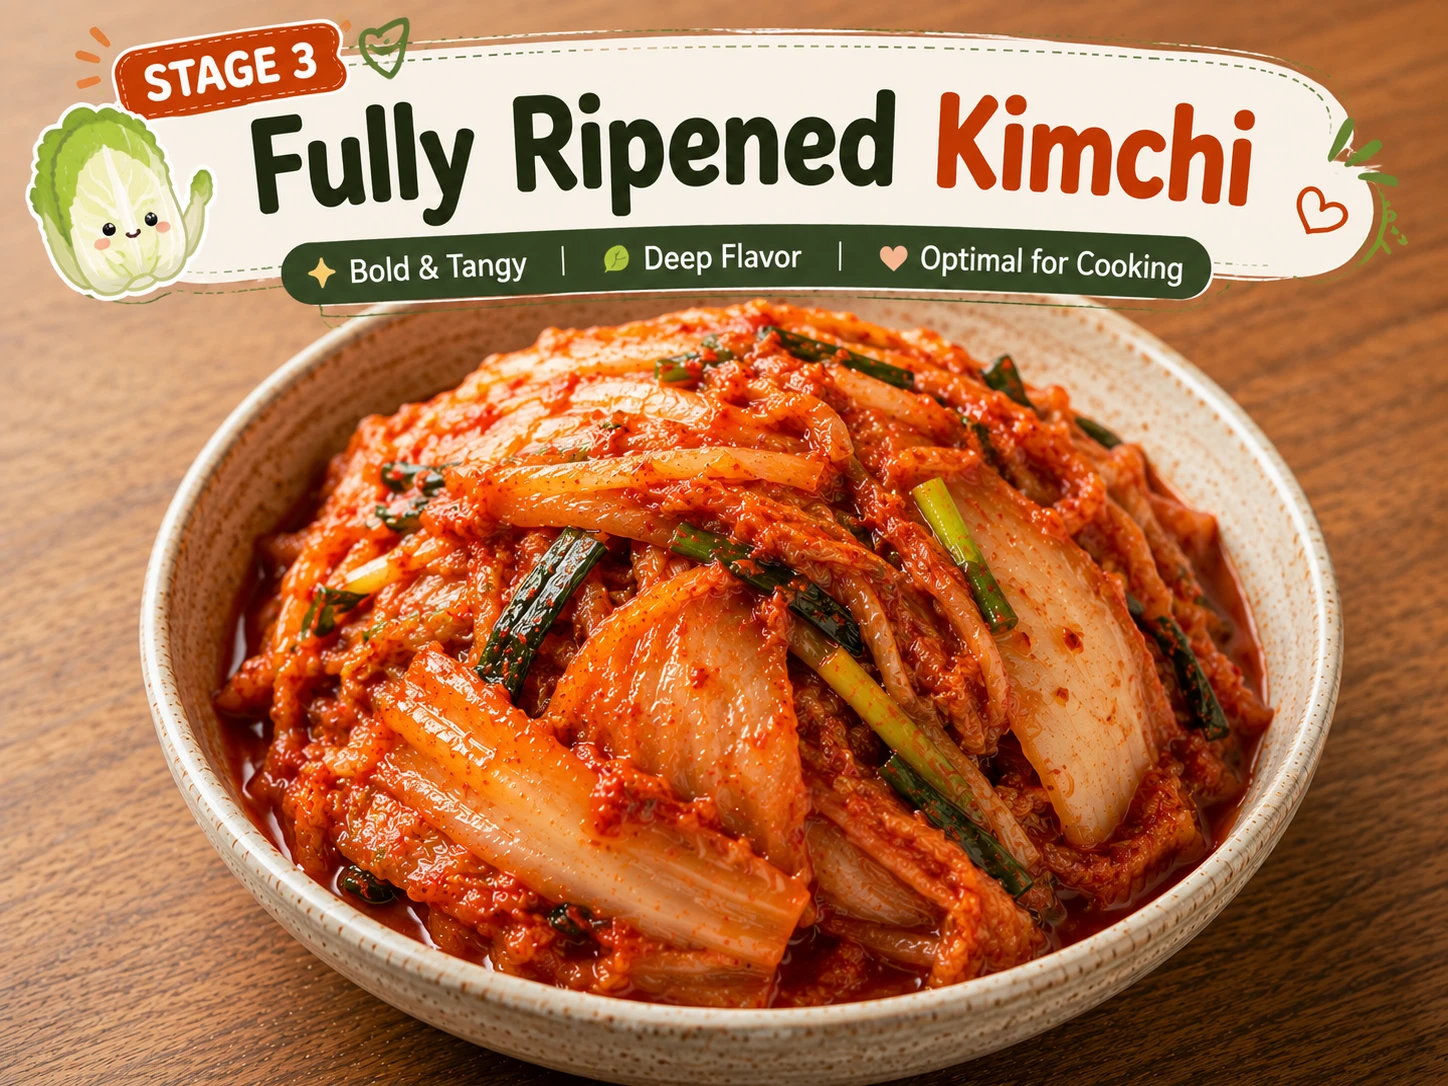
Full sour-umami complexity balances the beef, cheese and mayo — the only stage that delivers the tested flavour profile.
★ Correct — the only real choice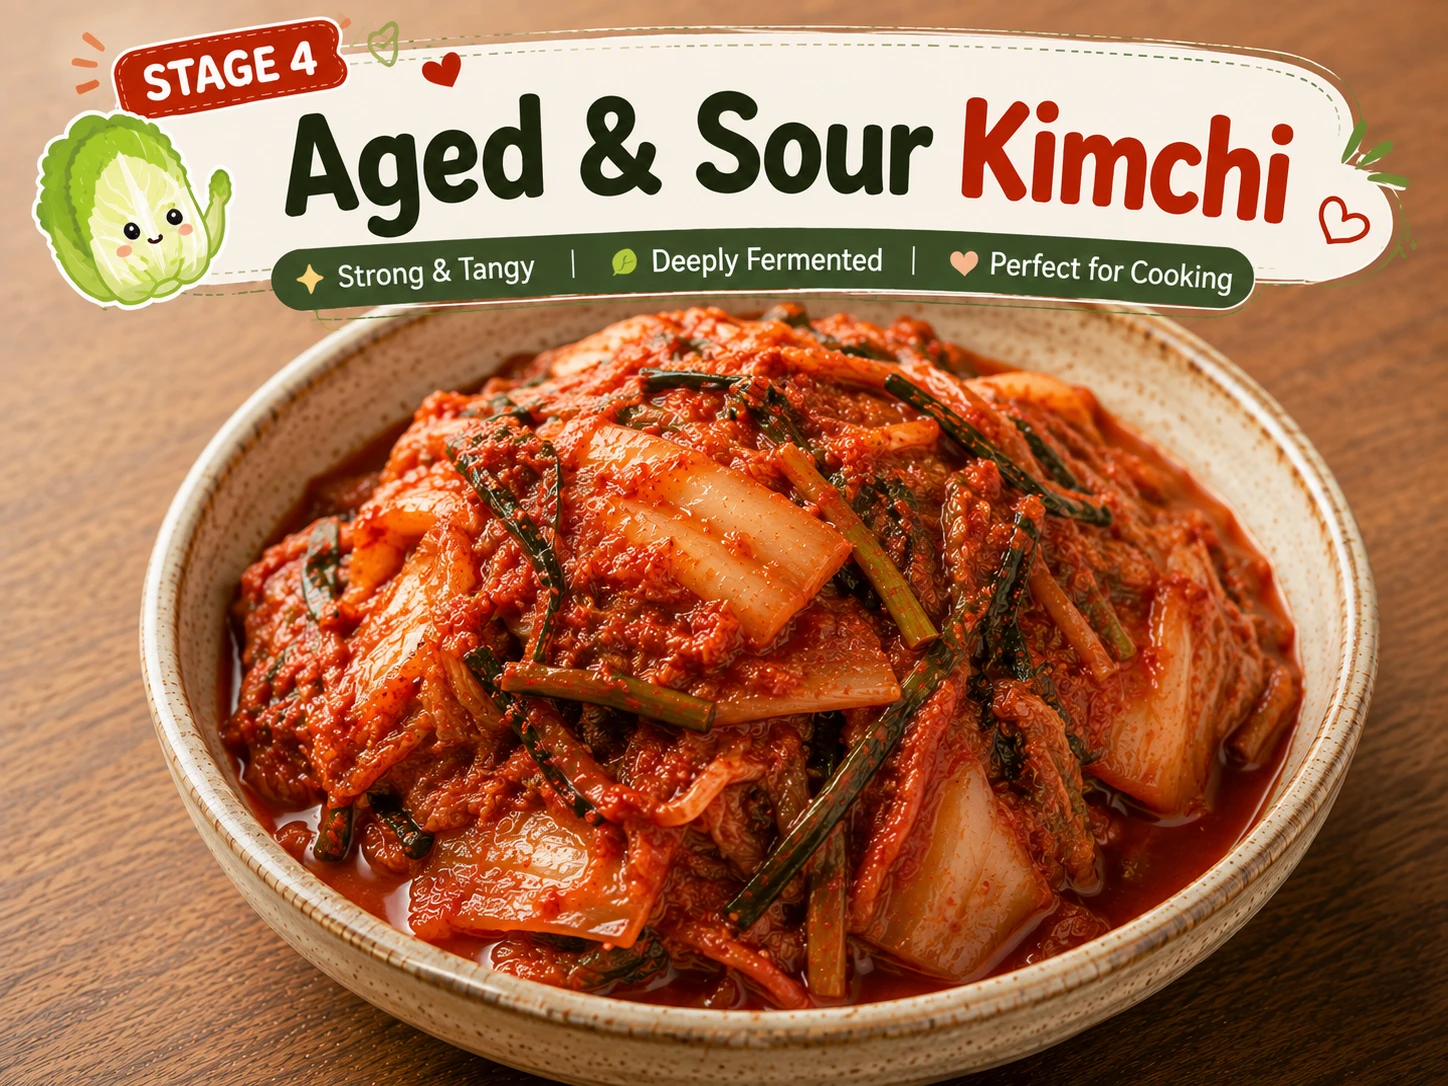
Can overpower the sandwich at full strength. Squeeze thoroughly and use sparingly, or blend with a younger batch.
△ Usable — squeeze firstIngredients

Substitution Guide — What Works, What Doesn’t
| Ingredient | Best Substitute | Ratio | Impact |
|---|---|---|---|
| Short-grain sticky rice | Sushi rice | 1:1 | Near-identical result — both are high-amylopectin short-grain varieties. See KimchiGuide’s best rice for fried rice guide for how other varieties compare. |
| Short-grain sticky rice | Long-grain or jasmine rice | — | Not recommended — won’t bind into a pressable cake, tested and confirmed in the Rice Type Comparison above. |
| Short-grain rice, if not sticky enough | Add ½ tsp potato starch, mixed through while warm | Per 300g rice | Backup binder — see the Nori Trick section above. Not needed if using true sushi or Korean short-grain rice. |
| Soy sauce glaze | Tamari (for a soy-free-adjacent, still not GF-certified option) | 1:1 | Similar flavour; check tamari’s own gluten-free certification if that matters to you. |
| American cheese | Melting cheddar or provolone slice | 1:1 | Slightly less smooth melt than American, otherwise very close. |
| 80/20 beef mince | 85/15 + 1 tsp grated cold butter per patty | Per 150g portion | Close match. Never go leaner than 85/15 for a smash patty — see KimchiGuide’s smash burger technique guide for why the fat ratio matters. |
| Round mold for pressing | Wide mason jar lid or measuring cup, lined with plastic wrap | — | Any rigid round vessel that lets you pack rice firmly works equally well. |

“People sometimes assume a rice bun is automatically ‘lighter’ than a bread bun because it sounds simpler, but gram for gram, cooked rice and bread land in a similar calorie range. The real nutritional story here is that it’s naturally gluten-free, not that it’s dramatically lower in calories — those are two different wins, and it’s worth knowing which one you’re actually getting.”
How to Make a Kimchi Rice Burger
Seven steps built around the same smash technique as the classic build, plus the rice-bun preparation that replaces bun-toasting entirely. Plan for the 20-minute chill — it isn’t optional.

Cook short-grain sticky rice — sushi rice or Korean short-grain rice — according to your rice cooker or stovetop method until fully tender and visibly sticky, not fluffy or separate-grained. This starch stickiness is the entire foundation of the recipe, so don’t substitute a long-grain variety here even if it’s what you have on hand; see the Rice Type Comparison above for what happens if you do.
While the rice is still warm, season it lightly with salt, mixing gently so you don’t crush the grains. Seasoning now, rather than after pressing, distributes the salt evenly through the interior of the finished bun. If your rice isn’t binding as tightly as you’d like even at this stage, stir in the optional ½ tsp potato starch mentioned in the Nori Trick section now, while everything is still warm.

Pack the warm rice firmly into a round mold, ramekin, or lined measuring cup, pressing with real, sustained force — the back of a spoon or your knuckles both work — until the surface feels dense and only slightly springy. You need four cakes total for two burgers, roughly 75g of packed rice per cake.
Transfer the pressed cakes to a plate or tray and refrigerate for at least 20 minutes. This is the step most first attempts at rice buns skip, and it’s the single biggest reason a rice cake holds together in the pan instead of falling apart. If you’re using the optional nori moisture-shield, press a bun-sized piece of nori onto the inner face of each cake now, right before it goes into the fridge, so it’s ready to fry.

While the rice cakes chill, whisk Kewpie mayo, gochujang, toasted sesame oil and rice vinegar until fully combined and uniform in colour — identical to the classic build’s sauce, since nothing about the bun swap changes the sauce itself. For ratio variations and heat-level adjustments, KimchiGuide’s full gochujang mayo sauce guide covers this sauce in more depth.
Refrigerate the finished mayo until assembly. It keeps well for up to a week in a sealed container. Spread it thinly at assembly rather than generously — excess mayo is one of the more common reasons a rice bun softens early, since it’s the moisture source closest to the rice itself.

Squeeze excess liquid firmly from the chopped Stage 3 kimchi — properly dry, not just drained — then toss with shredded napa cabbage, the remaining sesame oil, rice vinegar and sesame seeds. This same quick-toss method is the basis of KimchiGuide’s standalone quick kimchi slaw recipe, if you want to make a bigger batch to keep on hand.
Squeezing the kimchi properly here matters more with a rice bun than a bread bun: bread absorbs stray moisture without much consequence, but a fried rice cake will soften wherever wet kimchi sits against it.

Heat a cast iron griddle until visibly smoking. Add a small amount of neutral oil, place the beef ball on the hottest part of the surface, and press it flat immediately with a heavy spatula for a full 10 seconds. Cook undisturbed for roughly 90 seconds until deeply browned, flip, add a slice of cheese, and let it melt fully before removing.
Nothing about this step differs from the classic bunned build — the beef technique has nothing to do with what the bun is made from. For the full breakdown of why cold beef and a smoking-hot pan matter here, see KimchiGuide’s smash burger technique guide.

Heat the remaining oil in a pan over medium heat. Add the chilled rice cakes and fry undisturbed for 3–4 minutes per side, until a deep golden crust forms — resist the urge to move or flip them early, since the fragile surface tears easily before it’s set. If using the optional nori moisture-shield, fry nori-side down first so it toasts and adheres properly.
Prefer less oil? An air fryer works too: brush the chilled cakes lightly with oil and air-fry at 400°F (200°C) for 8–10 minutes, flipping halfway, brushing on the soy glaze in the final minute. The crust is slightly less even than pan-frying, but it’s a genuine hands-off alternative.

Spread gochujang mayo on both rice cake surfaces. Place the cheese-topped patty on the bottom rice cake, pile the kimchi slaw on top, and scatter spring onion. Cap with the second rice cake and press down gently to settle the layers.
Serve immediately — a fried rice cake softens once it sits in contact with the mayo and slaw moisture, exactly the way a toasted bread bun would, so this isn’t a build-ahead sandwich.
Test Kitchen Results
Every variable was tested at least twice against a bread-bun control batch. Here is what the data shows for building a kimchi burger with rice buns specifically.
Sushi rice and Korean short-grain rice pressed into cakes that survived flipping and biting intact. Jasmine and long-grain rice crumbled apart within the first minute of frying.
Short-grain sticky rice onlyGently mounded rice left air pockets that collapsed when lifted. Firmly packed rice, pressed until the surface resisted slightly, held its shape through frying and flipping.
Pack with real, sustained forceUnchilled cakes broke apart in the pan almost immediately. 20 minutes was the minimum that reliably held; 60 minutes showed no further improvement.
Chill minimum 20 minutesSoy sauce brushed on at the start of frying burned to bitterness well before the rice crisped. Glazing in the final 30 seconds produced a glossy, evenly caramelised crust.
Glaze only in the final 30 secondsAll three produced structurally identical results — the vessel’s rigidity and roundness mattered, not the specific brand or type of container.
Any rigid round mold worksFully thawed frozen rice cakes fried up nearly identical to fresh-pressed ones. Frying directly from frozen left cold centres under overcooked exteriors.
Thaw fully before frying if frozenBare rice cakes stayed intact through frying but softened at the mayo-contact point within about 8 minutes of assembly. Cakes with nori pressed against the inner face held their structure noticeably longer under the same fillings.
Worth it if you’re not serving instantlyPan-frying produced a more even, deeper crust. Air-frying used noticeably less oil and held its shape just as well, but browning was patchier without a mid-cook toss.
Pan-fry for best crust; air fryer for less oilA kimchi rice burger succeeds or fails on rice selection and preparation technique, not on any dramatic change to the beef, sauce or slaw. Use short-grain sticky rice, pack it firmly, chill it a full 20 minutes, fry it undisturbed, and glaze late — every other step is identical to the classic build. The nori shield and air-fryer method are genuine upgrades, not requirements.

Kimchi Rice Burger
Pressed rice buns · Beef patty · Gochujang mayo · Kimchi slaw · 40 minutes
- 300g 80/20 beef mince, two 150g patties
- 300g cooked short-grain sticky rice, warm
- 1 tbsp soy sauce, for glazing
- 2 sheets roasted nori, optional (moisture-shield trick)
- 150g Stage 3 kimchi, chopped + squeezed dry
- 2 slices American cheese
- 2 tbsp neutral oil, divided
- 3 tbsp Kewpie mayo + 1 tbsp gochujang
- 2 tsp sesame oil + 2 tsp rice vinegar (split mayo/slaw)
- 80g napa cabbage, shredded
- 1 tsp sesame seeds; 2 spring onions, sliced
- Salt and black pepper
- 1Cook and lightly salt warm sticky rice.
- 2Press into 4 rice cakes; chill at least 20 minutes.
- 3Whisk Kewpie mayo, gochujang, sesame oil, rice vinegar.
- 4Squeeze kimchi dry, build slaw with cabbage.
- 5Smash patty hot and fast; flip, melt cheese on top.
- 6Fry chilled rice cakes until crisp (or air-fry at 400°F); glaze with soy in final 30 sec.
- 7Spread mayo, add patty, pile slaw, cap with second rice cake. Serve.
Per serving (2 servings total). Reviewed by Dr. Sarah Mitchell RD, PhD · Updated August 21, 2026
Per serving (1 burger). Every ingredient is listed with an explicit value for every column — including 0g/0mg where an ingredient contributes nothing — so calorie-counters and diabetic readers can see exactly where every number comes from, not just the totals above.
| Ingredient (per serving) | Cal | Protein | Carbs | Fat | Fiber | Sugar | Sodium |
|---|---|---|---|---|---|---|---|
| 150g 80/20 beef patty, cooked | 210 | 24g | 0g | 12g | 0g | 0g | 40mg |
| 2 pressed rice cakes (120g cooked rice) | 140 | 3g | 31g | 1g | 1g | 0g | 15mg |
| 1 slice American cheese | 45 | 3g | 1g | 4g | 0g | 1g | 280mg |
| 75g Stage 3 kimchi, squeezed | 10 | 1g | 2g | 0g | 1g | 1g | 330mg |
| 1½ tbsp gochujang-Kewpie mayo | 30 | 0g | 1g | 3g | 0g | 0g | 60mg |
| 1 tsp toasted sesame oil | 15 | 0g | 0g | 2g | 0g | 0g | 0mg |
| ½ tbsp neutral oil (frying rice cakes + patty) | 10 | 0g | 0g | 1g | 0g | 0g | 0mg |
| 40g napa cabbage | 5 | 0g | 1g | 0g | 0g | 0g | 4mg |
| ½ tsp toasted sesame seeds | 8 | 0g | 0g | 1g | 0g | 0g | 0mg |
| 1 spring onion, sliced | 2 | 0g | 1g | 0g | 0g | 0g | 1mg |
| Soy glaze, brushed on rice cakes | 5 | 0g | 1g | 0g | 0g | 1g | 120mg |
| Salt & black pepper, to taste | 0 | 0g | 0g | 0g | 0g | 0g | 50mg |
| Total per serving | 480 | 31g | 38g | 24g | 2g | 3g | 900mg |
Values are per-ingredient estimates rounded for readability; rice variety and exact frying oil absorption will shift these numbers slightly — check your own packaging for exact figures if you are managing a strict calorie or sodium target. The optional nori sheet is not included above; it adds roughly 5 calories per burger.
All 11 Kimchi Burger Builds
This is 1 of 11 builds in the KimchiGuide kimchi burger family. Classic recipe: Kimchi Burger Recipe →. Full comparison + origin story: Kimchi Burger Ultimate Guide →

The flagship. Smash patty, gochujang mayo, kimchi slaw. 520 cal.
Classic Recipe →
Two smashed patties, cheese glue, scaled toppings. 690 cal.
Double Smash →
Double-fried crispy fried thigh. Approx. 610 cal.
Chicken Burger →
Sweet soy bulgogi-marinated patty. Approx. 560 cal.
Bulgogi Burger →
Black bean patty, vegan mayo, jeotgal-free kimchi. 420 cal.
Vegan Burger →
3-bite party format, same ratios. Approx. 210 cal each.
Sliders →
Certified GF bun, GF gochujang, hidden-wheat checks. 520 cal.
Gluten-Free →
No bun, low-carb, lettuce-cup format. 340 cal.
Burger Bowl →
Pressed rice buns, naturally gluten-free. 480 cal.
Currently viewing
Bodega-style chopped beef and cheese, kimchi folded in off heat. Approx. 590 cal.
Chopped Cheese →
All 11 builds, comparison table, origin story, FAQs.
Full Guide →Kimchi Rice Burger — Pairing Guide
Since the bun is already rice-based, sides that lean savoury and pickled rather than starchy again tend to balance the plate best.

Sharp, crunchy acidity that cuts through the richness of the fried rice bun and mayo.

Shares the same gochujang-adjacent, savoury-sweet flavour world as the burger itself.

A warm, simple side that doesn’t compete with the rice bun’s texture or the kimchi’s tang.

A traditional sweet-tart iced tea that cuts through the fried rice bun’s richness.
Storage and Make-Ahead Guidance
Keep covered in the fridge, or freeze uncooked; thaw fully before frying — never fry from frozen.
Portion into a 150g ball, cover loosely, keep cold until cooking. Never bring to room temperature before smashing.
Sealed container, clean spoon each time. Do not freeze — the emulsion separates on thawing.
Softens within 30 minutes of dressing. Pre-shred cabbage and squeeze kimchi ahead, combine just before serving.
Where This Build Sits Among All 11 Kimchi Burgers
| Build | Calories | Protein | Vegan? | Best For |
|---|---|---|---|---|
| Kimchi Burger Bowl | 340 | 27g | No (beef) | Low-carb, lettuce wrap, meal prep |
| Vegan Black Bean | 420 | 18g | ✅ Fully vegan | Plant-based, egg-free |
| Kimchi Burger Sliders (each) | 210 | 13g | No | Portion control, parties |
| Kimchi Rice Burger ← This page | 480 | 31g | No | Naturally gluten-free, rice-bun texture |
| Kimchi Burger Recipe (Classic Smash) | 520 | 31g | No | The flagship recipe |
| Gluten-Free (certified GF bun) | 520 | 31g | No | Celiac-conscious, wheat-free with a bread bun |
| Kimchi Bulgogi Burger | 560 | 29g | No | Sweeter, caramelised profile |
| Kimchi Chicken Burger | 610 | 34g | No | Crispy fried texture |
| Double Smash | 690 | 42g | No | Bigger appetite, most protein |
Kimchi Rice Burger FAQ
Sourced from real reader search behaviour around rice-bun and rice burger formats, answered with the detail of someone who’s actually watched a few rice cakes fall apart in the pan.
It’s a kimchi burger built with crispy, pressed rice cakes standing in for the bread bun — the same smash patty, gochujang mayo and kimchi slaw as the classic recipe, held between two golden, pan-fried rice cakes instead. See How to Press & Crisp Rice Buns above for the full technique.
Yes, naturally — plain short-grain rice, beef, kimchi and the standard sauce ingredients here don’t involve wheat. If you need a strictly celiac-safe build, still check your specific gochujang and kimchi brands, the same way our Gluten-Free Kimchi Burger page recommends.
Short-grain sticky rice — sushi rice or Korean short-grain rice — held together far better than long-grain or jasmine rice in testing, because of its higher starch content and stickiness once cooked. See our best rice for fried rice guide for how the varieties compare more broadly.
Usually one of two causes: the rice wasn’t packed firmly enough into the mold, or it went into the pan without chilling first. Pressing hard and refrigerating the shaped cake for at least 20 minutes lets the starches set and hold the shape under heat.
No — a small round ramekin, a wide-mouth mason jar lid, or even a measuring cup lined with plastic wrap all work. Any rigid, round vessel that lets you pack the rice firmly and evenly will do.
It’s inspired by that same rice-bun format — invented by Japan’s MOS Burger chain in the 1980s and later adapted by Korean chains like Lotteria — but this version uses a Western-style beef smash patty and kimchi slaw rather than the specific fillings found on any particular restaurant chain’s menu.
Yes. Press and chill the rice cakes up to 24 hours ahead, keeping them covered in the refrigerator, then fry them fresh just before assembling — frying is the one step that shouldn’t be done far in advance.
Yes, uncooked pressed rice cakes freeze reasonably well for up to a month. Thaw fully in the refrigerator before frying — frying from frozen leaves the centre cold while the outside overcooks.
Approximately 480 calories versus 520 for the classic bread-bun version — modestly lower, since rice has a similar calorie density to bread but slightly less fat is used in frying than in buttering and toasting a bun.
A light soy glaze in the final 30 seconds of frying adds a savoury, slightly caramelised crust that plain fried rice cakes don’t develop on their own — it’s a classic rice-burger technique, not a substitute for seasoning the rice itself.
Stage 3, ripe kimchi aged 3–6 weeks, the same as the classic build — the rice bun swap doesn’t change the fermentation guidance. See the full kimchi fermentation stages guide for how each stage tastes.
Serve immediately after frying. Like a toasted bread bun, a fried rice cake softens once it sits in contact with the mayo and slaw moisture, so this isn’t a make-ahead-and-hold sandwich. The optional nori moisture-shield (see above) buys you extra time if you can’t serve instantly.
Not recommended for the bun itself — brown rice lacks the starch stickiness needed to hold a pressed shape together under frying heat. If you want brown rice for nutritional reasons, it works better as a bowl base than as a pressed bun.
Enough for a thin, even coating across the pan — roughly 1 tablespoon per two rice cakes. Too little leaves pale, unevenly browned spots; too much makes the exterior greasy rather than crisp.
Yes. Mix 1 tsp grated cold butter into the 150g portion to compensate for lean poultry’s lower fat content, since it won’t render and crisp on the griddle the way beef fat does.
The base recipe is medium heat. Halve the gochujang in the mayo for milder, or add a thin layer of gochugaru to the patty before flipping for more heat throughout. See our gochujang mayo sauce guide for more ratio options.
Same beef patty, same smash technique, same gochujang mayo and kimchi slaw — only the bread bun is replaced with two pressed, pan-fried rice cakes. See the Kimchi Burger Recipe for the standard version.
Not as written, since it uses beef and dairy cheese. For a plant-based rice-bun option, swap in the black bean patty from the site’s Vegan Black Bean Kimchi Burger recipe and use a plant-based mayo, keeping the rice-bun technique the same.
Season the rice lightly with salt while it’s still warm, before pressing — this seasons the interior evenly. The soy glaze only coats the exterior during frying and isn’t a substitute for seasoning the rice itself.
Skipping the chilling step after pressing. Rice cakes fried immediately after shaping are still warm and loosely bound, and tend to break apart in the pan; a minimum 20-minute chill lets the starches firm up enough to survive frying intact.
It’s a technique borrowed from Japan’s original MOS Burger rice buns: press a piece of roasted nori onto the inner face of each rice cake, the side that touches the filling, before frying. The nori crisps along with the rice and acts as a barrier against the mayo and slaw moisture, so the cake stays intact for longer once assembled. It’s optional, but worth doing if you’ve had buns go soft or fall apart from the inside — see the full technique above.
Yes — brush the chilled rice cakes lightly with oil and air-fry at 400°F (200°C) for about 8–10 minutes, flipping halfway, until golden. It uses less oil than pan-frying but the crust is slightly less even, so brush on the soy glaze in the final minute either way.
This usually means the filling was too wet or oily, not that the rice cake itself was underprepared. Squeeze the kimchi thoroughly and don’t over-sauce the mayo — excess liquid soaks into the rice from the inside during assembly, which no amount of packing or chilling can fully prevent.
Was this guide helpful?
Your feedback helps us improve KimchiGuide for everyone.
💬 Leave a Comment & Rating
Made this kimchi rice burger? Tell us which rice you used and whether your rice buns held together, and rate the recipe.