Smash Burger Technique: Complete Master Guide & Science
Smash Burger Technique: Master Guide with Science Equipment, Beef Selection, Timing, Crust Science, Regional Variations & Troubleshooting
The complete smash burger guide combining detailed Maillard reaction science with tested practical technique. Learn why smash works, equipment that matters, beef ratios, exact timings by griddle type, and how to troubleshoot every mistake.

What Is a Smash Burger?
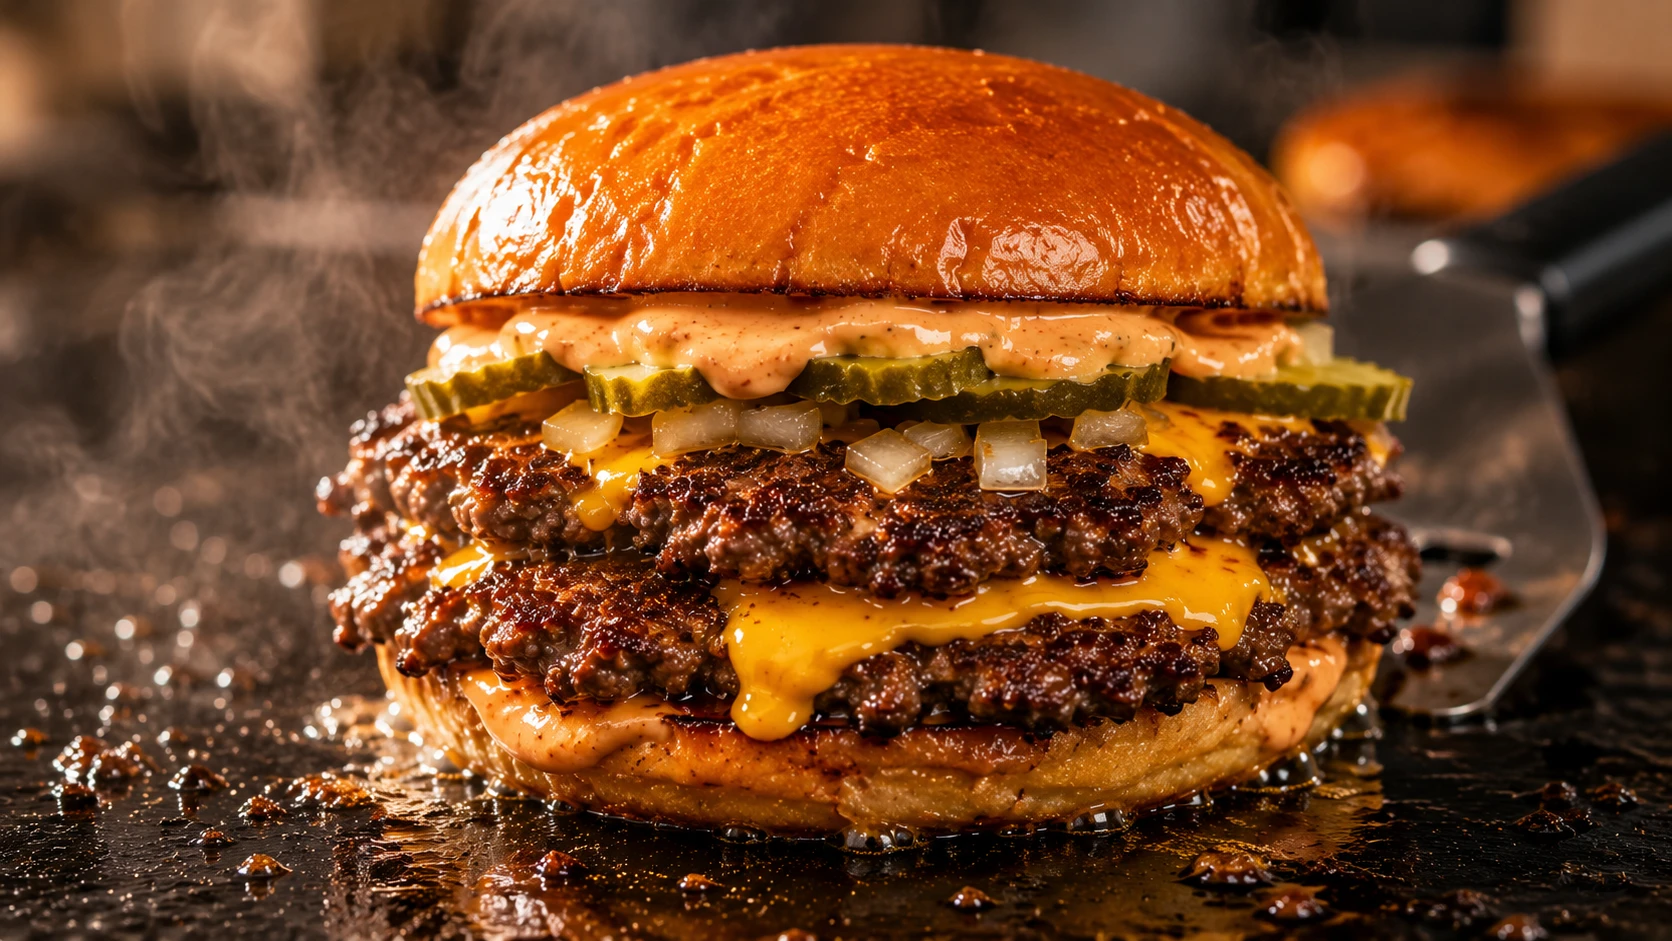
A thin burger patty (2 oz, 0.25 inch thick) pressed hard onto a screaming-hot griddle to create maximum crust. The flattening removes moisture from the meat’s surface, allowing the Maillard reaction to create a crispy, golden exterior while the interior stays juicy. It’s the opposite of a thick burger — less cooking time, maximum browning.
The Smash Burger Method
Preheat griddle → place thin patty → press 15 seconds → flip → cook second side → done.
- Preheat: Get griddle to 375-400°F (5-7 min for cast iron, 3-4 min for stainless).
- Place: Form 2 oz loose patty, place on griddle, hold for 30 seconds without pressing.
- Press: Firmly press for exactly 15 seconds with spatula (5-7 lbs pressure).
- Flip: Flip only once, immediately after first side crusts (20-25 seconds).
- Finish: Cook second side 10-15 seconds, remove at 130-135°F internal temp.
- Rest: Let rest 2 minutes before serving to redistribute juices.
The Science of the Crust: Maillard Reaction Explained
Understanding WHY smash burgers work makes you better at making them. It’s all about chemistry and physics working together.
What Is the Maillard Reaction?
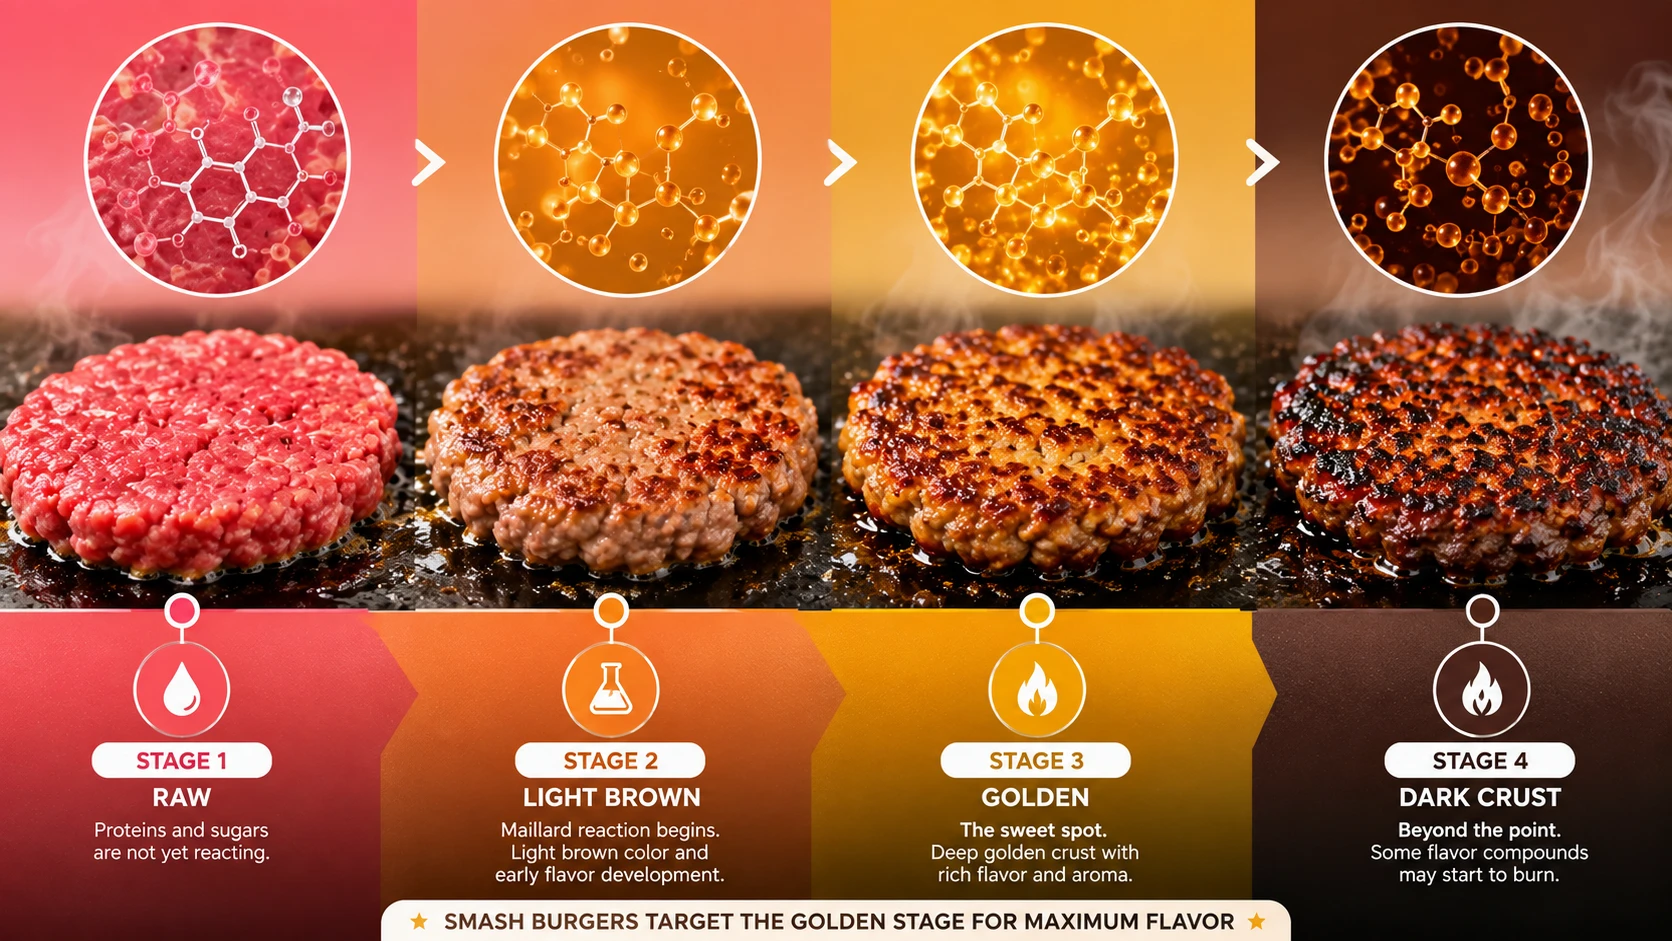
The Maillard reaction is a chemical process where amino acids (proteins) and sugars combine at high heat (above 300°F), creating hundreds of new flavor compounds and a brown crust. It’s not burning — it’s a complex molecular transformation that creates savory, umami-rich flavors.
Why it matters for smash burgers: The flatter your patty, the more surface area contacts the griddle. More contact = more Maillard = deeper, richer crust flavor.
How Pressing Creates Better Crust
Temperature Matters: The Maillard Minimum
| Surface Temp | What Happens | Result |
|---|---|---|
| Below 300°F | Meat steams, water evaporates, no browning | Grey, bland burger |
| 300-330°F | Maillard begins slowly, light browning starts | Pale crust, some flavor |
| 330-375°F | Maillard happens quickly, good color development | Golden-brown crust, excellent flavor |
| 375-400°F (IDEAL) | Maillard is aggressive, crust forms in 15-20 seconds | Dark golden crust, complex flavor, juicy inside |
| Above 400°F | Meat surface burns faster than inside cooks | Burnt exterior, raw inside |
Why Salt Timing Matters
Salt draws out moisture from meat via osmosis. This is actually GOOD for smash burgers because you want a dry surface. Salt your meat lightly right before cooking — it removes surface moisture, helping Maillard happen faster. Don’t salt too early (30+ minutes ahead) or you’ll dry out the interior of the patty.
Fat Render During Pressing
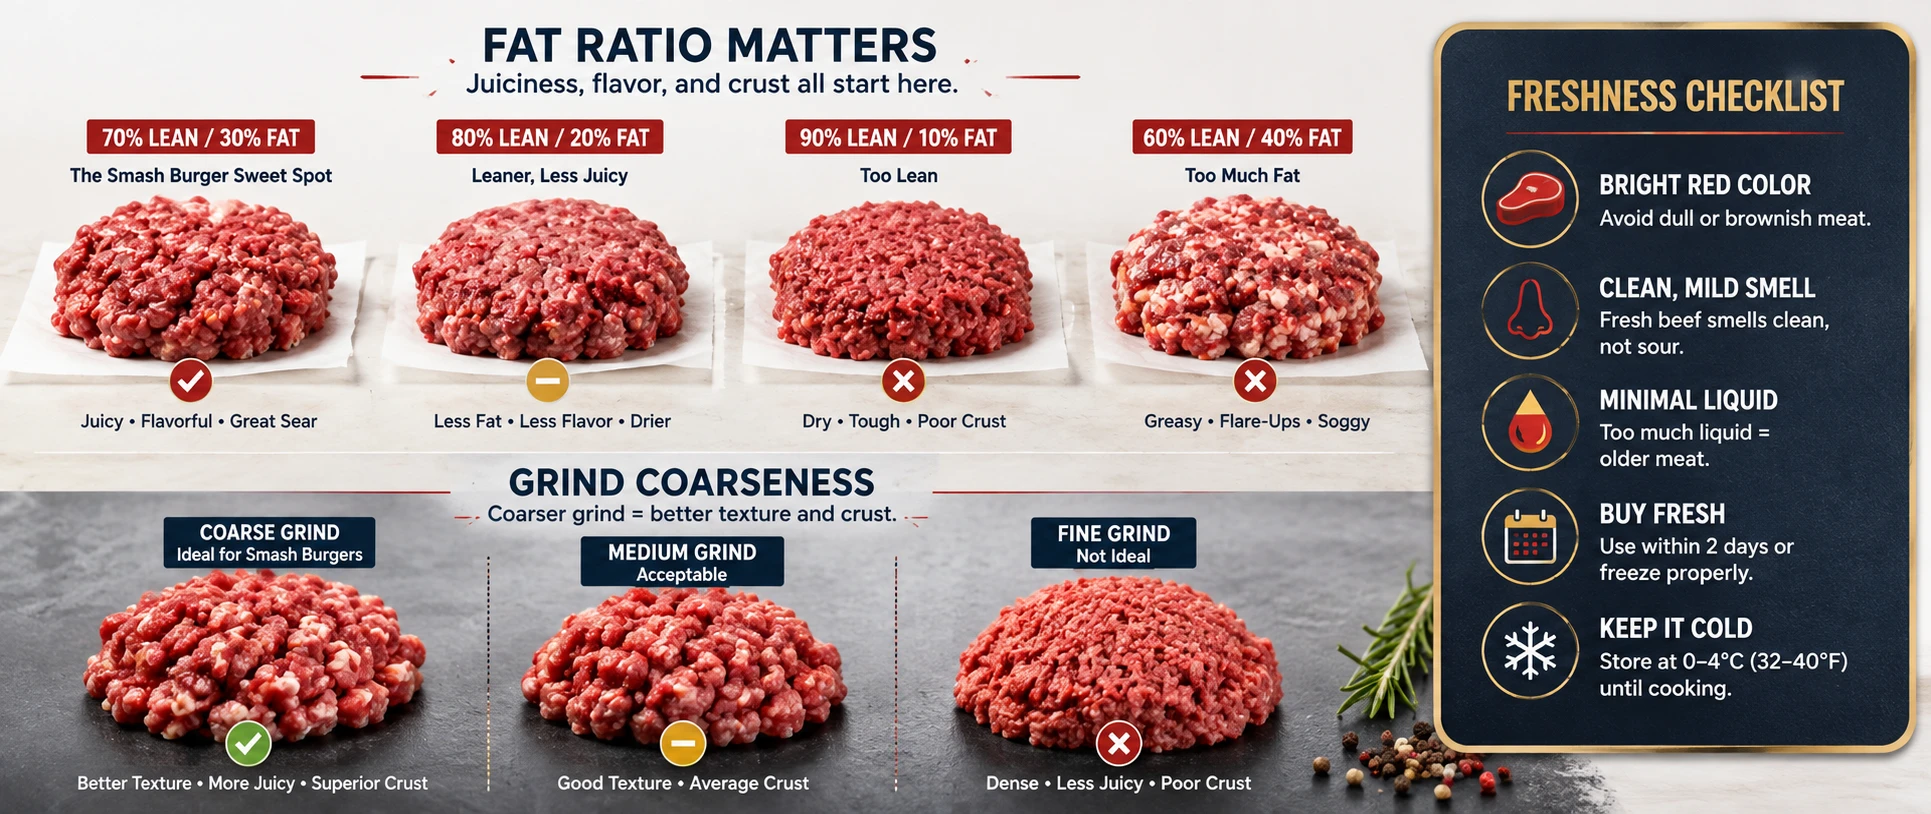
When you press a burger, the fat in the ground beef (usually 15-20%) melts slightly from the heat. This rendered fat flows into the meat fibers and onto the griddle surface, creating extra flavor and helping brown the crust. Leaner meat (70/30) browns slightly better because it has less fat to render, while fattier meat (80/20) tends to steam more from its own rendered fat.
Choosing Your Beef: Fat Ratio, Grind, & Freshness
Smash burgers are only as good as the meat you start with. Three variables matter: fat ratio, grind coarseness, and freshness.
Fat Ratio: The Most Important Variable
Grind Coarseness: Why It Matters
Freshness: Why It Matters
Where to Buy: Options & Quality
Equipment Guide: What Works, What Doesn’t
You can make smash burgers on many surfaces, but some are far better than others. Here’s how to choose.
Griddle Types: Full Comparison
| Equipment Type | Thermal Mass | Heat Recovery | Preheat Time | Smash Quality | Best For |
|---|---|---|---|---|---|
| Cast Iron (12-inch) | Excellent (heavy) | Slow but stable | 5-7 min | ★★★★★ | Home burgers, best all-around |
| Stainless Steel (12-inch) | Good (lighter) | Fast recovery | 3-4 min | ★★★★ | Quick cooking, commercial kitchen |
| Carbon Steel (12-inch) | Very good (mid-weight) | Very good recovery | 4-5 min | ★★★★ | Professional home cooks |
| Nonstick (9-10 inch) | Poor (thin) | Poor recovery | 2-3 min | ★★ | Avoid — coating breaks down |
| Copper Griddle (custom) | Excellent | Excellent | 3-4 min | ★★★★★ | Professional kitchens, high-end |
| Home Stovetop Pan (8 inch) | Fair | Fair recovery | 4-5 min | ★★★ | Emergency only, not ideal |
Why Cast Iron Wins for Home Cooks
Stainless Steel: The Professional Choice
Stainless steel heats faster than cast iron and recovers heat quickly between burgers. It’s lighter and easier to maneuver. Professional kitchens use stainless because it lets cooks make many burgers in quick succession without temperature drops. Downside: requires more oil to prevent sticking, and doesn’t develop flavor patina like cast iron.
Home Stovetop Pan: It Works (But Isn’t Ideal)
A standard home stovetop skillet (8-10 inch) can work in a pinch. It’s smaller than ideal, so you can’t make multiple burgers at once. Heat recovery is slower, so there’s more temperature drop between burgers. If using a pan instead of griddle, use cast iron (stays hot longer) rather than stainless (heats/cools faster).
Spatula: The Pressing Tool
A thin, sturdy metal spatula is your pressing tool. Stainless steel works best — won’t rust and won’t warp from heat. Avoid plastic (melts) and wooden (absorbs grease). A 4-6 inch spatula is ideal. The spatula should be flat and rigid enough to apply consistent pressure without flexing.
Meat Thermometer: Doneness Check
An instant-read thermometer is essential for consistency. Insert into the side of the burger, parallel to the griddle (not from top). Target temps: 130-135°F for medium-rare, 135-140°F for medium. Remember: carryover cooking adds 3-5°F after removal from heat.
Step-by-Step Technique: The Complete Walk-Through
Every step matters. Follow this sequence exactly the first few times — once you understand it, you can adapt.
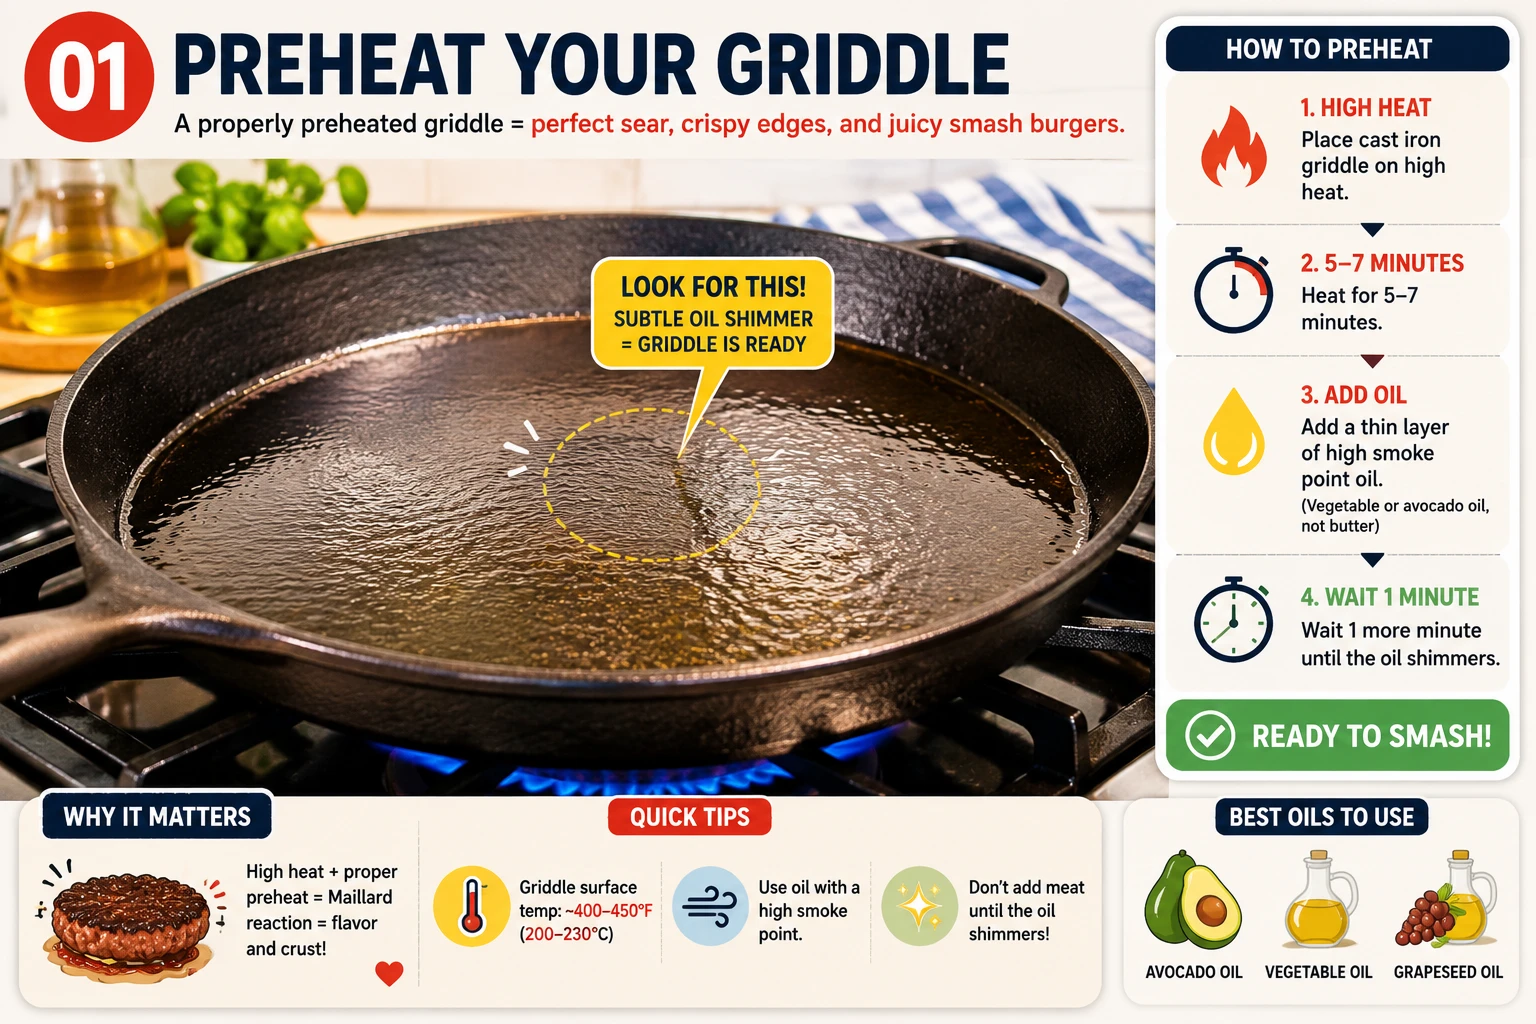
Cast iron: Place on high heat for 5-7 minutes. Add thin layer of oil (vegetable or avocado oil, not butter). Wait 1 more minute.
Stainless steel: Place on high heat for 3-4 minutes. Add thin layer of oil. Wait 30 seconds.
Temperature check: Use a thermometer or listen for immediate aggressive sizzle when you flick water on the griddle. The water should evaporate instantly.
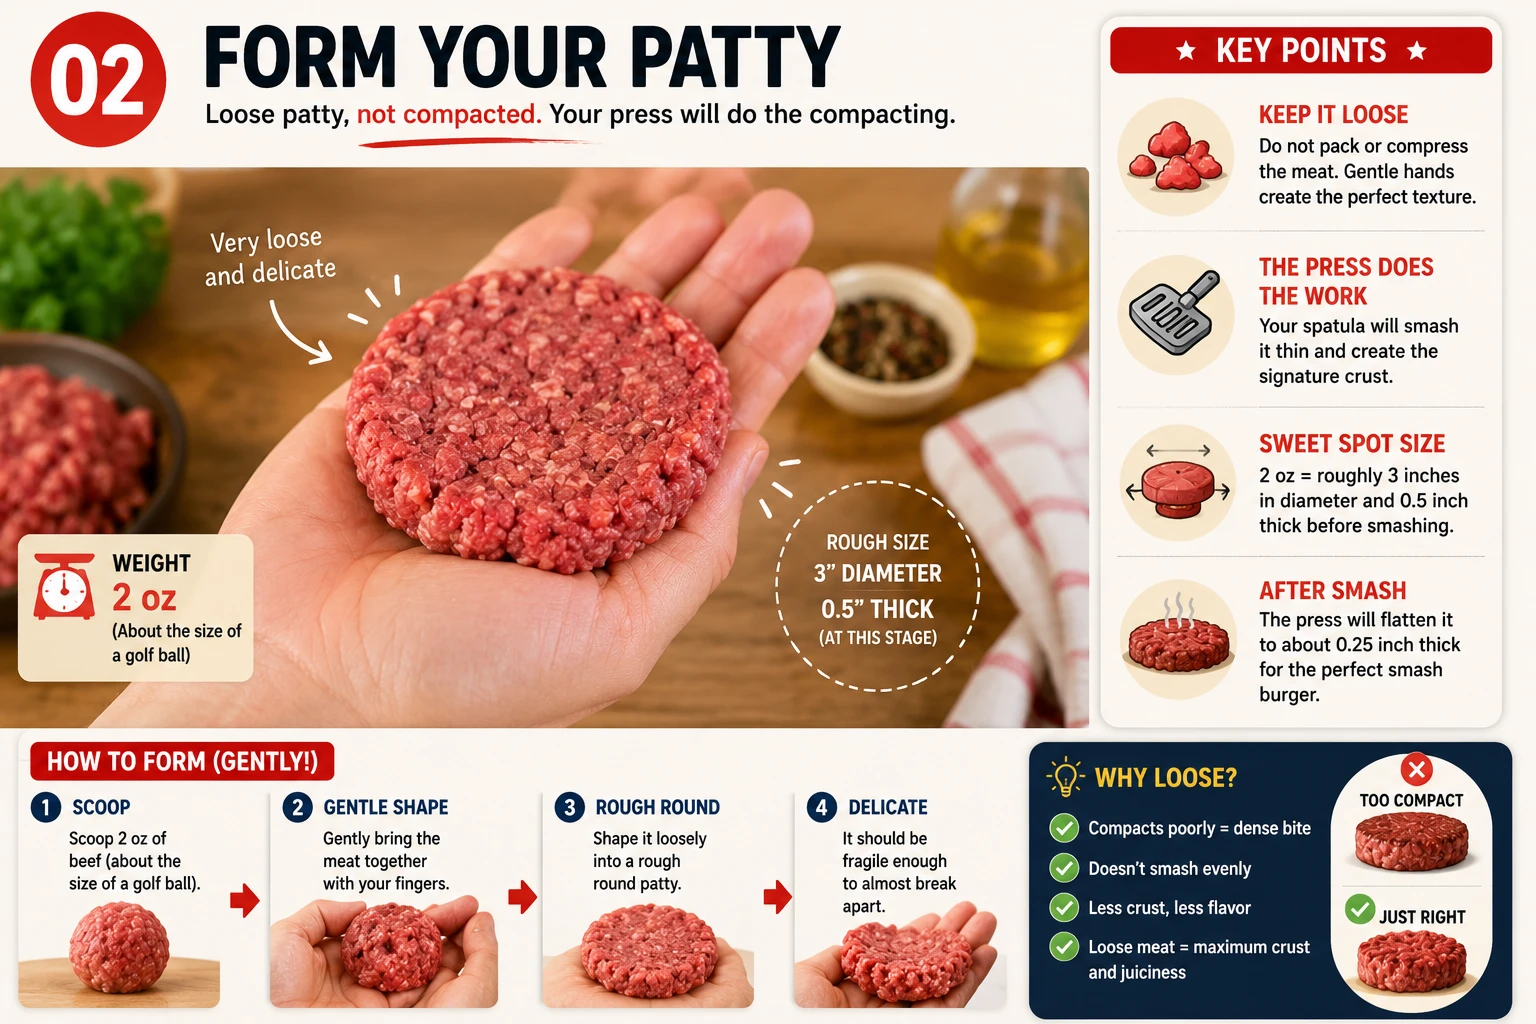
Using 2 oz ground beef (about the size of a golf ball), gently form a very loose patty. Don’t compact it — just shape it roughly round. It should be fragile enough that you could almost break it with your fingers.
Why loose? Compact patties are dense and don’t smash well. Loose patties compress easily under your spatula, creating the thin, uniform thickness you want.
Size: 2 oz is the sweet spot — roughly 3 inches diameter, 0.5 inch thick at this stage. The press will flatten it to 0.25 inch.
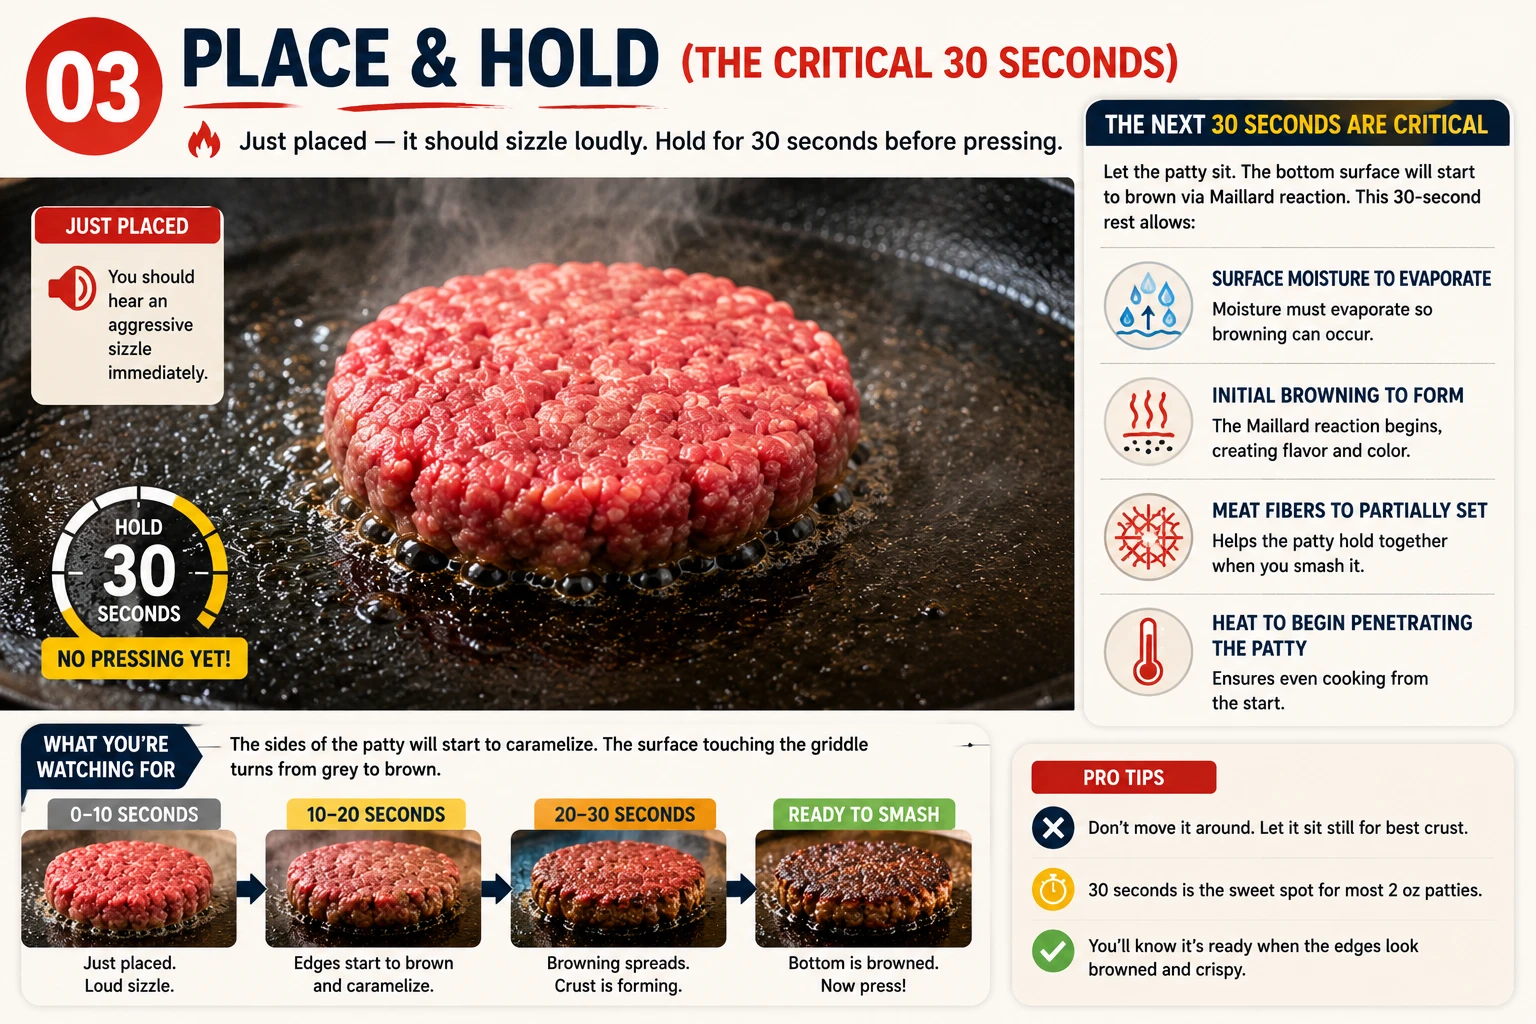
Carefully place your loose patty on the preheated griddle. You should hear an aggressive sizzle immediately. Don’t press yet.
The next 30 seconds are critical: Let the patty sit. The bottom surface will start to brown via Maillard reaction. This 30-second rest allows:
- Surface moisture to evaporate
- Initial browning to form
- Meat fibers to partially set
- Heat to begin penetrating the patty
What you’re watching for: The sides of the patty will start to caramelize. The surface touching the griddle turns from grey to brown.
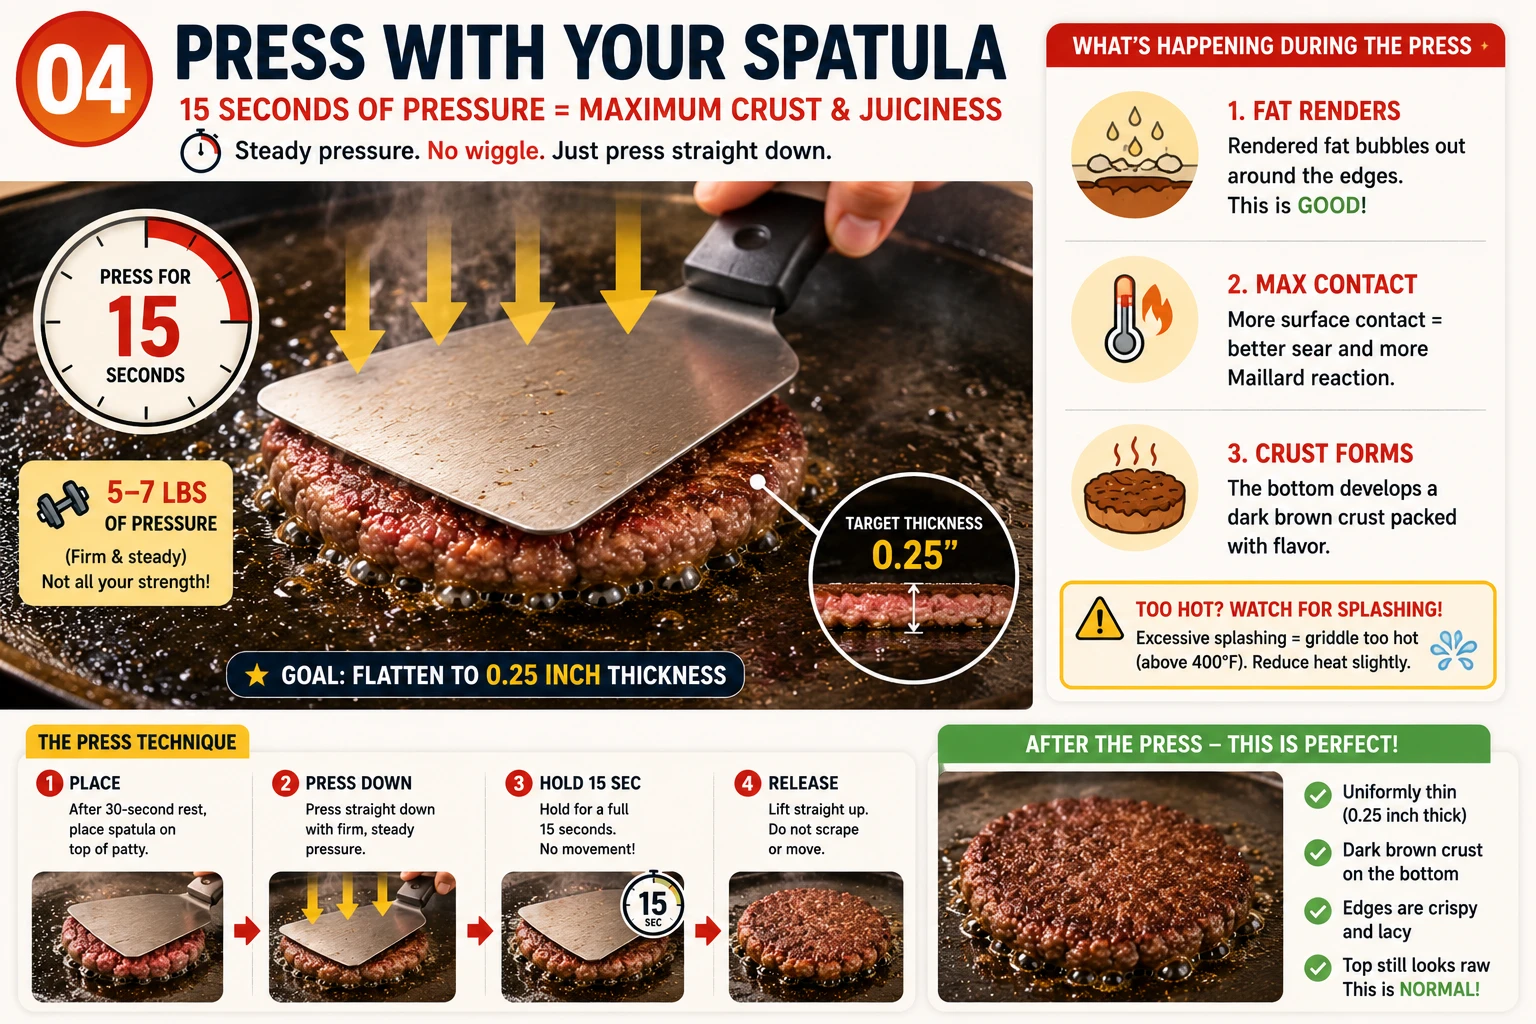
Using your metal spatula, press the patty down firmly with steady pressure for exactly 15 seconds. You’re aiming to flatten the patty to 0.25 inch thickness.
Pressure guide: Apply 5-7 lbs of force (imagine pressing the weight of a dumbbell down). Don’t use all your strength — just firm, confident pressure.
During the press: Rendered fat will bubble out around the edges. This is good — it means the heat is working. If you see significant splashing, your griddle might be too hot (above 400°F).
After the press: Your patty should be uniformly thin (0.25 inch) with a dark brown crust forming on the griddle-side. The top surface will still look raw — this is normal.
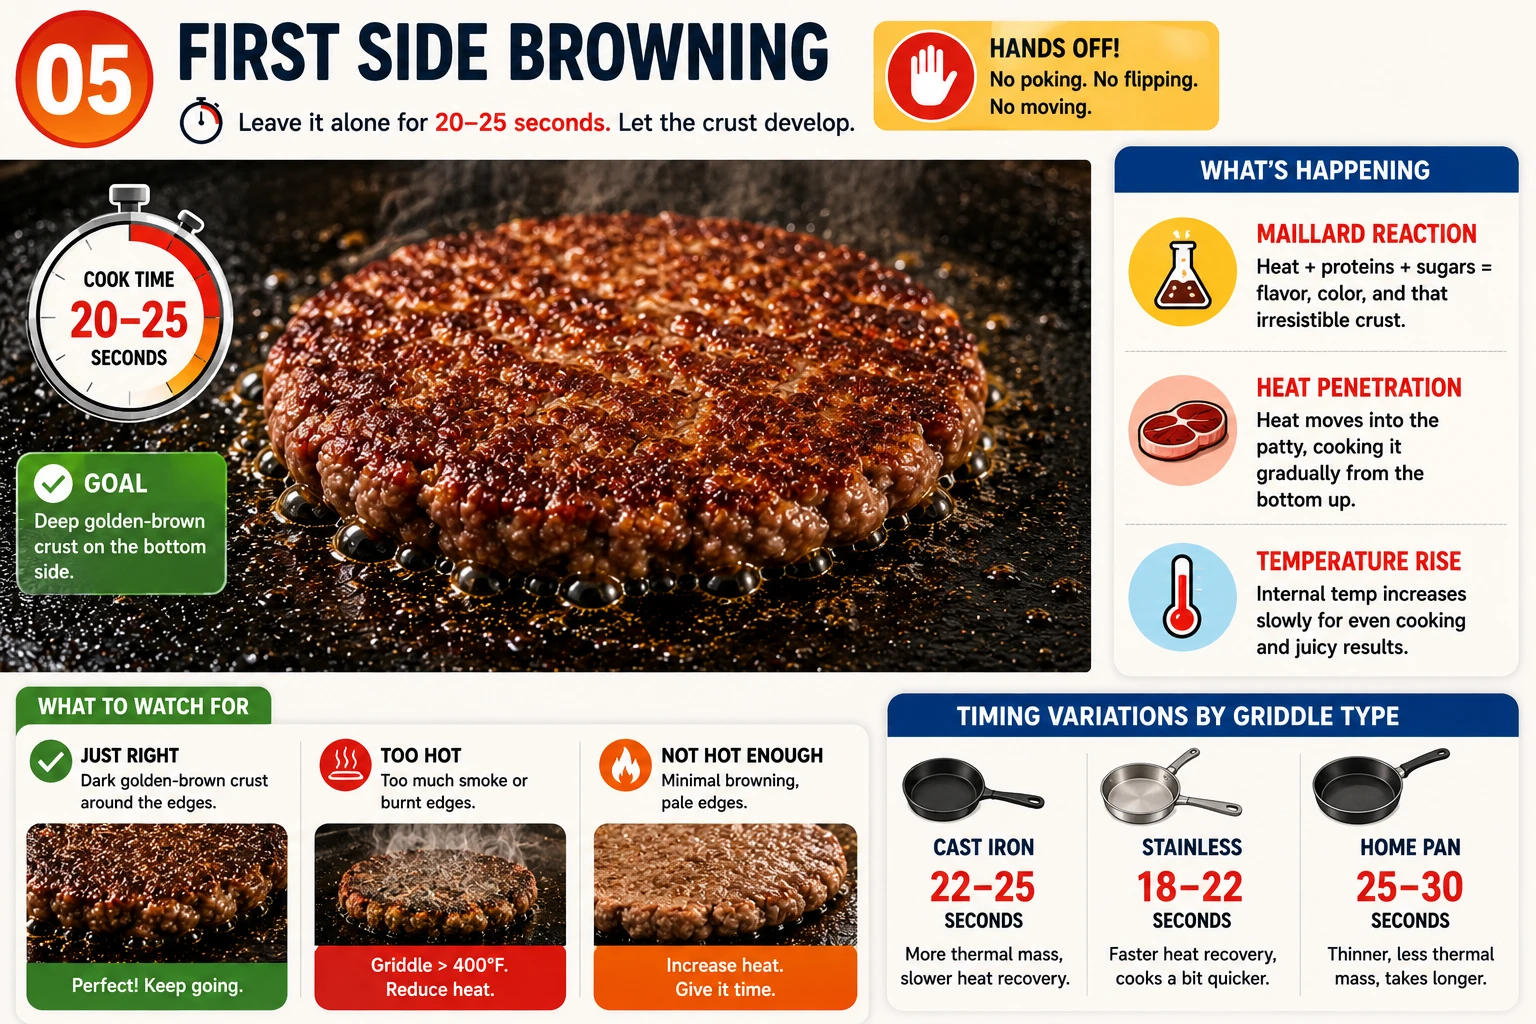
After pressing, leave the burger alone for 20-25 seconds. The bottom crust will continue browning. Don’t poke it, don’t flip it, don’t move your spatula.
What’s happening: The Maillard reaction continues and intensifies. The heat penetrates deeper into the meat. The internal temperature rises gradually.
Watch for: A dark golden-brown crust should be visible at the edges. If you see smoke, your griddle is too hot (above 400°F). If you see minimal browning, your griddle isn’t hot enough.
Timing variations by griddle type:
- Cast iron: 22-25 seconds (more thermal mass, slower recovery)
- Stainless: 18-22 seconds (faster heat recovery)
- Home pan: 25-30 seconds (thinner, less thermal mass)
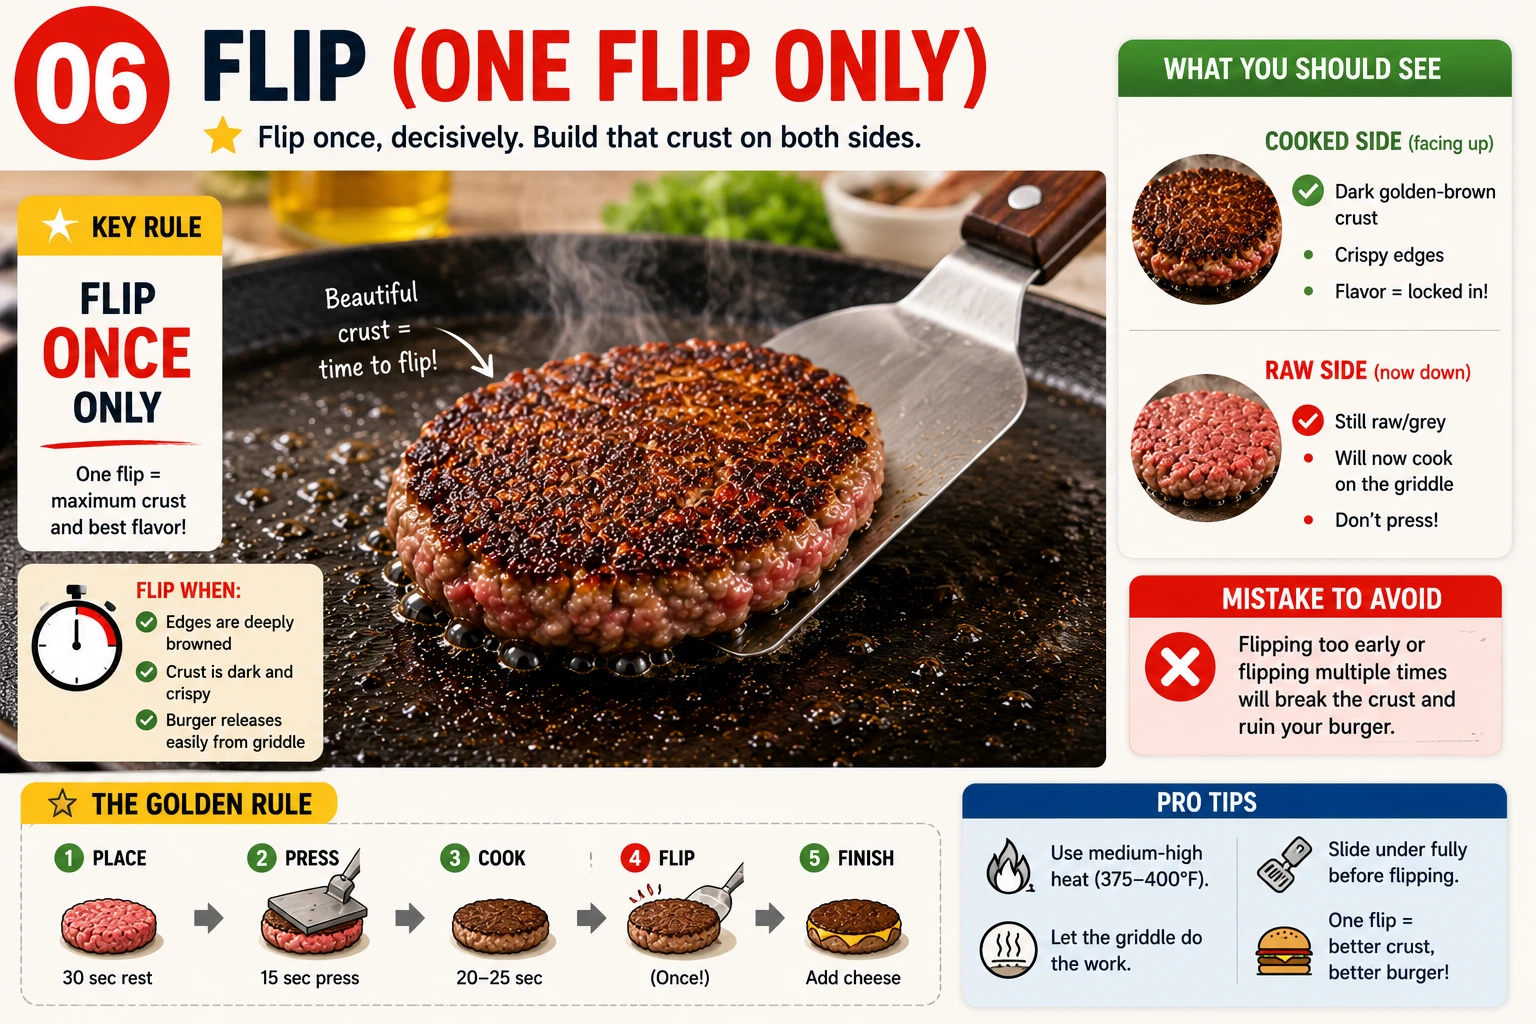
Flip the burger once, decisively. The cooked side (now facing up) should have a dark golden-brown crust. Slide your spatula under and flip quickly.
Critical rule: Flip only ONCE. Multiple flips disrupt the cooking process and prevent a good crust on the second side.
What you should see: The pressed crust is dark brown (almost charred in spots is fine). The uncooked side is still raw/grey and will now cook on the griddle.
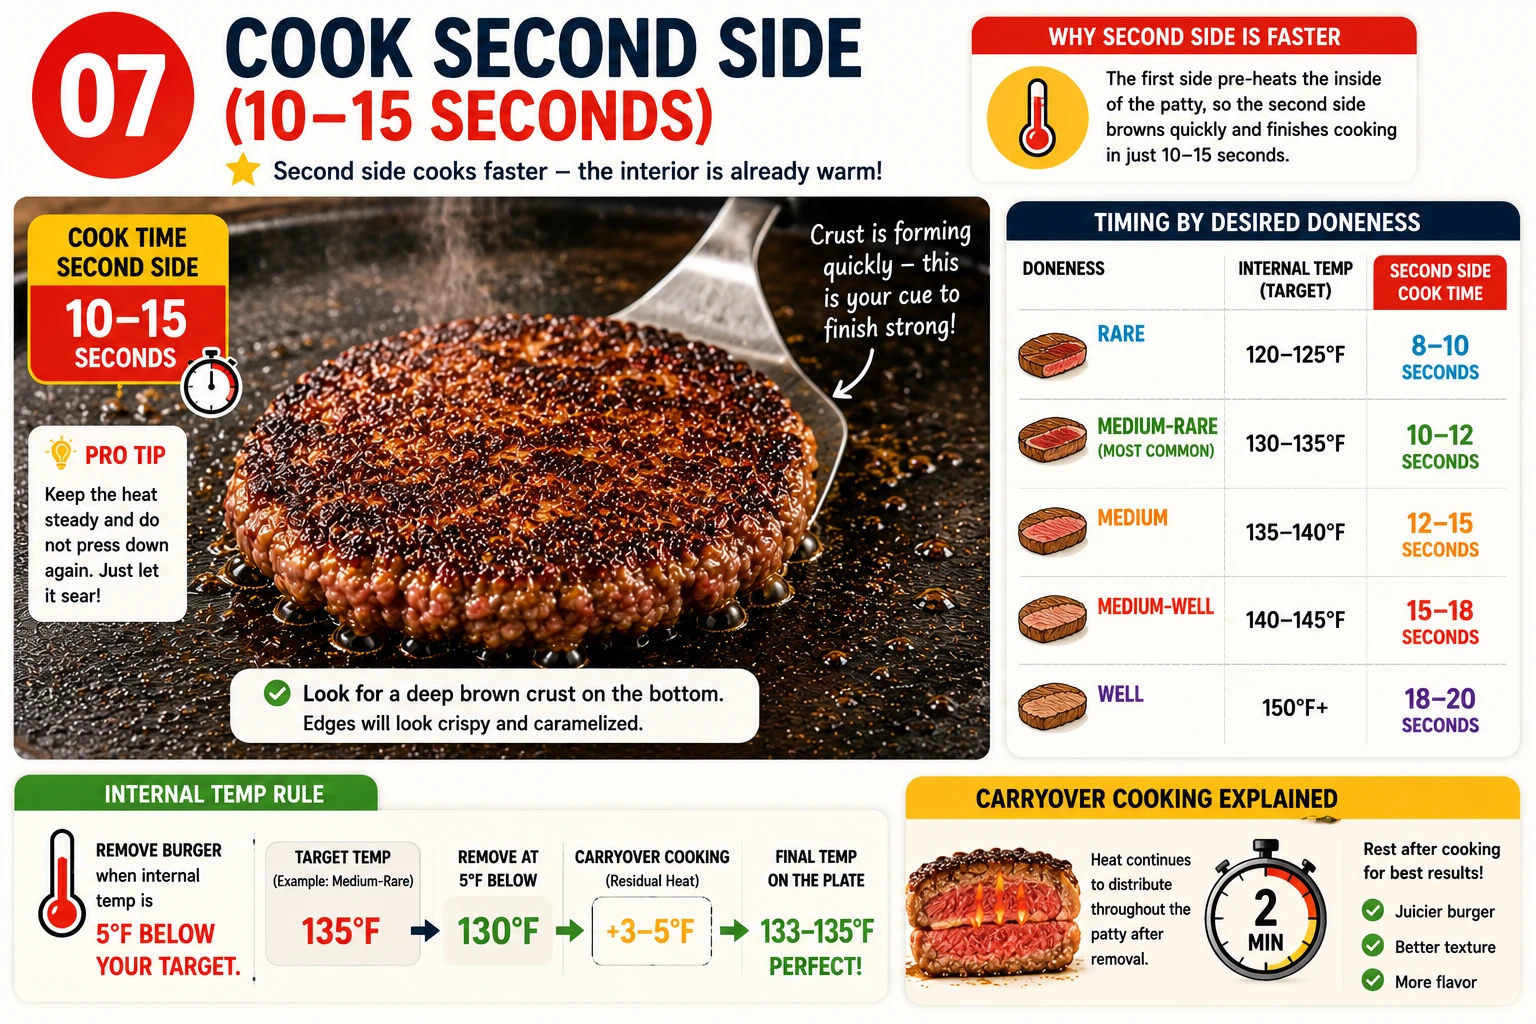
The second side will brown faster than the first because the interior is already warm. Cook for 10-15 seconds.
Timing by desired doneness:
- Rare (120-125°F): 8-10 seconds second side
- Medium-rare (130-135°F): 10-12 seconds second side (most common)
- Medium (135-140°F): 12-15 seconds second side
- Medium-well (140-145°F): 15-18 seconds second side
Internal temp rule: Remove burger when internal temperature is 5°F below target. Carryover cooking (residual heat) will add 3-5°F after removal.
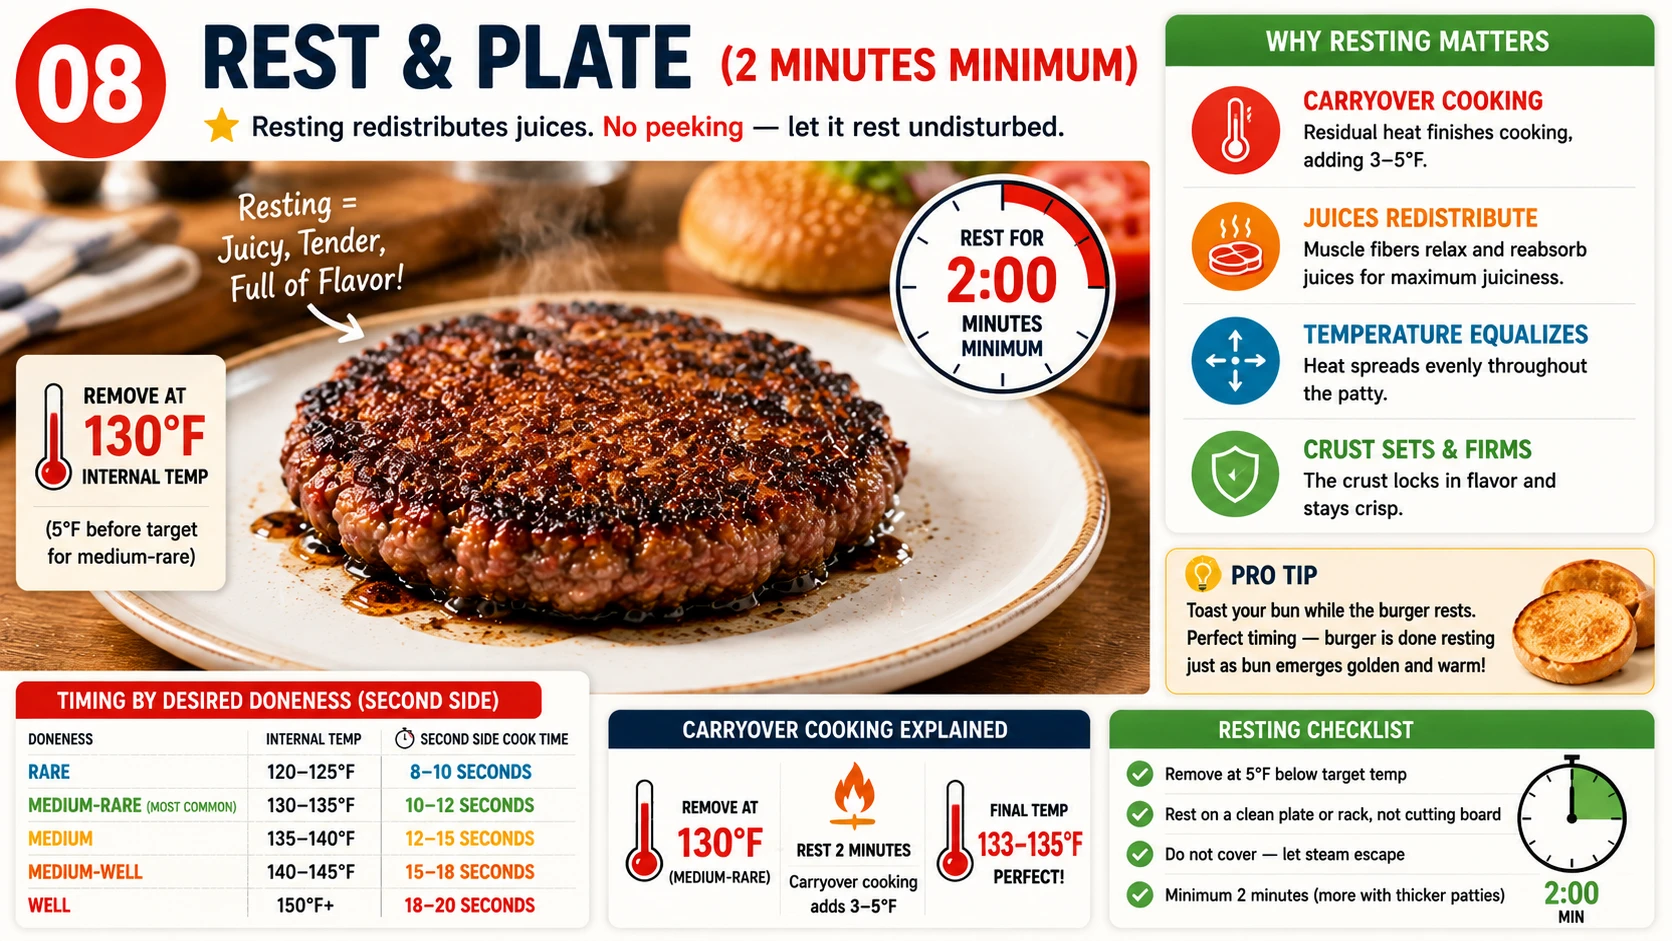
Remove the burger from griddle when it reaches 130°F internal temperature (5°F before target for medium-rare). Place on a clean plate or bun-adjacent surface.
Rest for 2 minutes minimum. During rest:
- Carryover cooking finishes (adds 3-5°F)
- Muscle fibers relax, reabsorb juices
- Temperature equalizes throughout patty
- Crust sets and firms up
Why this matters: A burger that’s plated immediately will bleed juice everywhere. Rested burger stays juicy on the plate and inside, retaining all flavors.
Timing Charts: Exact Cook Times by Equipment Type
Different griddles need different times. Use these as baselines — adjust based on your actual griddle temperature.
Cast Iron (12-inch) — Thermal Mass Champion
| Step | Action | Duration | What To Watch For |
|---|---|---|---|
| 1 | Preheat griddle on high heat | 5-7 min | Place drops water immediately evaporates |
| 2 | Add oil, wait | 1 min | Oil shimmers slightly, smokes faintly |
| 3 | Place loose 2 oz patty, hold (no press) | 30 sec | Hear aggressive sizzle, sides brown slightly |
| 4 | Press firmly with spatula | 15 sec | Rendered fat bubbles at edges, patty flattens to 0.25″ |
| 5 | Cook first side (no touching) | 22-25 sec | Dark golden crust forms, edges caramelize |
| 6 | Flip once | 2 sec | Crust should be dark brown on cooked side |
| 7 | Cook second side | 10-15 sec | Second side browns faster, internal temp rises |
| TOTAL | Place to Remove | 50-60 sec | Internal temp should be 130°F |
Stainless Steel (12-inch) — Fast Heating
| Step | Action | Duration | Notes |
|---|---|---|---|
| 1 | Preheat griddle on high heat | 3-4 min | Heats faster than cast iron |
| 2 | Add oil, wait | 30 sec | Less wait time needed than cast iron |
| 3 | Place loose 2 oz patty | 30 sec | Same as cast iron |
| 4 | Press firmly | 15 sec | Same pressure, same duration |
| 5 | Cook first side | 18-22 sec | Cooks faster due to thinner metal |
| 6 | Flip | 2 sec | Same as cast iron |
| 7 | Cook second side | 8-12 sec | Faster than cast iron |
| TOTAL | Place to Remove | 45-55 sec | Stainless is 5-10 sec faster overall |
Home Stovetop Pan (8-10 inch) — Emergency Option
| Step | Action | Duration | Adjustment Notes |
|---|---|---|---|
| 1 | Preheat pan on high | 4-5 min | Takes longer due to thin metal |
| 2 | Add oil | 30 sec | Use more oil — pan sticks easier |
| 3 | Place patty | 30 sec | Sizzle should be aggressive |
| 4 | Press | 15 sec | May need slightly less force on smaller surface |
| 5 | Cook first side | 25-30 sec | Slower due to less thermal mass |
| 6 | Flip | 2 sec | Small pan = small surface, awkward angle |
| 7 | Cook second side | 12-18 sec | Similar to stainless, not as fast as ideal |
| TOTAL | Place to Remove | 60-75 sec | Slower than griddle, less ideal |
Common Mistakes & How to Fix Them
Even experienced cooks make these errors. Knowing them helps you avoid them.
Troubleshooting Decision Tree
Something went wrong? Use this interactive guide to diagnose the problem and fix it next time.
No, it sizzles quietly → Griddle too cold. Preheat longer (375-400°F).
Yes, loud sizzle → Q2: Did you press for full 15 seconds?
No, pressed less → Press for full 15 sec. Incomplete pressing = incomplete flattening.
Yes, full 15 sec → Q3: Is your beef fresh (same day or frozen)?
No, 3+ days old → Old beef doesn’t brown well. Use fresh next time.
Yes, fresh → Possibly high moisture content in beef. Dry surface before griddling.
70/30 or leaner → Too lean for smash. Use 75/25 or 80/20 next time.
75/25 or 80/20 → Q2: Did you over-press (press harder than 5-7 lbs)?
Yes, pressed very hard → Reduce pressure next time. Firm but not maximum force.
No, moderate pressure → Q3: Did you rest burger for 2 minutes?
No, served immediately → Always rest 2 min. Juices redistribute during rest.
Yes, rested 2 min → May have cooked too long. Check internal temp — don’t exceed 135°F.
Nonstick pan → Nonstick fails at high heat for burgers. Use cast iron or stainless.
Cast iron, not well-seasoned → Season griddle. Use more oil. Cast iron needs seasoning for naturally nonstick surface.
Stainless steel → Used enough oil? Use more oil (1/4 tsp) for stainless. Also ensure full 30-second initial hold before pressing.
Cast iron, well-seasoned → Griddle temp fine? Ensure oil shimmers. Better oil: vegetable or avocado (high smoke point).
Yes, flipped 2+ times → Multiple flips cause uneven cooking. Flip only ONCE.
No, flipped once → Q2: Did you press evenly across entire patty?
No, pressed unevenly → Uneven pressing = uneven thickness = uneven cooking. Press flat with steady force.
Yes, even press → Q3: Griddle hot spots? Some areas hotter than others?
Possibly → Rotate burger 90° midway through second side to even out hot spots.
No salt → Salt is essential. Season lightly right before griddle. Salt enhances Maillard and draws out moisture.
Yes, salted → Q2: When did you salt?
30+ minutes before → Too early. Salt draws out moisture, drying interior. Salt right before griddle.
Right before griddle → Q3: Quality of beef? Fresh or old?
Old/oxidized → Old beef tastes muted. Use fresh beef for better flavor.
Regional Smash Burger Variations
Smash burgers aren’t one-size-fits-all. Different regions have developed their own styles, each with merit.
Advanced Techniques for Smash Burger Masters
Once you nail the basics, these refinements will elevate your smash burgers to the next level.
1. Double Smash Technique
The Method: After placing patty and holding 30 seconds, press down. Instead of cooking the first side 20-25 seconds, flip at 15 seconds (before crust fully sets). Immediately press again on the second side for 10 seconds. Result: crispy exterior on both sides.
When to use: When you want maximum crispiness at the cost of slightly less juiciness. Best for crust-lovers.
Tradeoff: Double pressing squeezes out more moisture. Burger is crispier but can be drier.
2. The “Griddle Hot Spot” Rotation
The Method: Home griddles have uneven heat — some areas hotter than others. During second-side cook, rotate burger 90° at the halfway point. This exposes different areas to different heat zones, evening out final doneness.
Result: More even browning, especially on second side. Reduces grey spots or over-cooked edges.
3. Caramelized Onion Base
The Method: Slice raw onions thinly. Lay on griddle before placing burger. As burger cooks, onions caramelize from the heat. When you flip burger, onions are soft and deeply browned, ready to go on the burger.
Why it works: Onions don’t burn during the 50-second cook. They soften and caramelize perfectly, adding sweetness and depth. Classic American style.
4. Dry-Brining (Salt Ahead)
The Method: Salt your loose patty 5-10 minutes before griddle. Not 30+ minutes (too drying) but not just before (no effect). This middle ground removes surface moisture without drying the interior.
Result: Faster Maillard reaction. Crust forms 10% quicker. Slight improvement in browning and color.
5. Pressing Without Spatula (Two-Handed Press)
The Method: For maximum crust, use a cast iron press or heavy weight instead of spatula. Place over burger and hold for 15 seconds. Creates more even pressure than spatula (which can have uneven pressure points).
Challenge: Harder to see what’s happening underneath. Use only if experienced.
6. Bun Toasting During Cook
The Method: Toast bun on griddle’s cooler edge (300-325°F) while burger cooks. Butter or mayo on cut side. Toast 30-45 seconds. Burger finishes resting just as bun is golden and warm.
Result: Perfect timing. Warm bun ready when burger is ready. Prevents soggy bun.
Smash Burger Technique FAQ
Covering the most asked questions about smash burger technique. First 3 always open.
Yes, but it’s not ideal. A smaller skillet (8-10″) means you can only make one burger at a time and have less room to work. Use cast iron for better heat retention than stainless. Preheat longer (5 min) and watch carefully — it will have more temperature fluctuation than a large griddle.
Remove from griddle at 130°F for medium-rare (most common). Carryover cooking will add 3-5°F, bringing it to 133-135°F at table. For medium, remove at 135°F, resulting in 138-140°F. For rare, remove at 125°F, resulting in 128-130°F. Use an instant-read thermometer, inserting horizontally from the side.
Three reasons: (1) Old beef loses flavor over time — use same-day beef or frozen. (2) Salted too early (30+ min ahead) — salt draws out moisture and damages interior flavor. Salt right before griddle only. (3) Not enough salt — season generously, don’t be shy. Taste should be savory, almost salty. Or consider using custom beef blend (chuck + brisket) for deeper flavor.
Yes, but you need proper equipment and sequencing. A 12″ griddle can fit 2-3 burgers at a time. Preheat once, then cook burgers in batches. Keep finished burgers warm (175°F oven) while you cook others. Timing: ~2 minutes per batch of 3 burgers (cook time + rest + remove). A restaurant-grade griddle or two-burner setup is ideal for crowds.
Use oil. Butter has a lower smoke point (~350°F) and burns at griddle temperature (375-400°F). Use vegetable oil or avocado oil (smoke point 400-500°F). These won’t burn and won’t add flavor. Avoid olive oil (low smoke point) and coconut oil (strong flavor).
No, keep meat pure. Adding onions, garlic, or breadcrumbs to the meat disrupts the smash burger texture and makes it harder to flatten properly. Keep toppings separate — put them on after cooking. The magic of smash burgers is beef + crust + toppings working as distinct layers.
Cast iron improves with use. Every burger adds a tiny layer of seasoning. After 50+ burgers, you’ll have excellent natural nonstick surface. Just wipe clean between uses and re-oil lightly. Full re-seasoning (oven method) only needed if rust appears or surface degrades significantly.
Yes, freeze unassembled. Wrap cooled burger patties individually, freeze up to 3 months. Thaw in fridge, then reheat on griddle at 325°F for 2-3 minutes. The crust won’t be as good as fresh (moisture condenses during freeze-thaw) but tastes decent. Best to cook fresh, not freeze.
“Smash burger” is the cooking method/style. “Smashed” is past tense of the action. A “smash burger” uses the smash technique. A burger that has been “smashed” had pressure applied to it. Same thing, different grammar.
Not difficult once you understand the science. First 2-3 burgers: learning curve (might be imperfect). After 5 burgers: muscle memory develops. After 10 burgers: you’ll make consistently good burgers. The technique is simple — it’s just understanding timing and temperature. Even your first burger will be edible.
Technically yes, but not ideal. Grills have grates (gaps) instead of flat surface. Burgers fall through and don’t get full griddle contact for Maillard reaction. Use a cast iron skillet on the grill grate instead for better results. Or use a flat griddle insert made for grills.
Insufficient pressing means incomplete flattening. Burger stays 0.35-0.4″ thick instead of 0.25″. Result: less crust surface area, less Maillard reaction, paler crust. Interior is juicier but exterior isn’t as crispy. It’ll still taste good — just not optimal smash burger.
Fresh-ground (from butcher) is ideal — fresher = better flavor. But pre-packaged works fine if it’s same-day. Check expiration date. Fresh-ground lets you specify fat ratio and grind coarseness. Pre-packaged is more consistent but less control. Either works for good smash burgers.
Not recommended for best quality. Reheating steams the burger and softens the crispy crust. If you must, cook fresh, cool completely, wrap, refrigerate (up to 1 day). Reheat on griddle at 325°F for 2-3 minutes to restore some crispness. Ideally, cook and serve immediately.
Three tests: (1) Water droplet test — drop water on griddle. If it evaporates instantly (within 1 second), perfect. If it boils and sits, too cold. (2) Oil shimmer — oil should shimmer and just barely smoke. (3) Hand test (advanced) — hold hand 3″ above griddle. If you can only hold it for 2-3 seconds before heat forces you away, about right. Use a thermometer (375-400°F) for precise control.
It’s not ruined, but the crust will be uneven. Once you flip twice, the crust pattern is broken and won’t develop as nicely. For future burgers: flip only once. If it happens, just finish cooking — it’ll still taste good, just not as perfectly crusted.
No. A basic cast iron skillet ($20-40) and a cheap metal spatula ($5) are all you need. You don’t need a $200 griddle or specialty equipment. Expensive equipment makes it easier but doesn’t improve the burger. Technique and understanding matter more than price.
Yes. Add cheese on second side after you flip (with about 5 seconds remaining). The residual heat from the burger will melt cheese slightly. Or add cheese after removing from griddle and let it melt from residual heat during resting period. Don’t add cheese to first side — it’ll burn.
Rest is highly recommended but not absolutely required. You can eat immediately — burger will taste good. But resting redistributes juices and makes texture more even. Without rest, burger bleeds juice onto plate and the interior is hotter than exterior. With rest, juices redistribute and temperature evens out. 2 minutes is worth it.
Related Guides & Recipes
Master smash technique, then explore the 11 kimchi burger builds powered by this technique.
The perfect sauce to pair with smash burgers — 3:1 ratio, tested and proven.
5-minute slaw topping that elevates every smash burger to the next level.
Every smash burger build on KimchiGuide — see this technique in action.
The original smash burger using this exact technique plus gochujang mayo & slaw.
Was this guide helpful?
Your feedback helps us improve KimchiGuide for everyone.