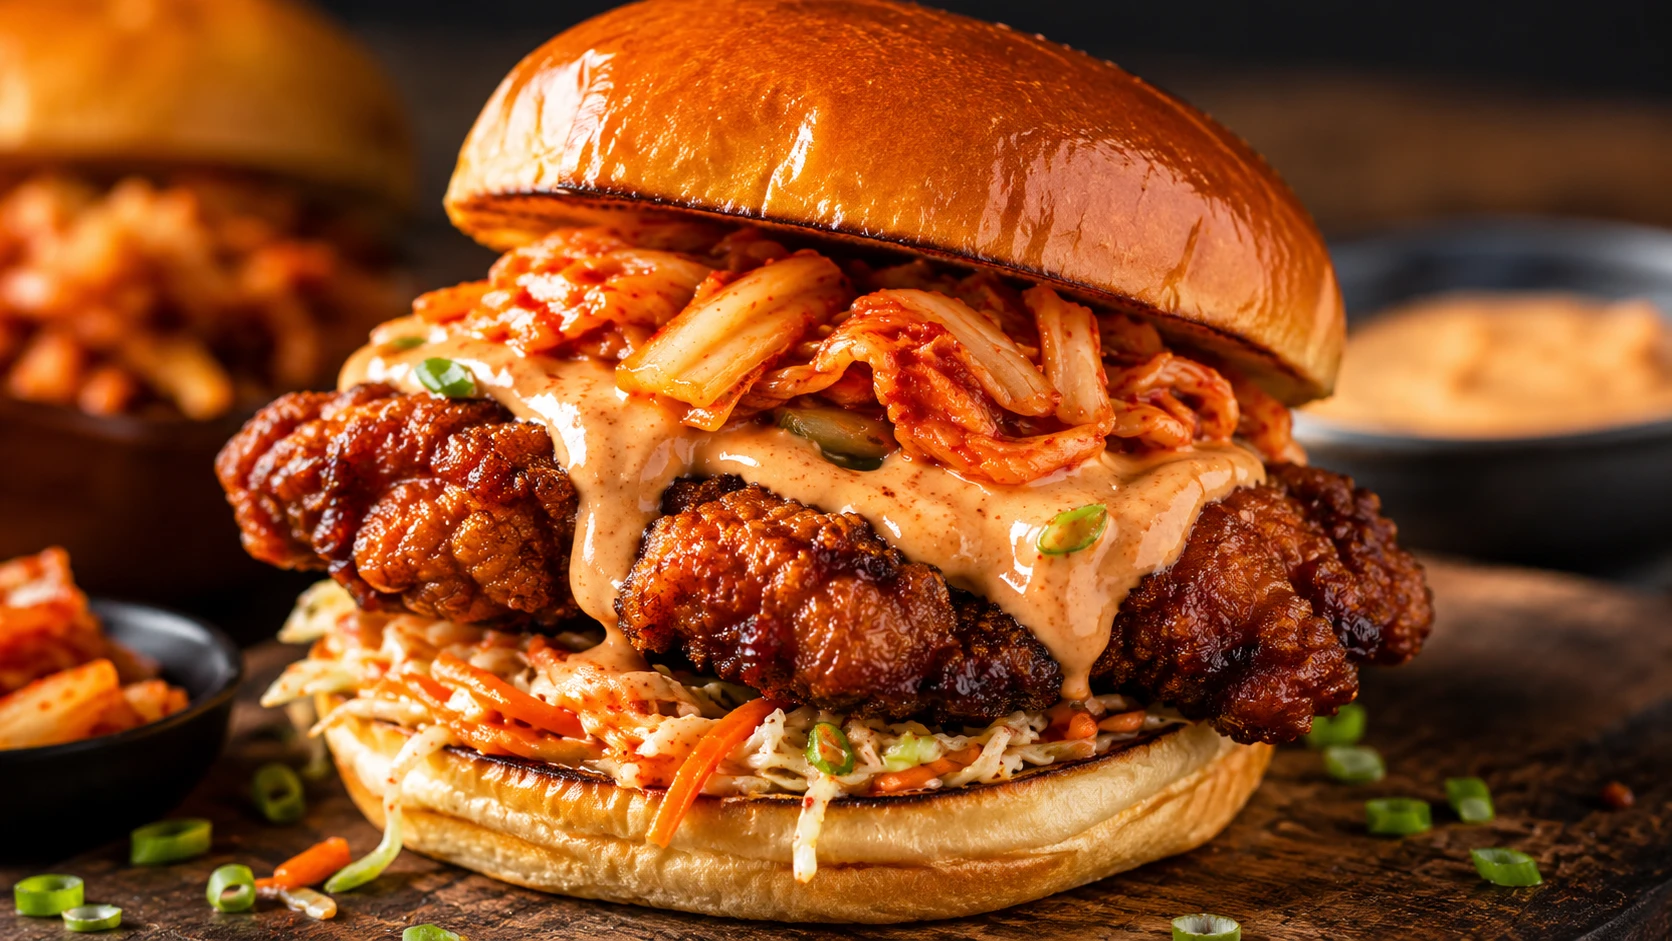
Kimchi Chicken Burger Recipe Double-Fried for a Crust That Survives the Kimchi Mayo
Every kimchi chicken burger recipe we found online picks one frying method and stops there. We tested single-fry against double-fry and air-fry, three buttermilk brine times, three dredge blends — and, new in this update, a sticky gochujang glaze tested against this recipe’s original dry-crust method, plus a kimchi bacon jam topping swap.


What Is a Kimchi Chicken Burger?
A kimchi chicken burger is a buttermilk-brined chicken thigh, double-fried for a shatter-crisp crust, topped with Kewpie-based kimchi mayo and squeezed Stage 3 kimchi slaw on a toasted brioche bun. The three non-negotiables: brine the chicken at least 2 hours, fry it twice — once to cook through, once to crisp — and assemble the burger immediately rather than letting the coating sit under the sauce. A thin sticky glaze or a kimchi bacon jam swap are both tested optional variations if you want them.
How to Make a Kimchi Chicken Burger
A kimchi chicken burger takes 45 minutes, most of it brine and fry time: brine chicken in buttermilk, dredge in a cornstarch-flour blend, fry twice, then build the kimchi mayo and slaw while it rests between fries.
- Brine: soak chicken thighs in gochujang buttermilk, 2+ hours.
- Dredge: press into a flour-cornstarch-baking powder blend.
- Sauce: whisk Kewpie mayo, chopped kimchi, gochujang, rice vinegar.
- Slaw: squeeze kimchi dry, toss with cabbage and sesame oil (or make kimchi bacon jam instead).
- Double-fry: 160°C to cook through, rest, then 190°C to crisp — glaze thinly or serve dry.
What Every Kimchi Chicken Burger Recipe Online Misses
We read the established recipes ranking for “kimchi chicken burger” — Pinch of Yum, Waitrose & Partners, Greenfields, MAK and Her Cheese, School of Wok, The Chutney Life, delectabilia, Krumpli, and McCormick. Every one of them commits to a single frying approach without ever testing it against the alternatives, and they’re genuinely split on glazing versus serving dry. Here is the gap this guide closes.
| Feature / Information | Typical Blog Recipe | Restaurant/Brand Recipe | This Guide |
|---|---|---|---|
| Single-fry vs double-fry vs air-fry tested | ✗ Picks one, no comparison | ✗ Picks one, no comparison | ✓ All 3 tested for crust survival |
| Buttermilk brine time tested | △ One time given, untested | ✗ Not covered | ✓ 30 min vs 2 hr vs overnight |
| Dredge blend tested (flour/cornstarch/rice flour) | ✗ Not covered | ✗ Not covered | ✓ 3 blends compared |
| Sticky glaze vs dry crust tested head to head | △ Some glaze (e.g. School of Wok), some don’t — neither tests the other | △ Same split, no comparison | ✓ Both tested, trade-off explained |
| Kewpie mayo vs yogurt-based sauce compared | ✗ Picks one | ✗ Picks one | ✓ Both tested, flavour profile explained |
| Kimchi bacon jam vs kimchi slaw compared | △ One recipe (Pinch of Yum) uses jam, doesn’t compare to slaw | ✗ Not applicable | ✓ Tested both ways, kept optional |
| Test kitchen data (multiple batches compared) | ✗ None | ✗ None | ✓ Documented batch results |
| Recipe + FAQPage + ItemList schema together | ✗ None | △ Recipe schema only | ✓ All three, plus Article |
What Makes This Build Different
Five decisions separate a kimchi chicken burger that’s still crisp on the last bite from one that’s gone soft by the second.
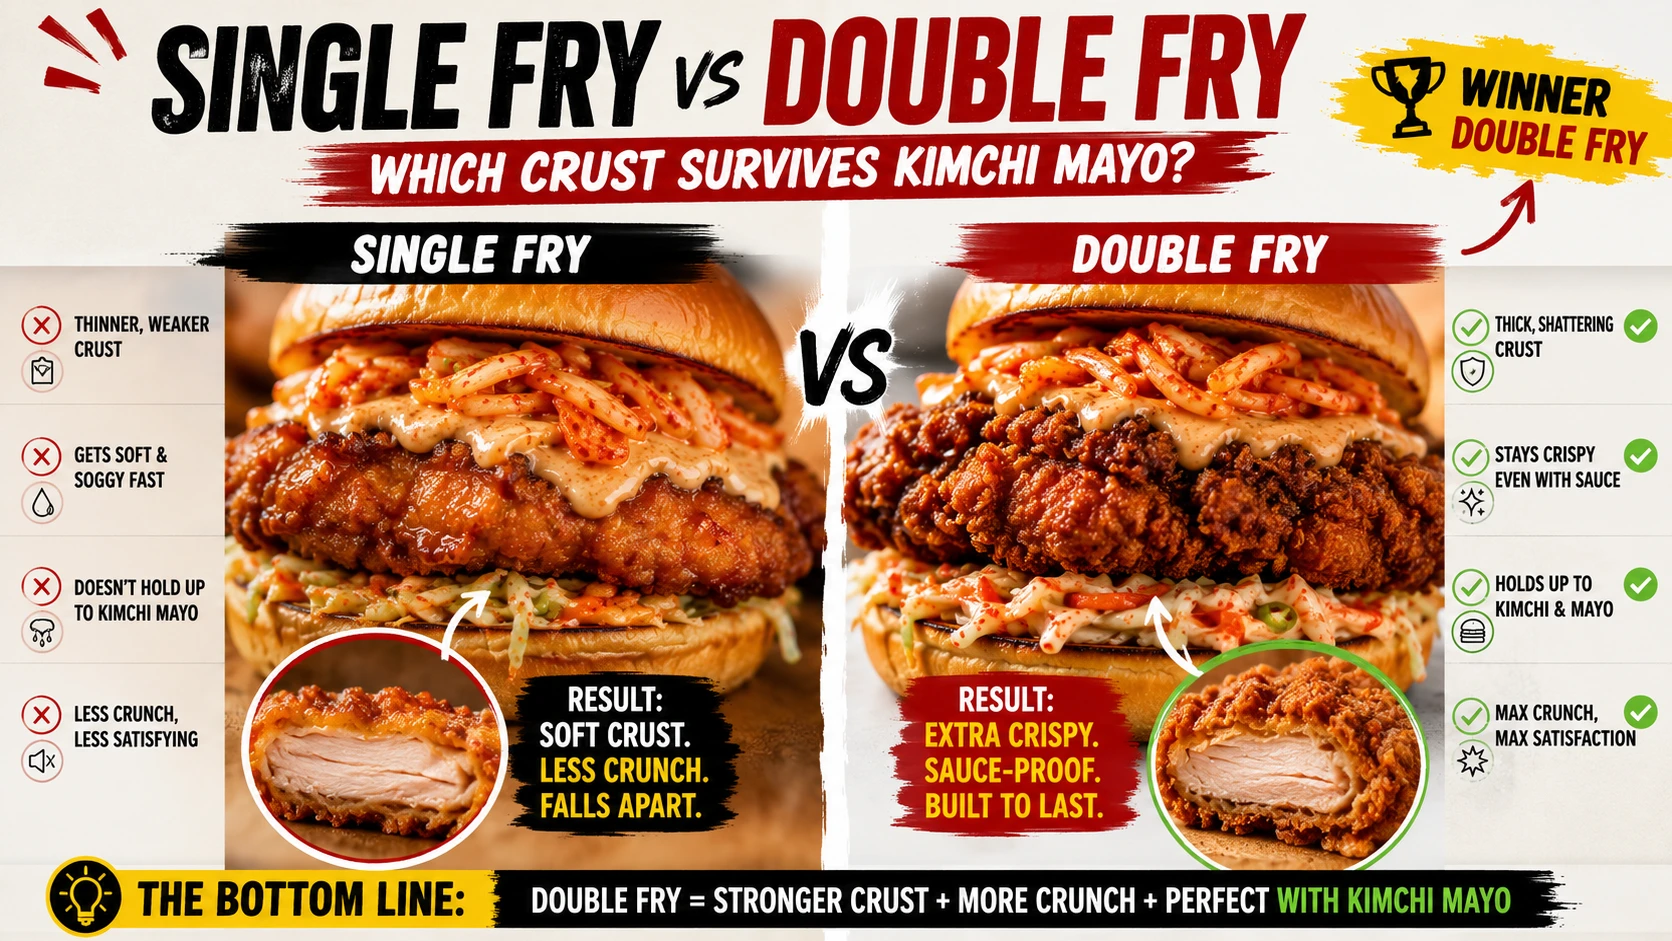
Double-frying rebuilds a shatter-crisp shell and purges surface oil that a single fry leaves behind. Against kimchi mayo, the double-fried crust held its crunch roughly twice as long.
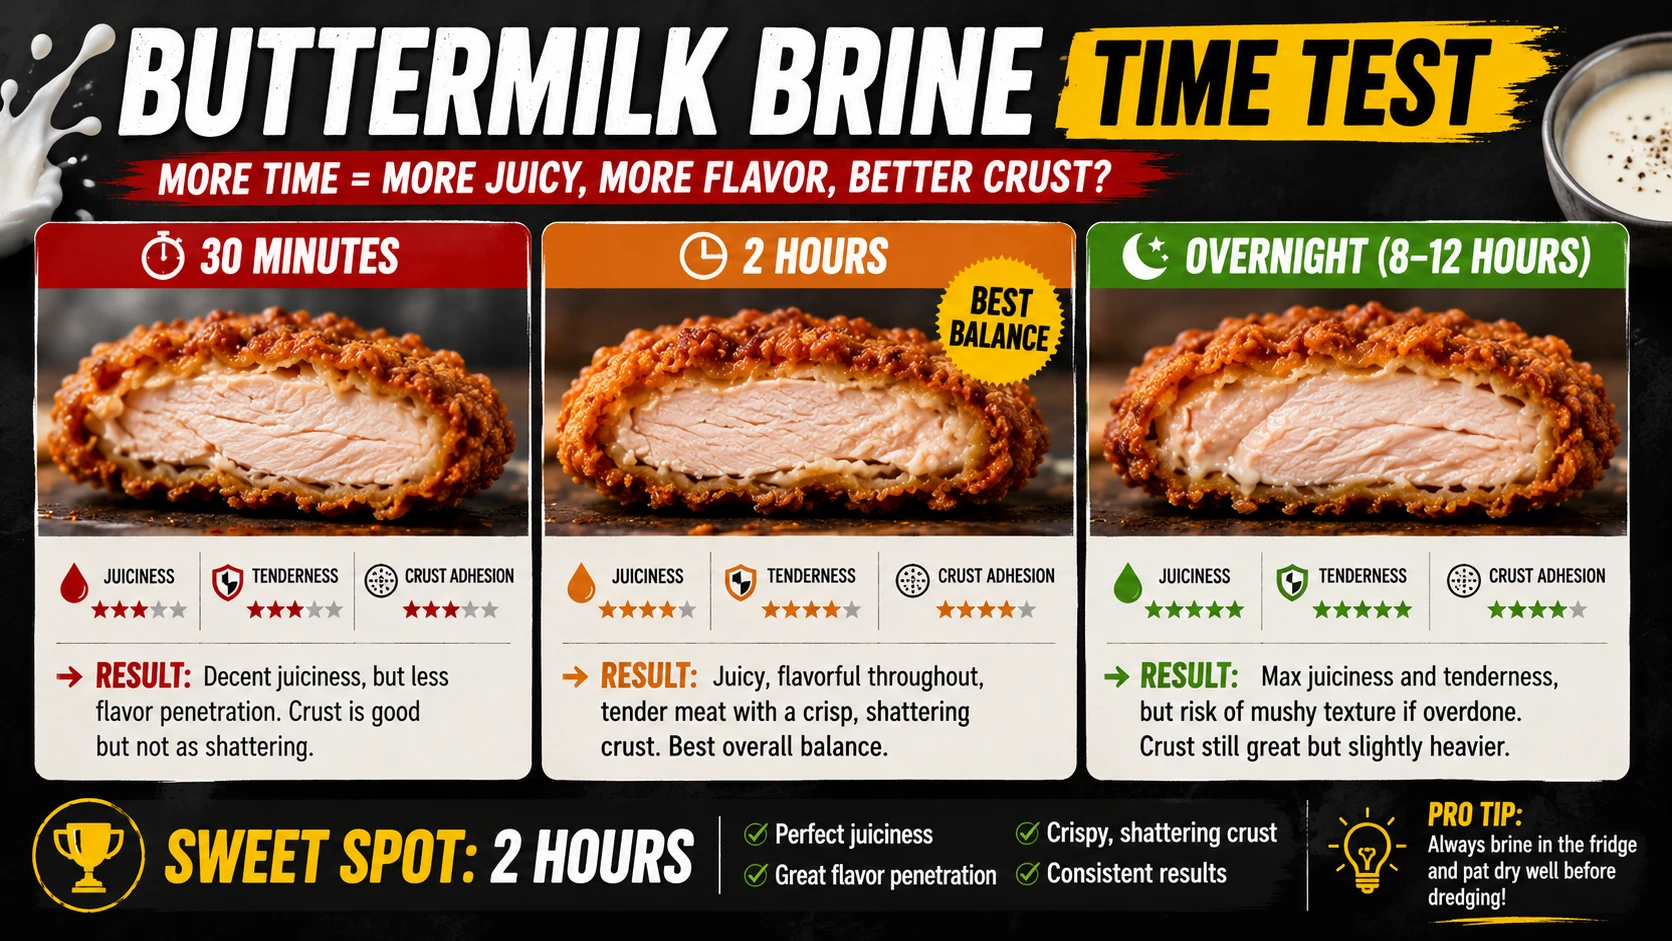
30 minutes wasn’t enough tenderizing time. Overnight was best but only marginally ahead of 2 hours — a meaningful difference for a weeknight recipe.
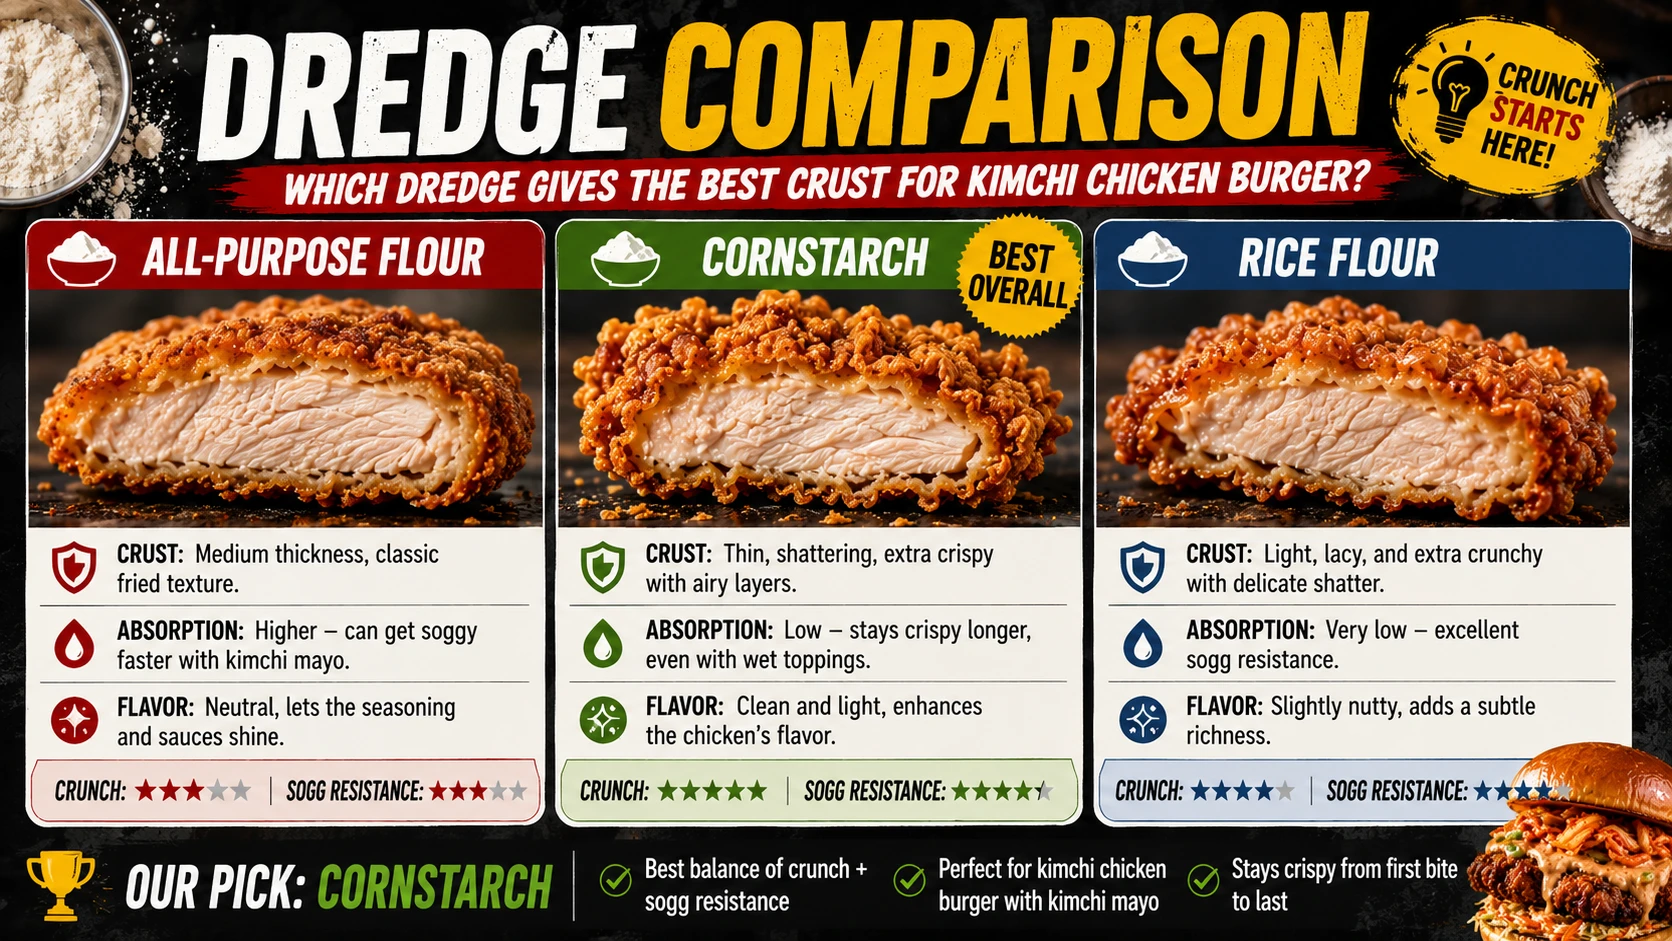
A 2:1 flour-to-cornstarch blend held onto the chicken better through handling than rice flour alone, while staying crisper than plain flour alone.
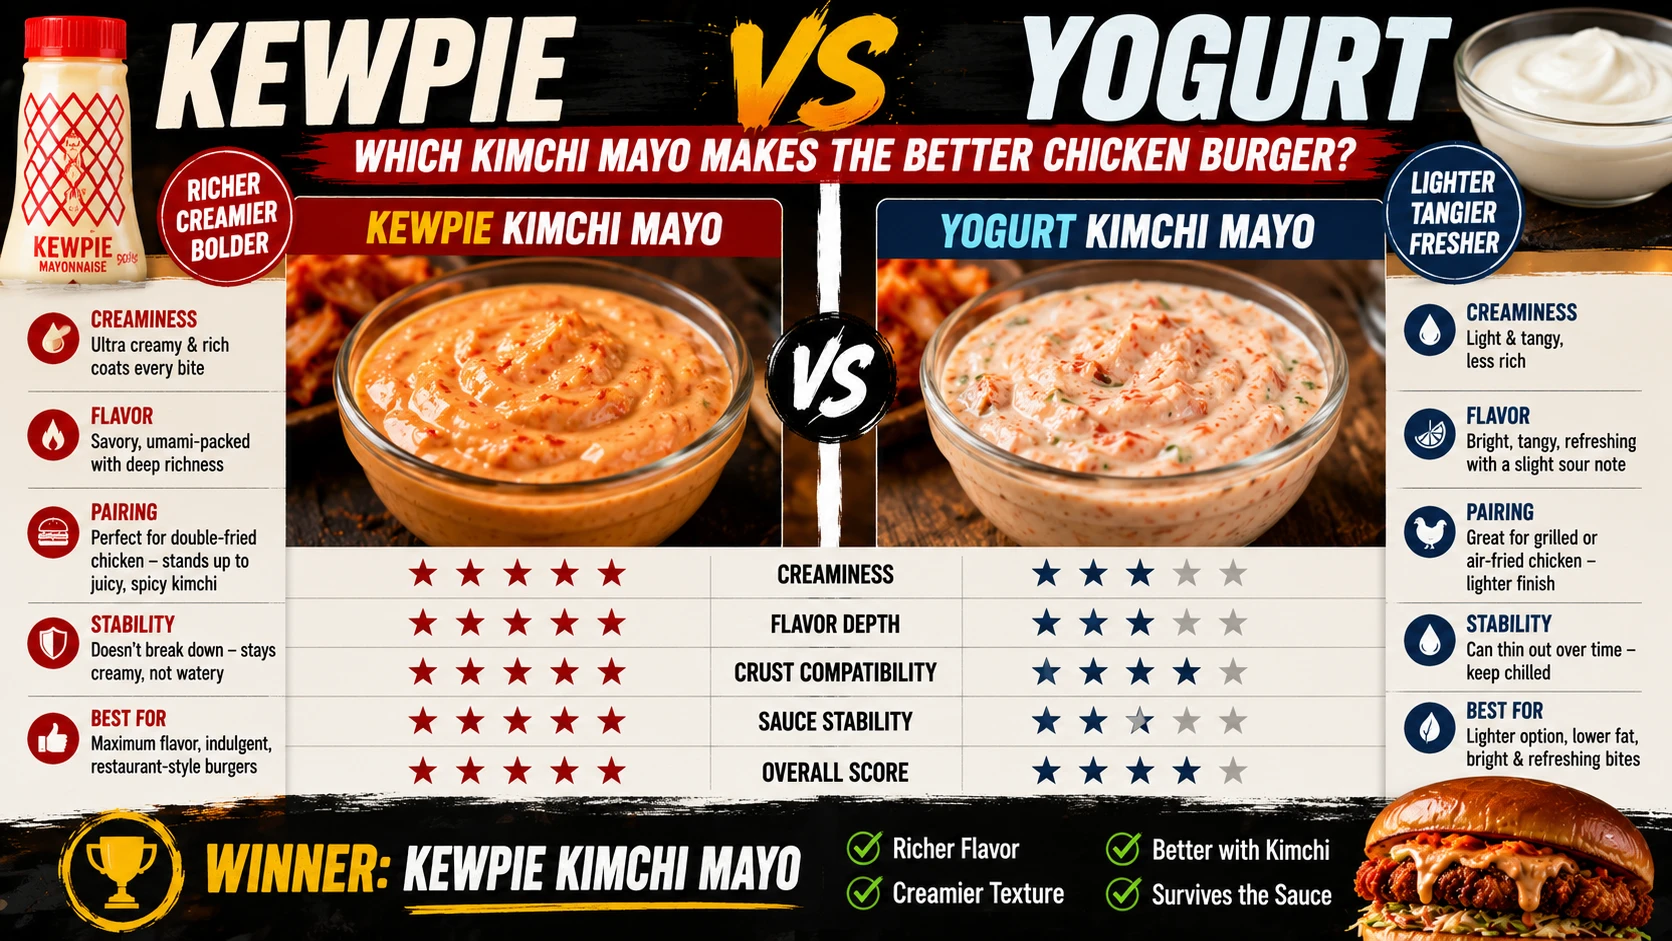
Kewpie-based kimchi mayo won for richness and umami depth. A yogurt-based version is lighter and tangier — a real alternative, not a downgrade, if that’s the profile you want.

This page originally said never glaze. A thin, well-reduced gochujang glaze applied right before serving actually held up far better than expected — dry still wins outright, but glazing is no longer an unexamined rule-break.
Key Terms — Language & Food Science Entities
Understanding these terms clarifies why each technique choice matters for a fried chicken build specifically.
How Difficult Is a Kimchi Chicken Burger?
The double-fry technique needs a thermometer and a bit of patience between fries — nothing here demands the split-second timing a smash burger does.
← This Recipe
Which Kimchi Stage to Use — Visual Guide
A rich, double-fried crust needs real acidity to cut through it — Stage 3 kimchi is the correct choice here just as it is for the classic beef build.
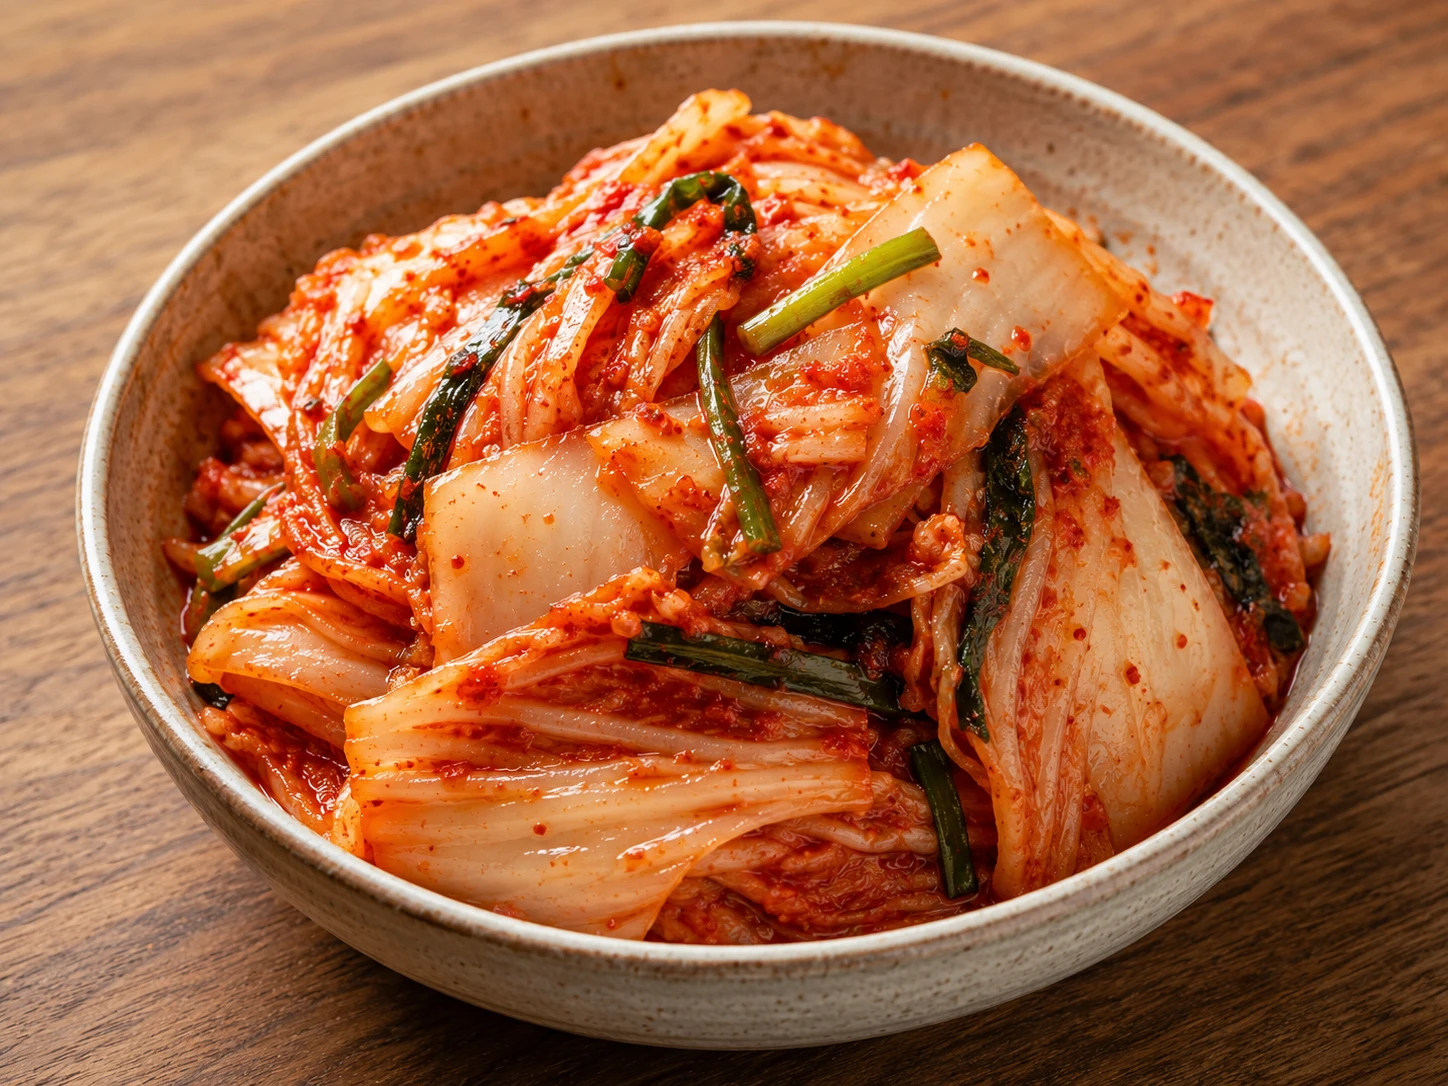
Tastes like spiced cabbage. Against a rich fried crust, this reads as sweet rather than cutting.
✗ Not Recommended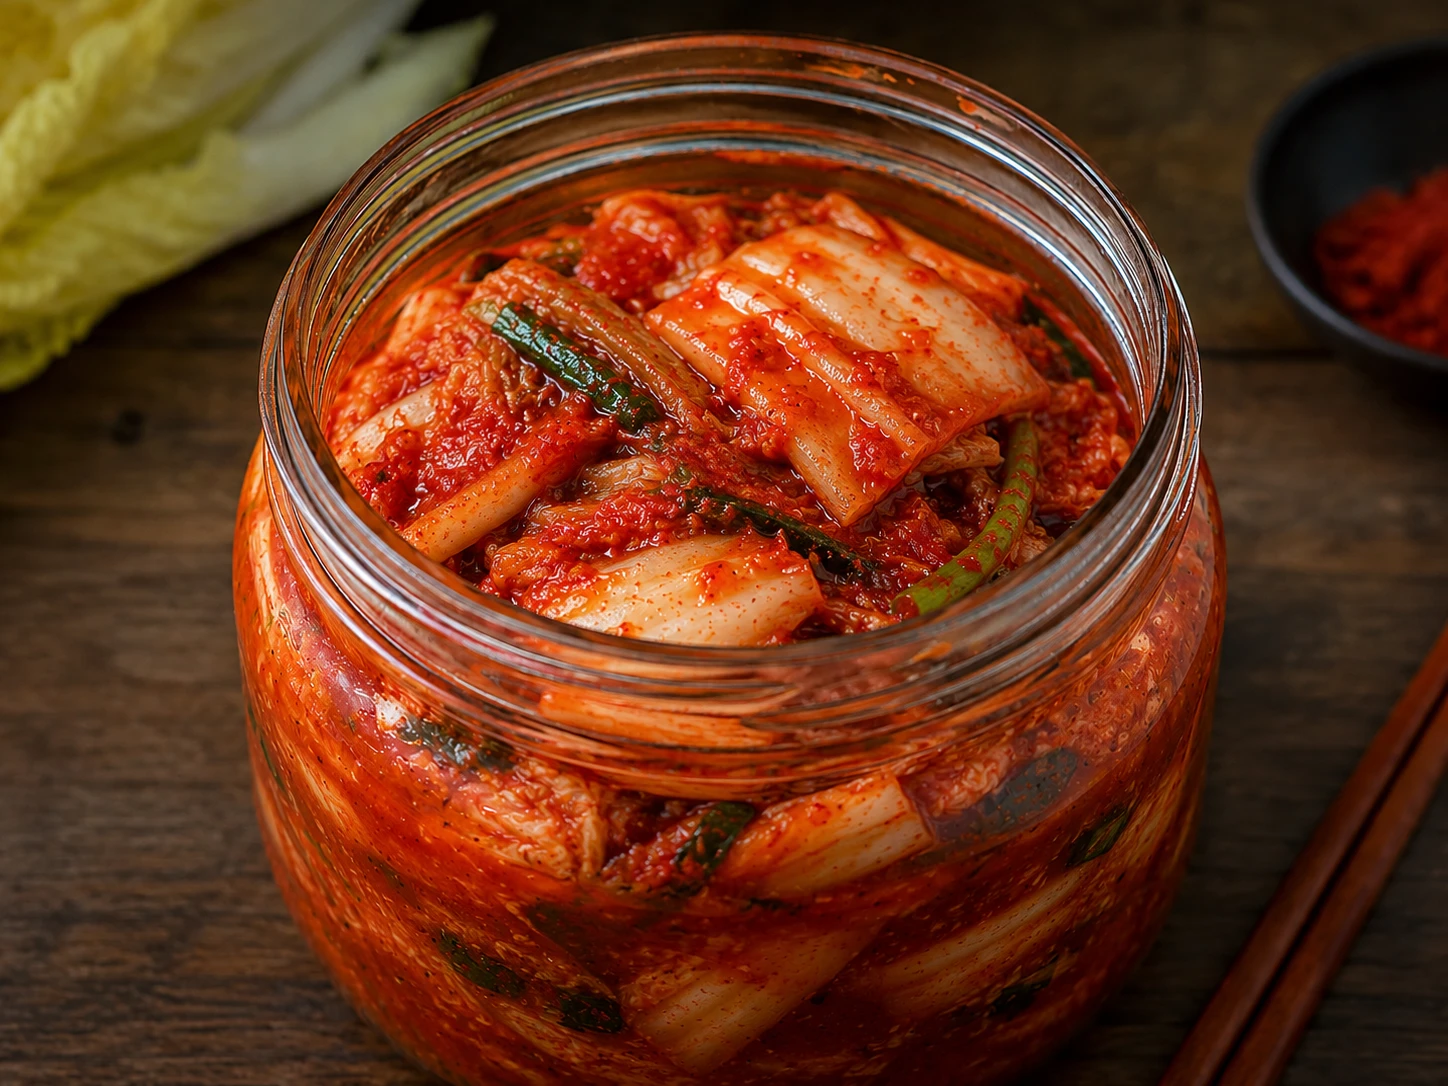
Acceptable if ripe kimchi is unavailable, but won’t cut through the fried oil the way Stage 3 does.
△ Acceptable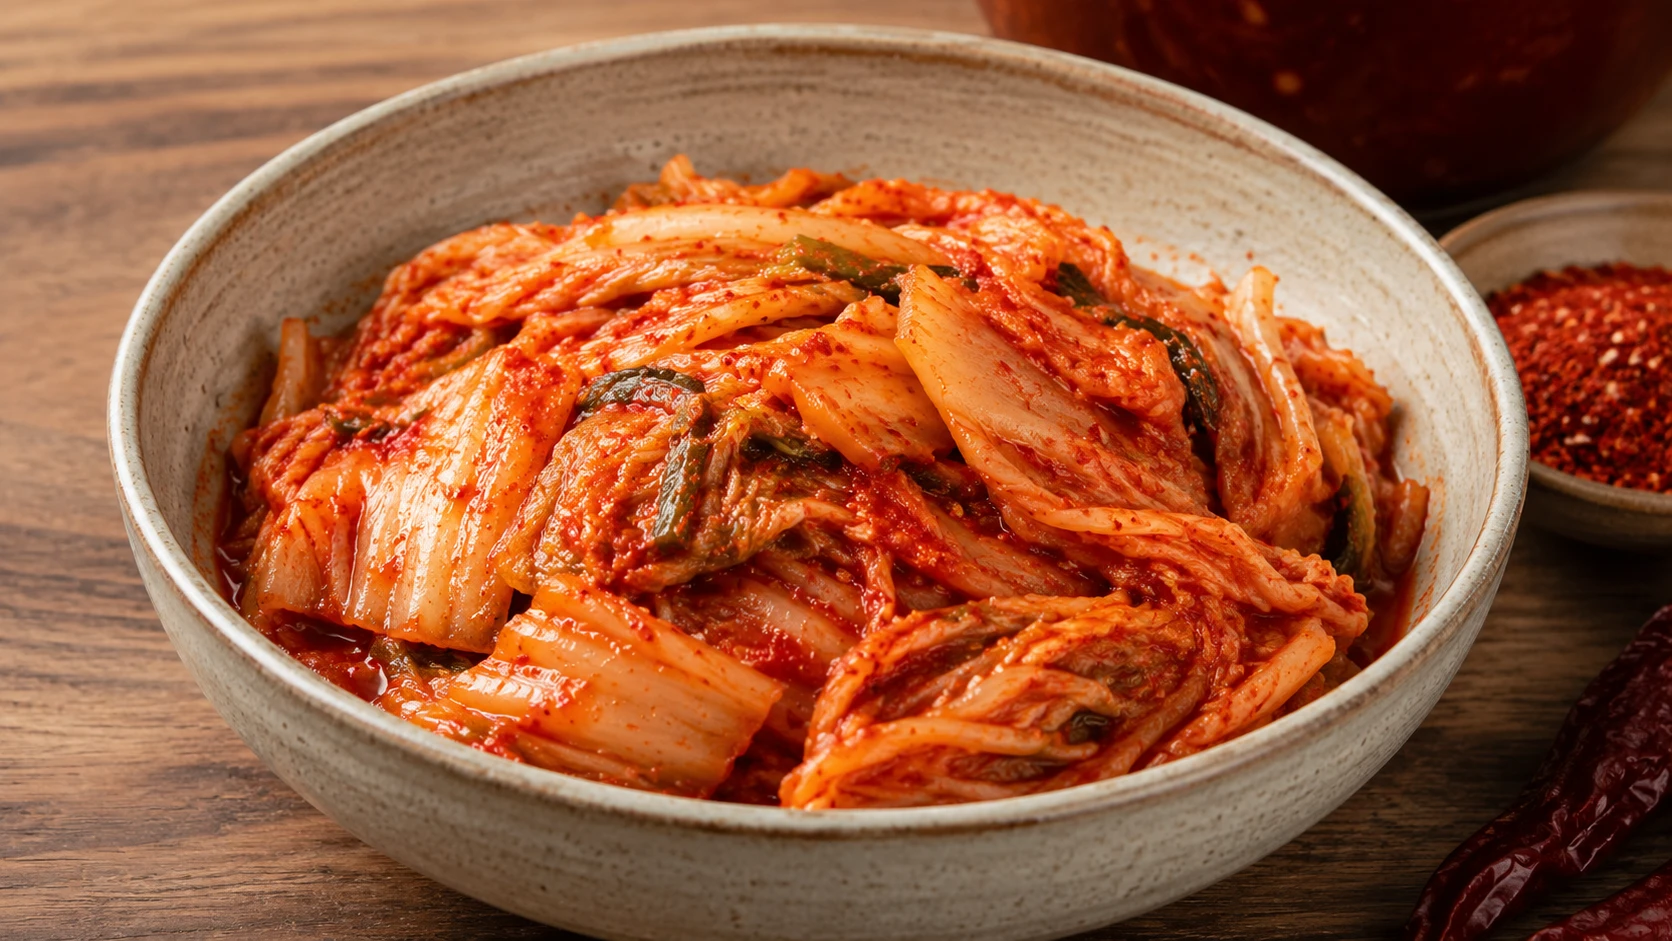
Full sour-umami complexity cuts directly through the double-fried crust’s richness in both the mayo and the slaw.
★ Correct — the only real choice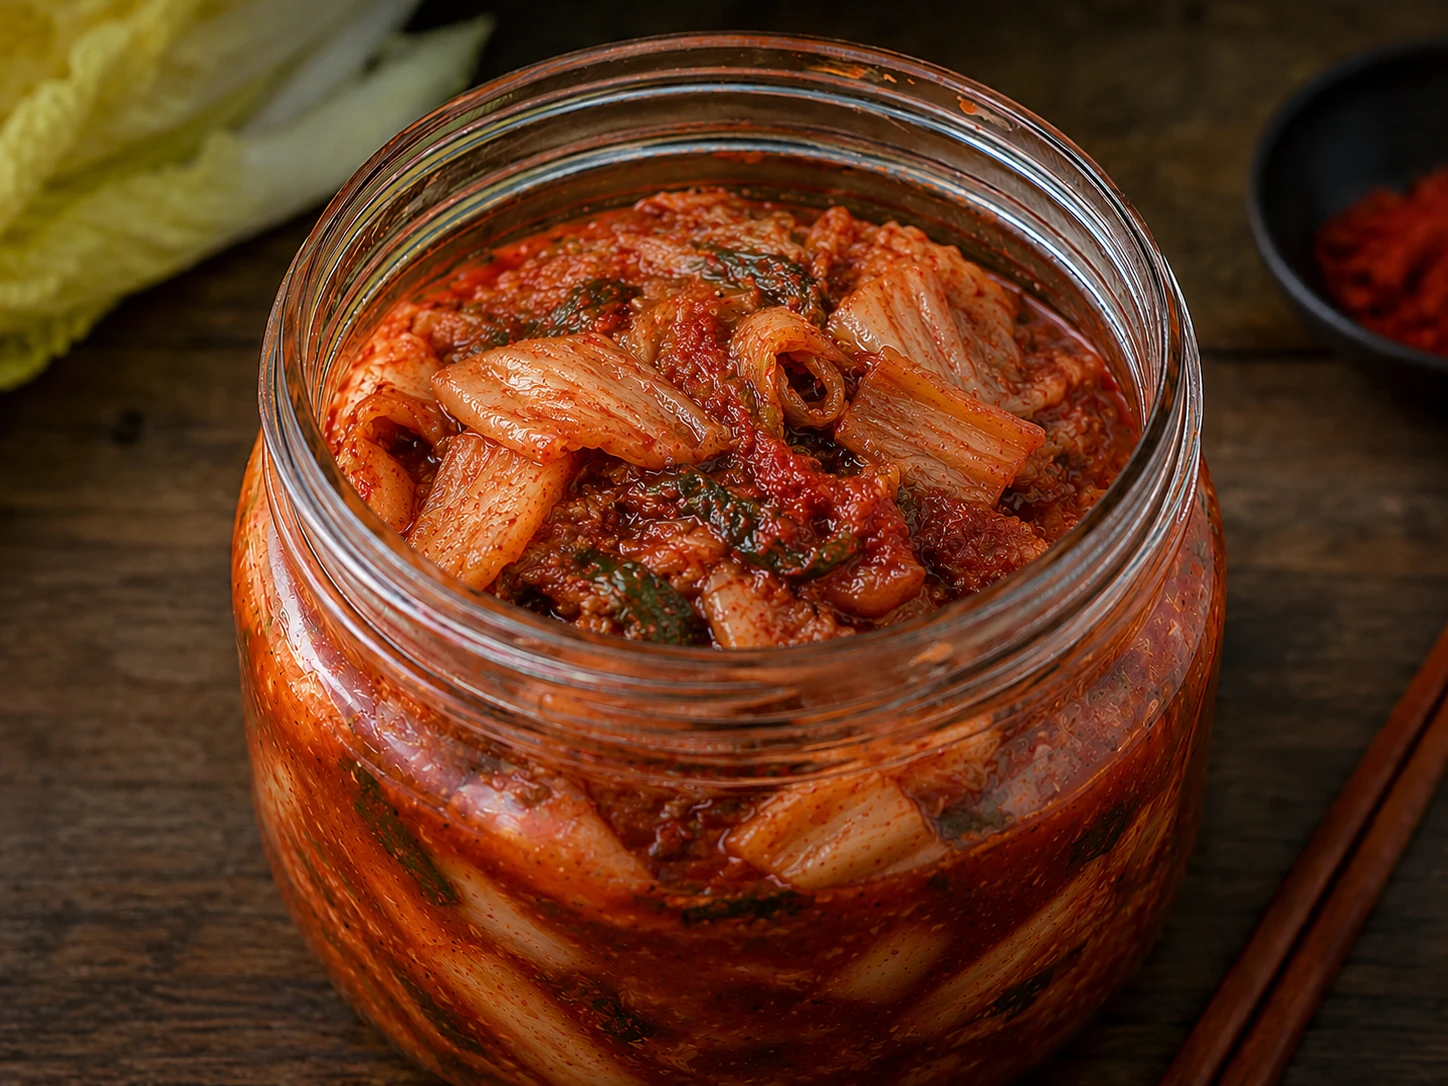
Very pungent and can dominate the mild chicken. Squeeze hard and use sparingly, more in the slaw than the mayo.
△ Usable — squeeze firstIngredients
Substitution Guide — What Works, What Doesn’t
| Ingredient | Best Substitute | Ratio | Gluten-Free | Taste/Texture Impact |
|---|---|---|---|---|
| Chicken thigh | Boneless chicken breast, pounded to even thickness | 1:1 | ✓ | Slightly drier through a double-fry. Reduce second fry by 30–60 seconds. |
| Flour + cornstarch dredge | 1:1 gluten-free flour blend + cornstarch | 1:1 | ✓ Makes it GF | Very close crispness, holds together slightly less firmly through handling. |
| Kewpie mayo | Plain Greek yogurt + 1 tsp honey + 1 tsp rice vinegar | Per 3 tbsp | ✓ | Lighter, tangier, less rich than Kewpie — a genuine flavour alternative, tested and approved. |
| Gochujang (mayo) | Sriracha (2 parts) + white miso (1 part) | Per 1 tsp | △ Check miso | Loses fermented sweetness, still good. |
| Buttermilk | Whole milk + 1 tbsp lemon juice, rested 10 min | Per 250ml | ✓ | Close approximation, slightly less tenderizing than true buttermilk. |
| Deep-frying (method) | Air fryer, 200°C/400°F, ~20 min, flip + respray at halfway | — | ✓ | Less crisp than double-fried, but noticeably crisper than baking alone. |
| Kimchi slaw (new, optional swap) | Kimchi bacon jam — 3 slices chopped bacon fried crisp, then 150g kimchi + 1 tbsp brown sugar cooked down in the fat | Replaces the slaw | ✓ | Sweeter, richer, jammy; loses the slaw’s fresh crunch. |
How to Make a Kimchi Chicken Burger
Seven steps built around the double-fry technique — a two-stage frying method that’s the backbone of proper Korean fried chicken, adapted here for a burger-sized crispy chicken thigh. The rest between fries isn’t optional; it’s what makes the second fry work.
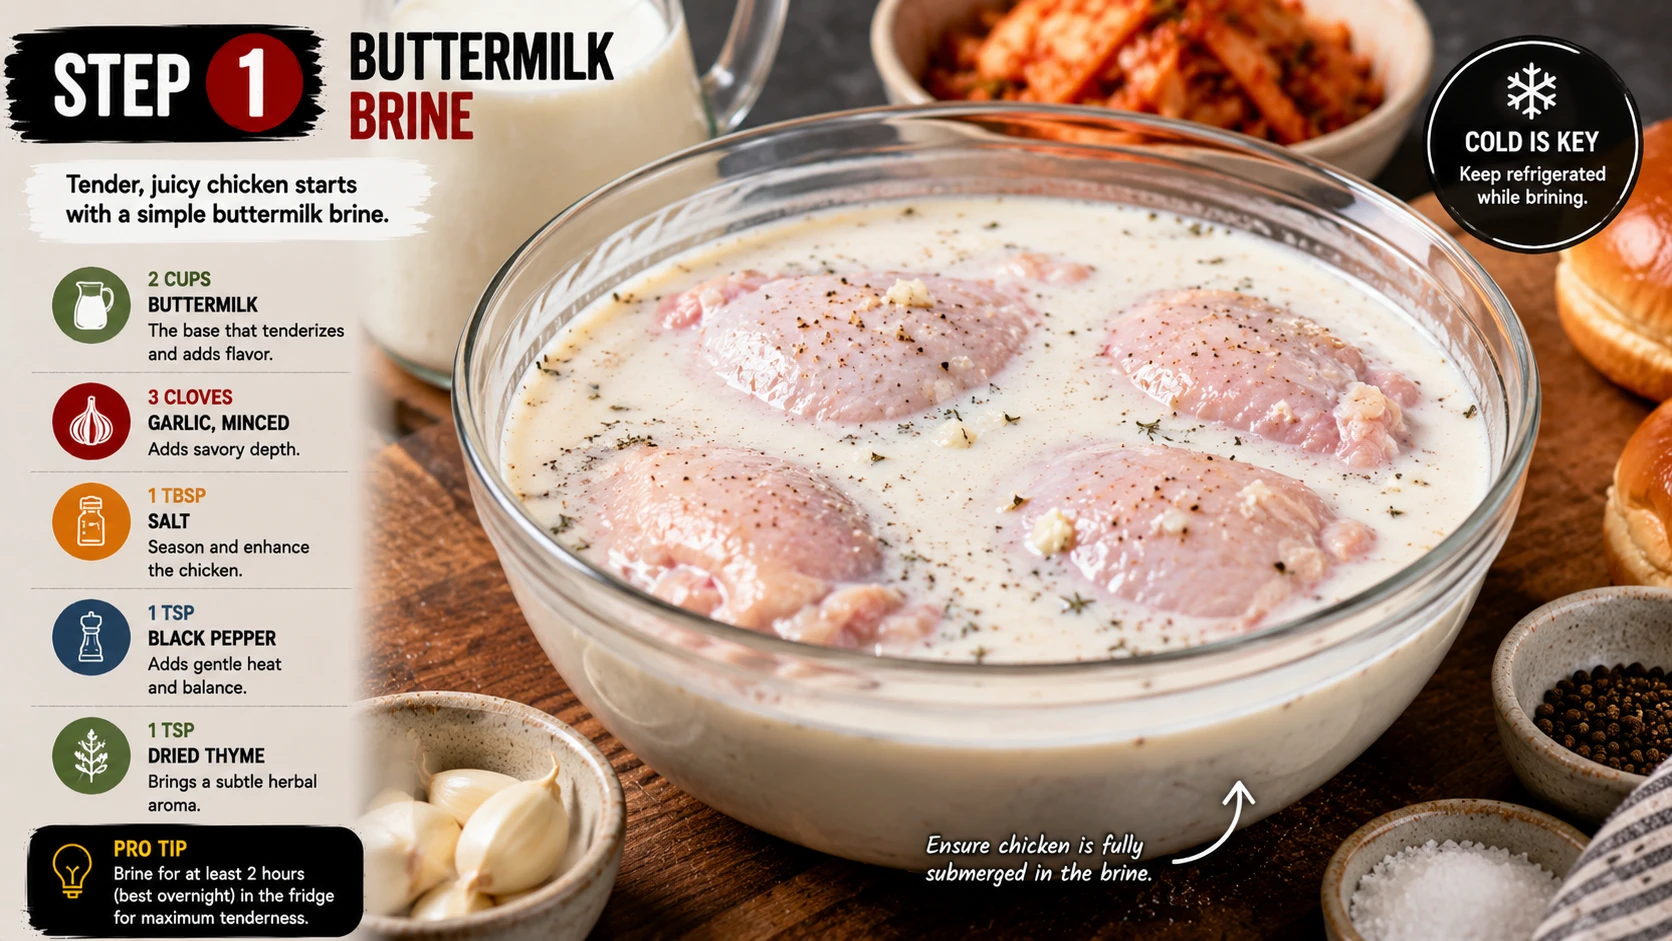
Whisk the buttermilk and gochujang together in a bowl or resealable bag until the gochujang is fully dissolved and the mixture is a uniform pale orange. Submerge the chicken thighs completely, cover, and refrigerate for at least 2 hours — the point our brine-time test found gave the best balance of tenderness and convenience, though overnight brining pushes the texture slightly further if you have the time.
Buttermilk’s mild lactic acidity works on the chicken’s proteins gently over time, tenderizing the meat without the mushiness a stronger acid marinade can cause. The gochujang folded into the brine does double duty here — a small amount of Korean chili paste flavour penetrates the meat itself, not just the surface, so the burger tastes seasoned in the middle, not only under the sauce. If you’d prefer the sharper, more savoury profile some recipes get from a soy-ginger marinade, whisk 1 tsp grated ginger into this brine — it layers on top rather than replacing the buttermilk’s tenderizing effect.
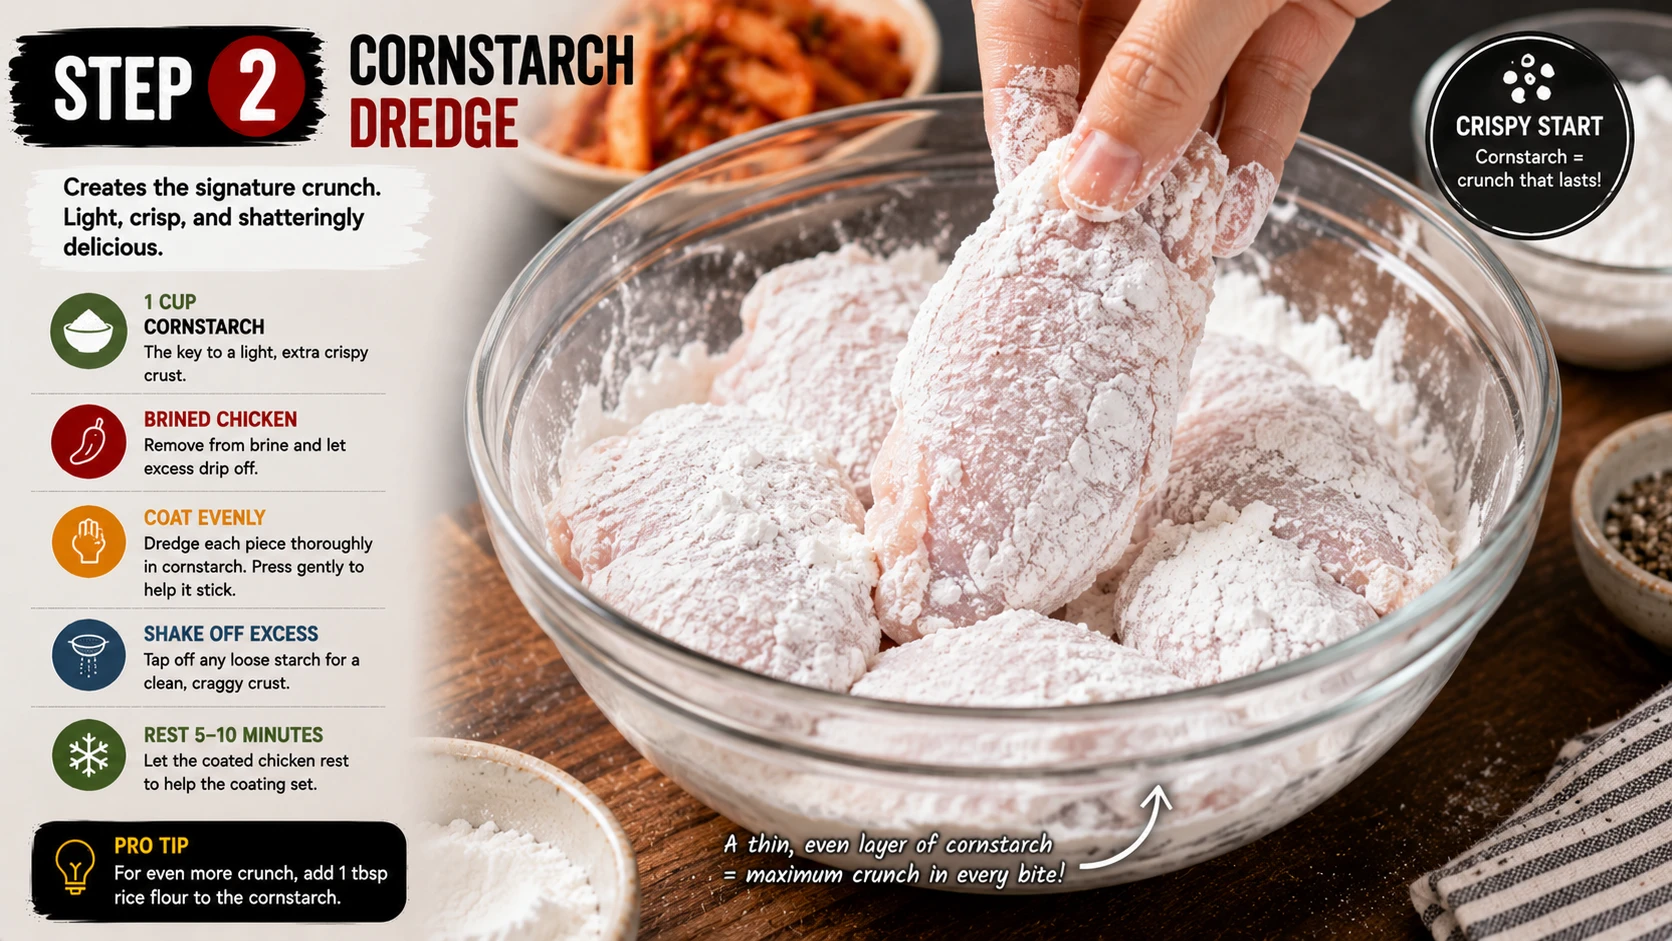
In a wide shallow bowl, whisk together the plain flour, cornstarch, baking powder, garlic powder and salt until evenly combined — this is the dredge blend that won our head-to-head test against rice flour alone and plain flour alone. Lift each chicken thigh out of the buttermilk brine, letting the excess drip off for a few seconds rather than shaking it dry, then press it firmly into the dredge on both sides, packing the coating on rather than just dusting it.
The cornstarch in this blend is doing specific work: it fries up lighter and crisper than flour alone, and the baking powder creates tiny air pockets in the coating as it fries, which is part of what gives Korean-style fried chicken its characteristically shatter-crisp, almost brittle texture rather than a heavier Southern-style crust.
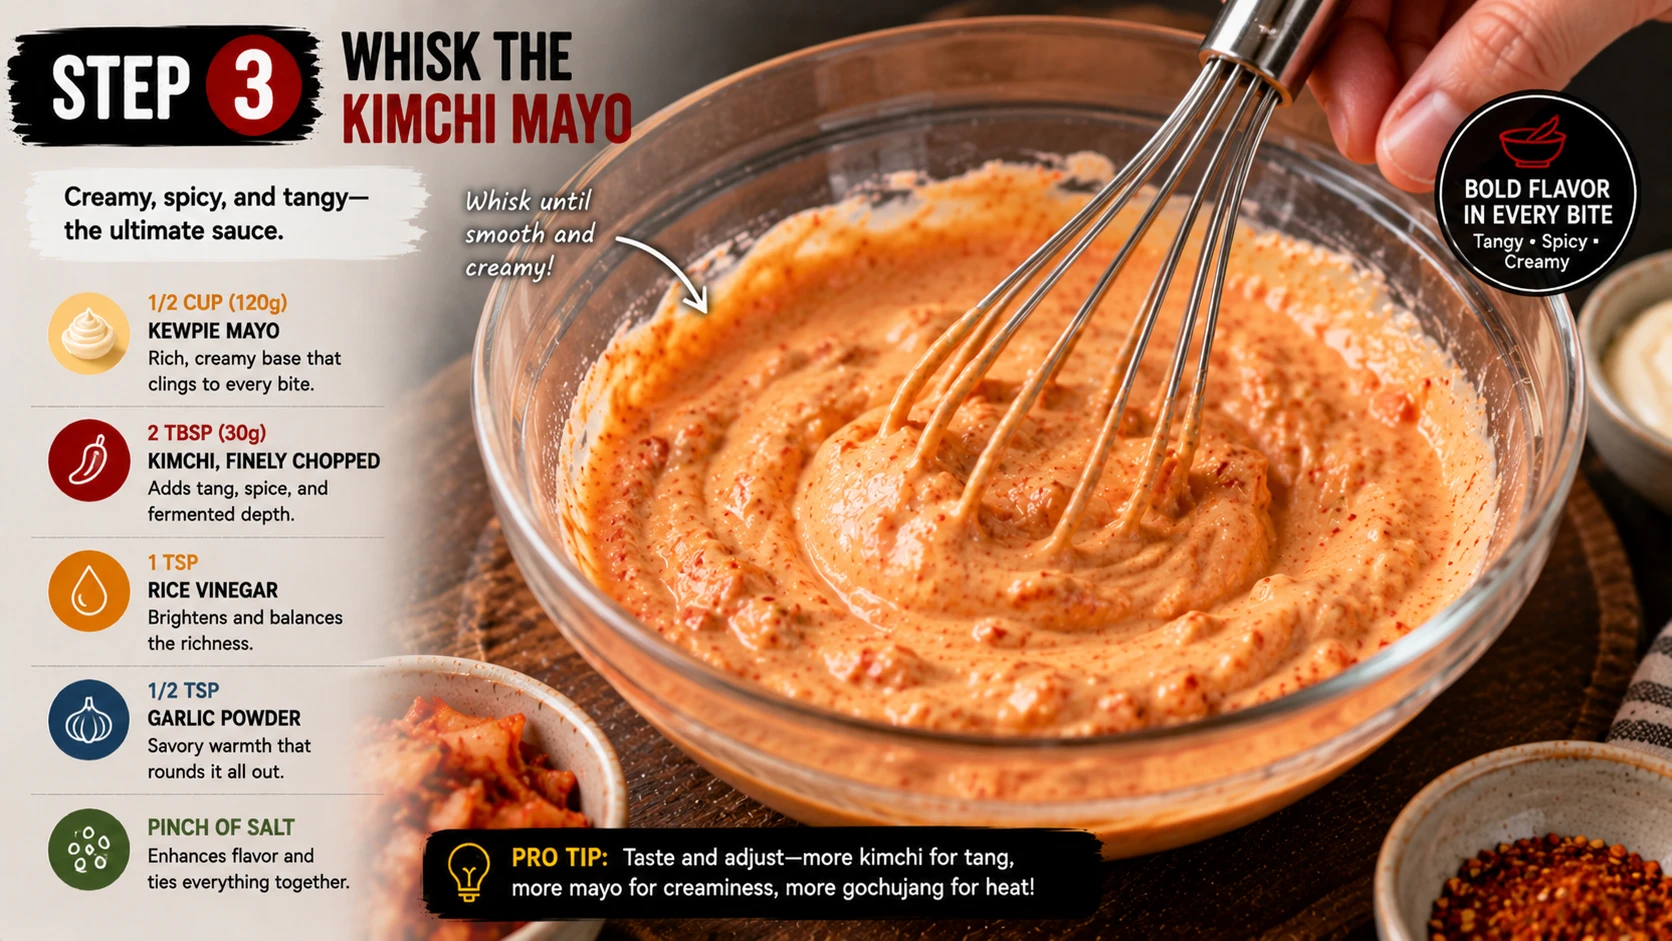
While the oil heats, whisk Kewpie mayo, finely chopped kimchi, gochujang and rice vinegar in a small bowl until combined — this is a distinct sauce from the smoother gochujang mayo used on the classic beef build, with visible flecks of kimchi folded directly through it rather than blended smooth. Refrigerate until assembly.
This kimchi mayo is the primary source of heat and tang in the finished burger if you’re serving the chicken dry, which our testing still recommends by default. Taste and adjust the gochujang up or down here based on how spicy you want the final burger to be.
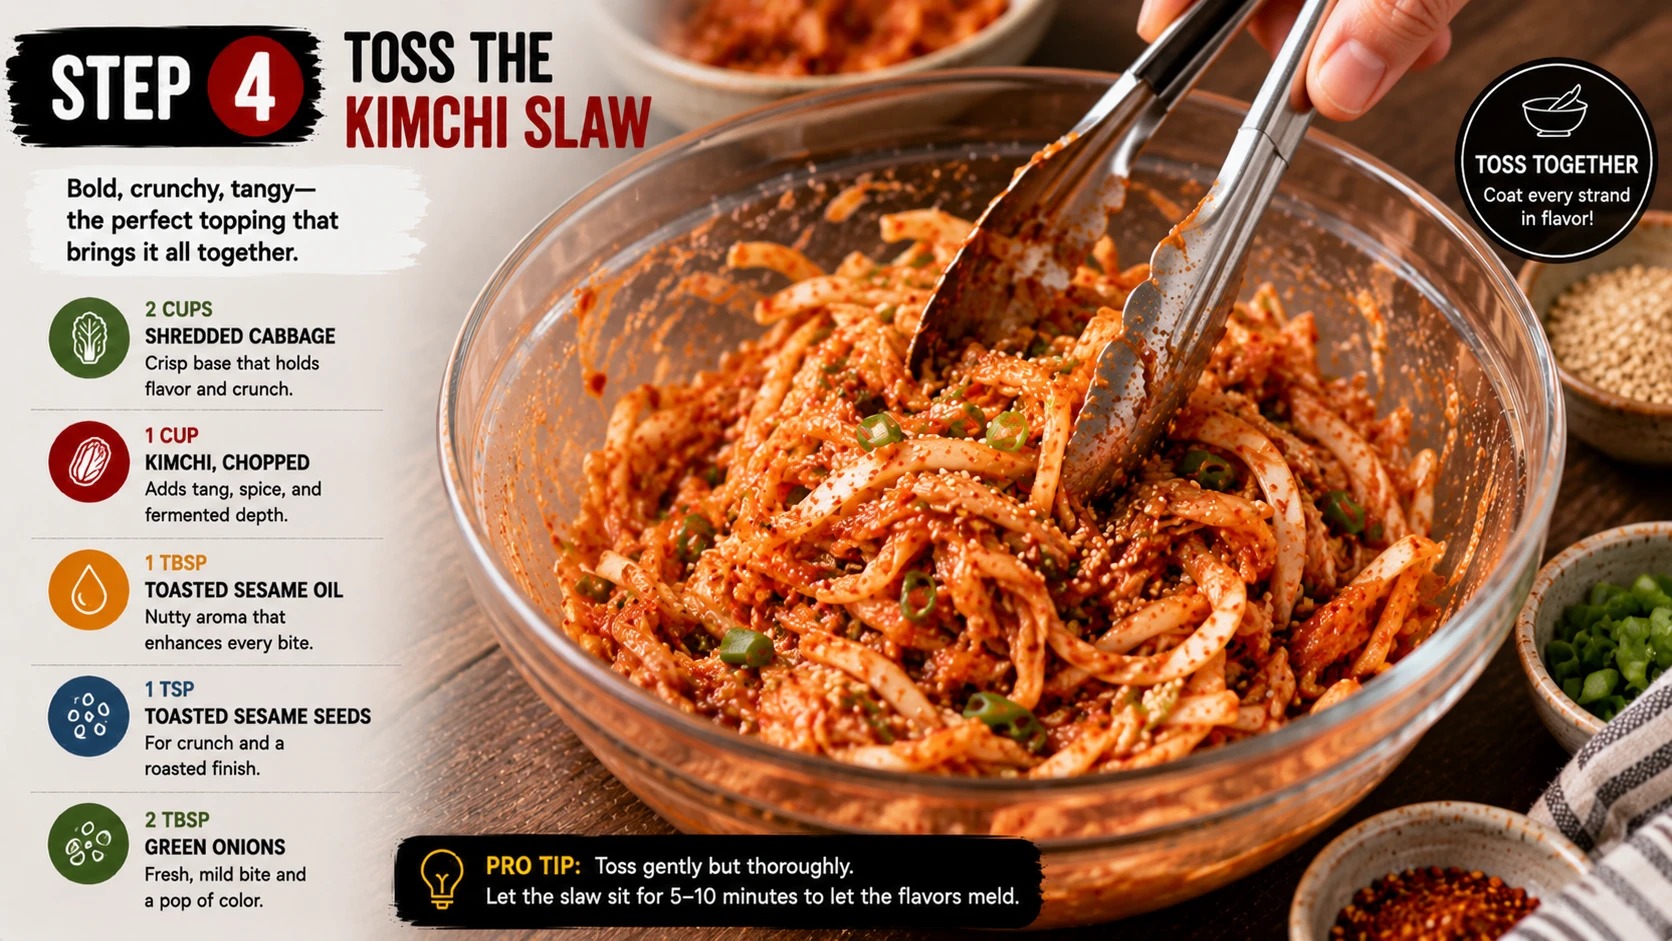
Squeeze the chopped, ripe Stage 3 kimchi firmly to remove excess brine, then toss with shredded napa cabbage, sesame oil, rice vinegar and sesame seeds. This step matters more here than it might seem — any liquid you don’t squeeze out now ends up softening the fried crust the moment the burger is assembled, undoing the work of the double-fry.
Optional kimchi bacon jam swap: if you want the sweeter, richer topping some kimchi chicken burger recipes use instead of a slaw, fry 3 slices of chopped bacon until crisp, then add the chopped kimchi and 1 tbsp brown sugar to the rendered fat and cook down for 6–8 minutes, stirring occasionally, until sticky and jammy. It’s a genuinely different sandwich — several testers preferred it — but you lose the slaw’s clean, fresh crunch and add meaningful extra calories.
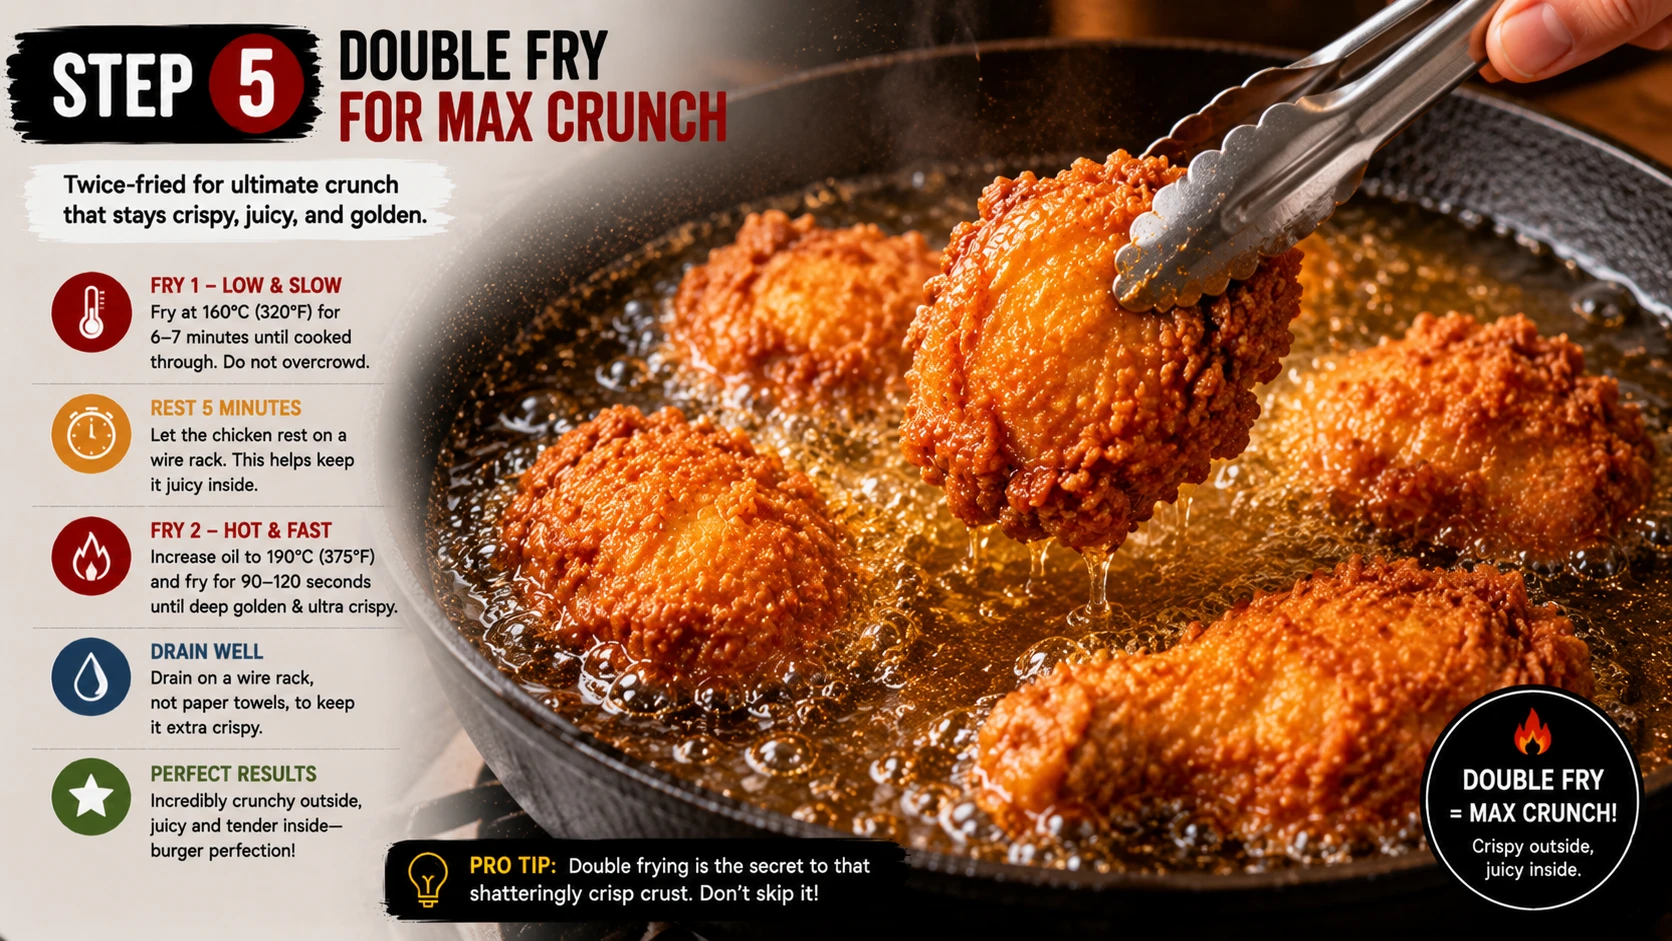
Heat neutral oil to 160°C (320°F) in a deep pot or Dutch oven — a thermometer removes almost all the guesswork here. Fry the dredged chicken for about 5 minutes until pale golden and cooked through, then lift out onto a wire rack (not paper towels, which trap steam against the crust) and rest for 3 minutes while the oil comes up to 190°C (375°F).
Fry a second time at the higher temperature for 2–3 minutes, until deep golden and audibly crackling when tapped with tongs — this second, hotter, shorter fry is what separates a genuinely shatter-crisp Korean-style crust from an ordinary fried chicken sandwich. It also purges some of the oil the first fry left in the coating, which is part of why double-fried chicken often tastes less greasy than single-fried, not more, despite touching hot oil twice.
Optional sticky glaze: if you want the glazed style popular UK recipes like School of Wok use, simmer 2 tbsp of the mayo’s gochujang mixed with 1 tbsp honey and 1 tsp soy sauce in a small pan until it coats the back of a spoon rather than pooling, then brush a thin layer over the just-fried chicken immediately before assembling. Tested against a wet sauce bath, this thin reduced glaze held up meaningfully better — though the plain dry crust with mayo only still stayed crisp the longest of all three.
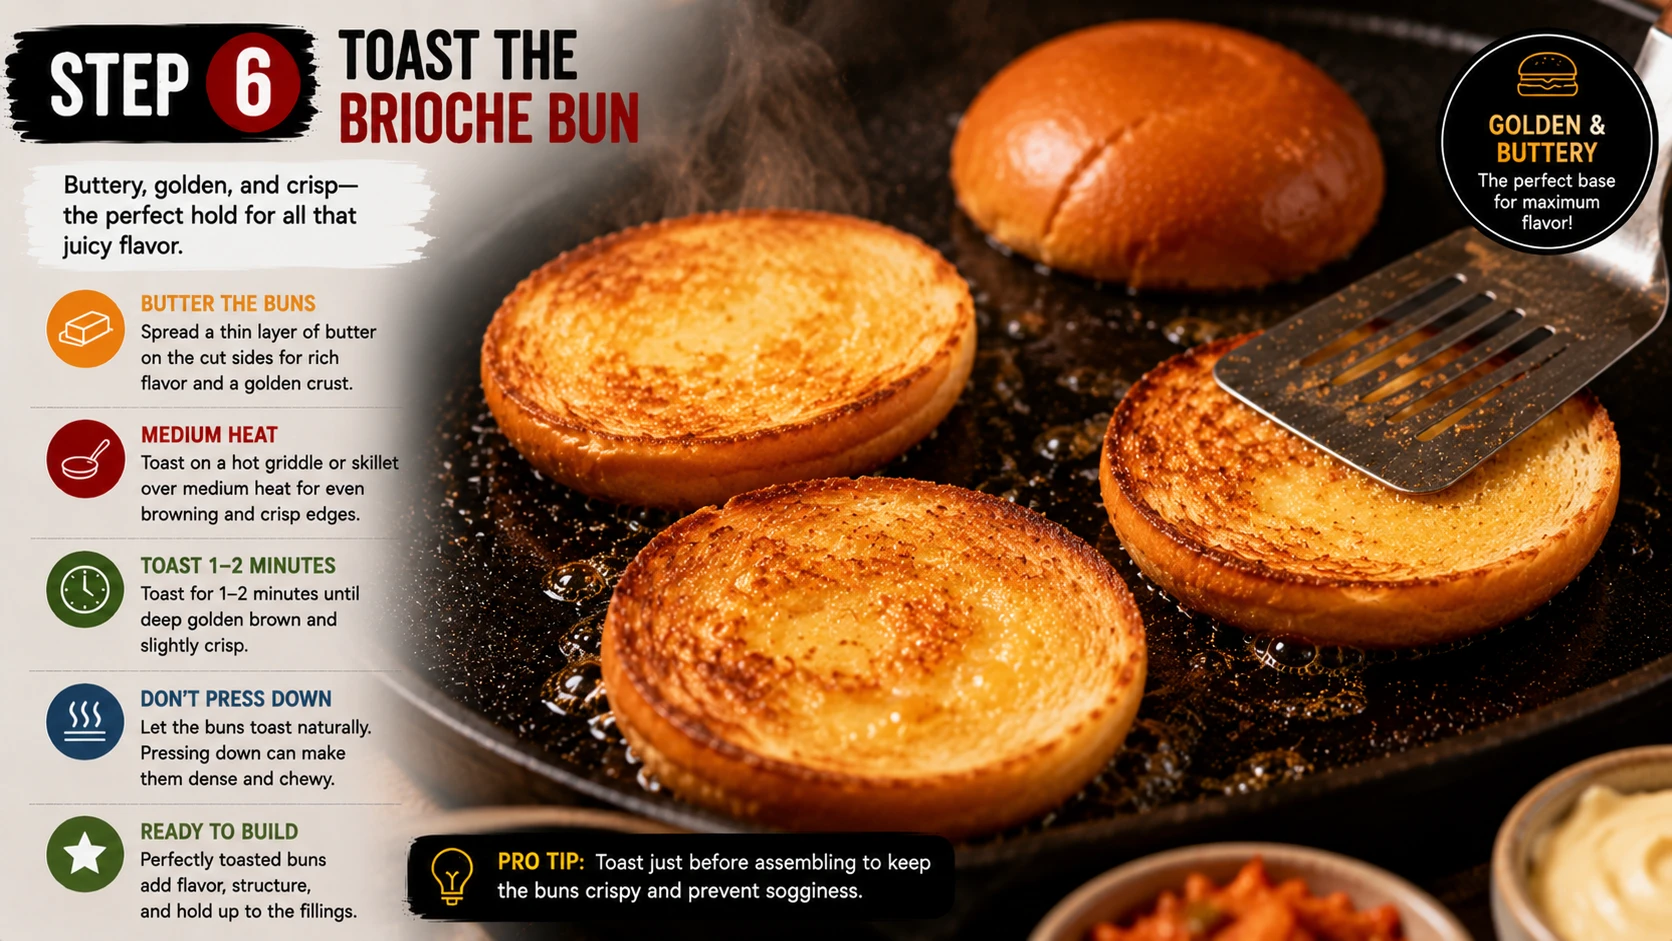
While the chicken rests after its second fry, melt the butter in a clean pan over medium heat and toast the brioche buns cut-side down for 60–75 seconds until deep golden. Brioche’s structure and slight sweetness do the same job here they do on the classic beef build — resisting the wet toppings and balancing the gochujang’s heat.
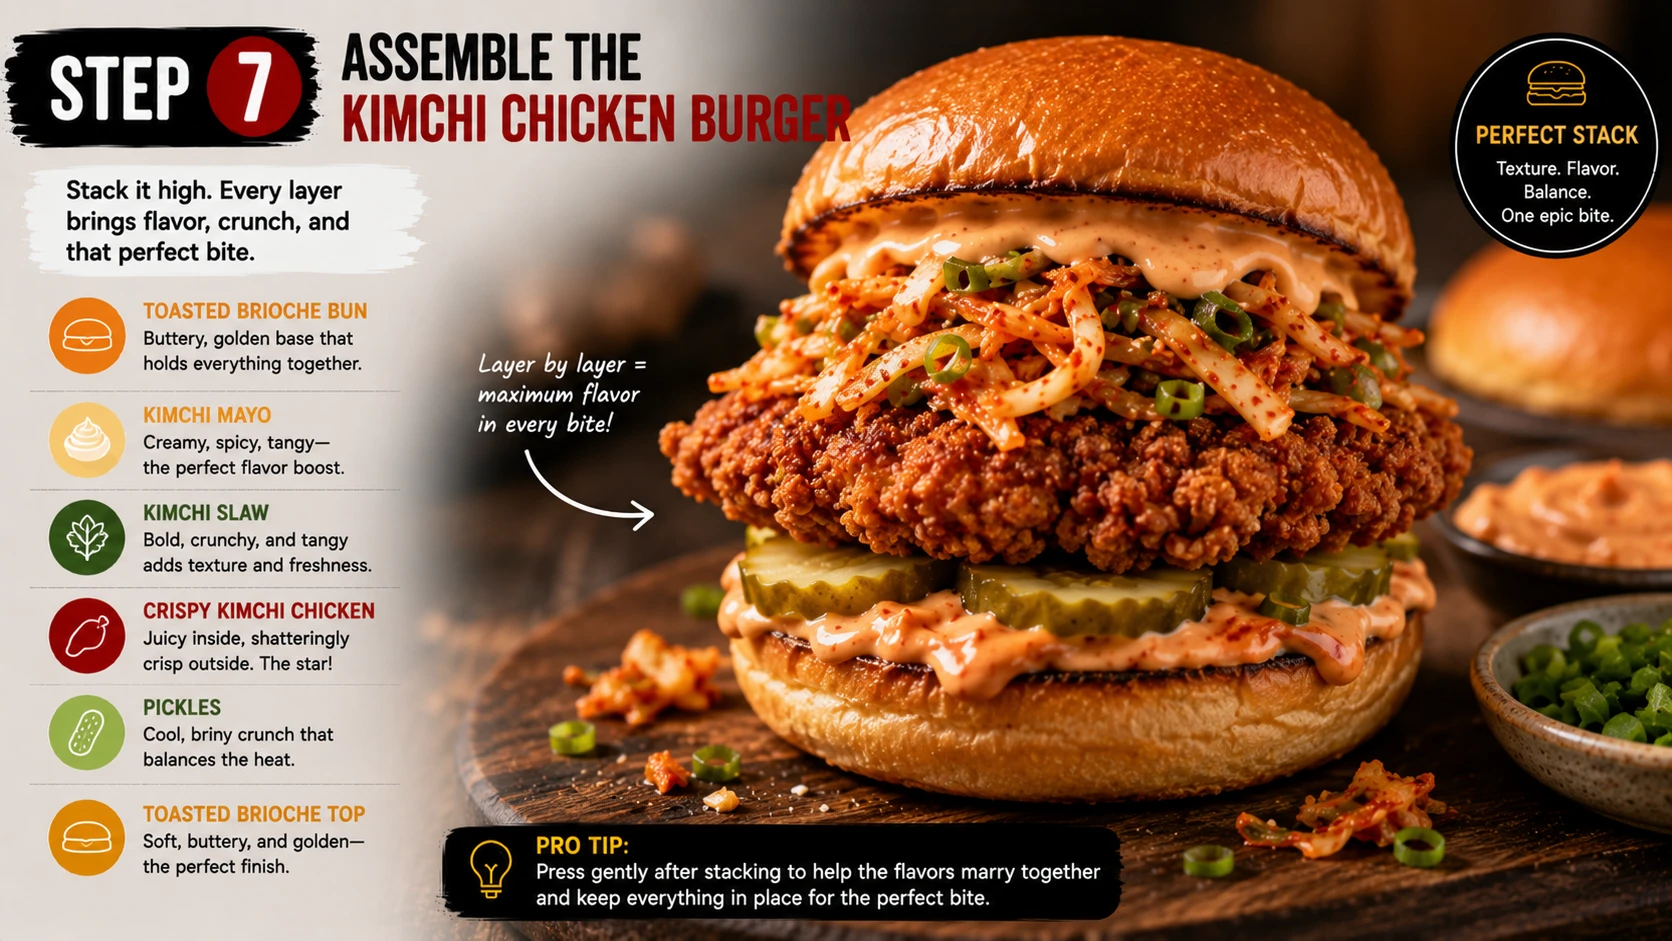
Spread kimchi mayo generously on both toasted bun halves. Place the double-fried chicken (glazed or dry) on the bottom bun, pile the kimchi slaw or kimchi bacon jam on top, and scatter sliced spring onion. Cap with the top bun and serve immediately.
Of every build in this kimchi burger family, this one loses quality the fastest if it sits — the whole point of the double-fry is a crust that’s crisp right now, and every minute of standing time under the mayo works against that. If you’re serving a crowd, keep the fried chicken, mayo, and slaw separate until each plate is built.
Test Kitchen Results
Every variable was tested at least twice, using the same base brine and dredge so only one factor changed per batch. Updated Aug 30, 2026 with two new batches.
Double-fried coating stayed audibly crisp roughly twice as long once dressed with kimchi mayo. Single-fry started softening within a few minutes of assembly.
Double-fry — best crust survivalNoticeably crisper than baking alone, and a reasonable lower-oil alternative, but still fell short of the double-fried crust’s shatter texture.
Solid second choice30 minutes: noticeably less tender. 2 hours: clearly improved, practical for a weeknight. Overnight: best texture, only a small step up from 2 hours.
2 hours — practical sweet spotFlour-cornstarch (2:1) held onto the chicken best through handling. Rice flour was crisper fresh out of the fryer but flaked off more easily. Flour alone browned well but stayed less shatter-crisp.
2:1 flour-cornstarch blendKewpie scored higher for richness and umami in blind tasting. Yogurt-based sauce was well liked too, for a lighter, tangier profile — a genuine alternative rather than a compromise.
Kewpie preferred, yogurt a valid swapA wet, unreduced sauce bath (dipping the chicken directly in loose sauce) softened the crust within minutes, confirming the original finding. A thin, well-reduced glaze brushed on just before serving held up far better than expected — a real, legitimate option. Dry with mayo only still held crunch the longest overall.
Dry wins outright; reduced glaze is a valid second choiceKimchi bacon jam gave a sweeter, richer, jammier bite that several testers preferred outright. It loses the slaw’s fresh crunch and adds meaningful bacon-derived calories.
Both valid — comes down to preferenceCrust survival time, not initial crispness, is the real differentiator for a kimchi chicken burger. Almost any dredge fries up crisp straight out of the oil — the question is how long it stays that way once it meets wet toppings. Double-frying, a firm flour-cornstarch dredge, and keeping any sauce reduced and thin (or off the chicken entirely until final assembly) are the levers that actually extend that window. Glazing isn’t automatically wrong, as this update found — it just has to be done with a properly reduced sauce, not a wet dip.
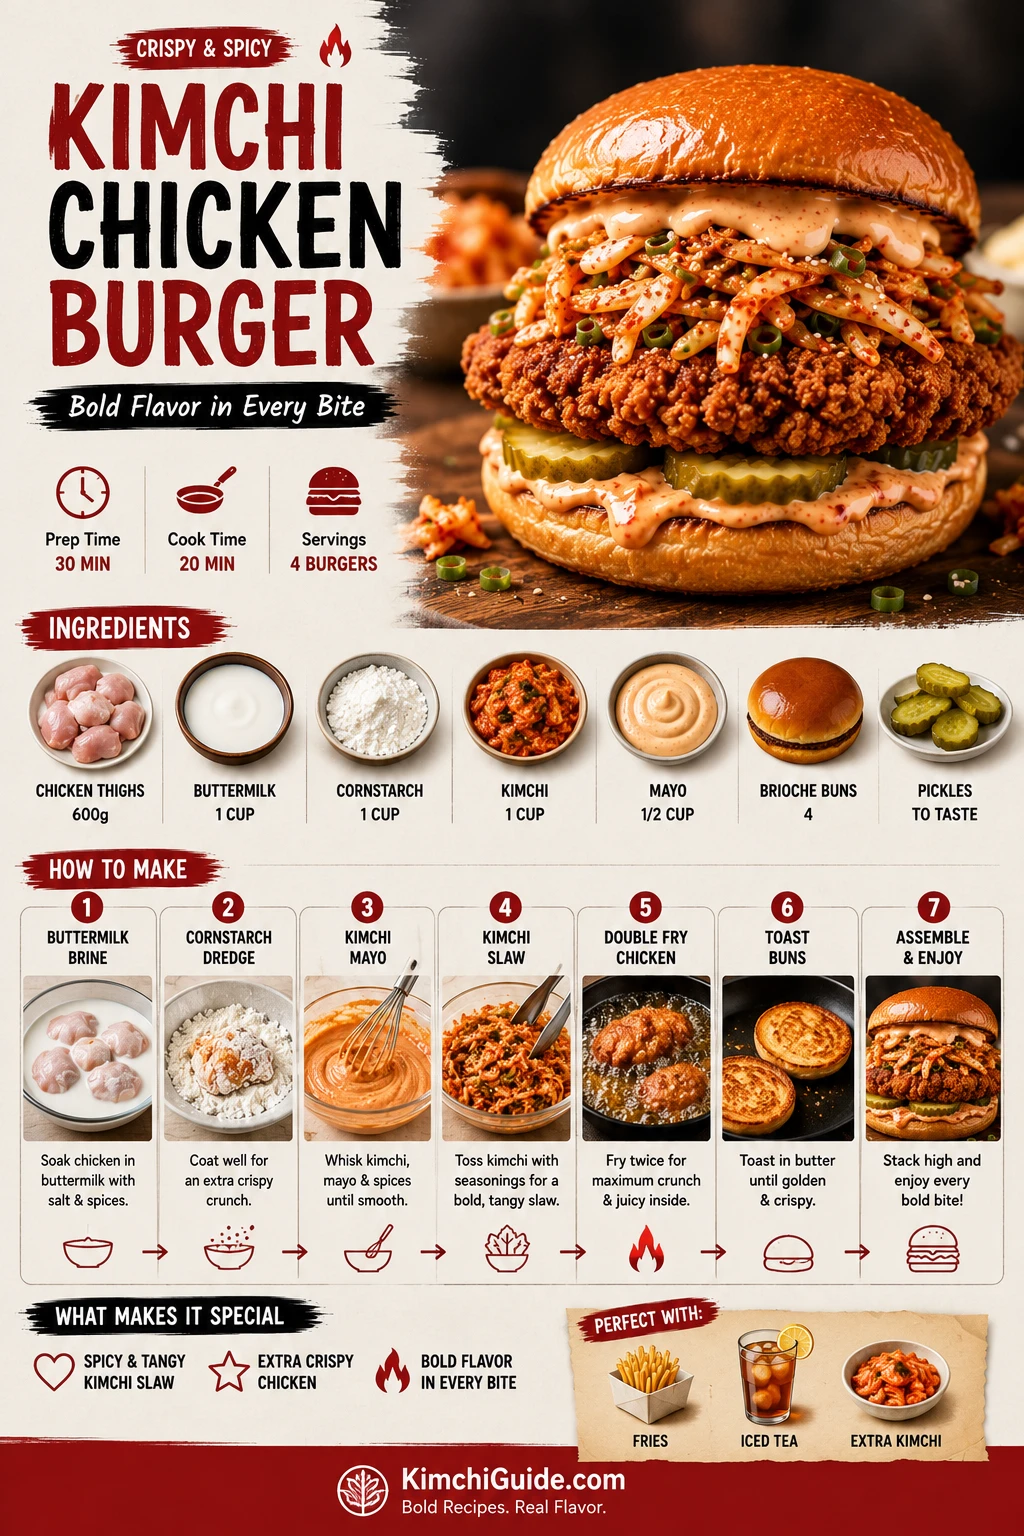
Kimchi Chicken Burger
Double-fried chicken thigh · Kewpie kimchi mayo · Stage 3 kimchi slaw · 45 minutes
- 2 boneless, skinless chicken thighs
- 250ml buttermilk + 1 tbsp gochujang (brine)
- 100g flour + 50g cornstarch + 1 tsp baking powder + 1 tsp garlic powder (dredge)
- Neutral oil, for deep-frying
- 150g ripe kimchi (Stage 3), chopped + squeezed dry (or kimchi bacon jam — see substitution table)
- 2 brioche burger buns + 1 tbsp butter
- 3 tbsp Kewpie mayo + 1 tbsp chopped kimchi + 1 tsp gochujang + 1 tsp rice vinegar (mayo)
- 80g napa cabbage; 1 tsp sesame oil + 1 tsp rice vinegar + 1 tsp sesame seeds (slaw)
- 2 spring onions, thinly sliced
- 1Brine chicken in gochujang buttermilk, 2+ hours refrigerated.
- 2Dredge in flour-cornstarch-baking powder blend, pressing firmly.
- 3Whisk Kewpie mayo, chopped kimchi, gochujang, rice vinegar. Refrigerate.
- 4Squeeze kimchi dry, toss with cabbage, sesame oil, vinegar, sesame seeds (or make kimchi bacon jam).
- 5Fry at 160°C 5 min, rest 3 min, fry again at 190°C 2–3 min until deep golden. Glaze thinly or leave dry.
- 6Toast buns in butter 60–75 sec until golden.
- 7Spread mayo, add chicken, pile slaw or jam, scatter onion. Serve immediately.
Per serving (2 servings total), base recipe with slaw, dry crust. Reviewed by Dr. Sarah Mitchell RD, PhD · Published July 15, 2026 · Updated August 30, 2026
All 11 Kimchi Burger Builds
This is 1 of 11 builds in the KimchiGuide kimchi burger family. Classic recipe: Kimchi Burger Recipe →. Full comparison + origin story: Kimchi Burger Ultimate Guide →

The flagship. Smash patty, gochujang mayo, kimchi slaw. 520 cal.
Classic Recipe →
Two 110g patties, cheese between. Approx. 690 cal.
Double Smash →
Double-fried crispy chicken thigh, kimchi mayo, tested glaze option. 610 cal.
Currently viewing
Sweet soy bulgogi-marinated patty. Approx. 560 cal.
Bulgogi Burger →
Black bean patty, vegan mayo, jeotgal-free kimchi. 420 cal.
Vegan Burger →
3-bite party format, same ratios. Approx. 210 cal each.
Sliders →
Certified GF brioche-style bun + GF gochujang. 520 cal.
GF Burger →
Lettuce-wrapped, no bun. Approx. 340 cal.
Burger Bowl →
Pressed sticky rice patties instead of bread — naturally GF. Approx. 480 cal.
Rice Burger →
Bodega-style chopped beef and cheese, kimchi folded in off heat. Approx. 590 cal.
Chopped Cheese →
All 11 builds, comparison table, origin story, FAQs.
Full Guide →Kimchi Chicken Burger — Pairing Guide
These pairings echo the burger’s Korean-fried-chicken profile without competing with the crust for attention.

The classic side for Korean fried chicken — sweet-tangy crunch that cuts the crust’s richness.

Thin-cut fries tossed with gochugaru and sesame oil — a coherent double dose of crisp and heat.

A beloved Korean fried-chicken-and-beer side — melted cheese and sweet corn alongside the burger.

Chimaek — fried chicken and beer — is a Korean institution for good reason. Light lager cuts the fried richness.
Storage and Reheating
The buttermilk brine can run up to a full day if needed, though 2 hours is the tested sweet spot for texture.
Freeze after the first fry only, on a tray until solid, then bag. Thaw fully before the second, hotter fry to restore crispness.
Sealed container, clean spoon each time. Do not freeze — the emulsion separates on thawing.
Reheat at 190°C/375°F for 6–8 minutes to restore crunch. Microwaving turns a double-fried crust soft almost instantly — avoid it.
Where This Build Sits Among All 11 Kimchi Burgers
| Build | Calories | Protein | Vegan? | Best For |
|---|---|---|---|---|
| Kimchi Burger Bowl | 340 | 27g | No (beef) | Low-carb, lettuce wrap |
| Vegan Black Bean | 420 | 18g | ✅ Fully vegan | Plant-based, egg-free |
| Kimchi Burger Sliders (each) | 210 | 13g | No | Portion control, parties |
| Kimchi Burger Recipe (Classic Smash) | 520 | 31g | No | The flagship recipe |
| Gluten-Free Version | 520 | 31g | No | Same build, GF bun/gochujang |
| Kimchi Bulgogi Burger | 560 | 29g | No | Sweeter, caramelised profile |
| Kimchi Chicken Burger ← This page | 610 | 34g | No | Crispy, shatter-crust texture |
| Double Smash | 690 | 42g | No | Bigger appetite, more crust |
Kimchi Chicken Burger FAQ
Sourced from real competitor gaps and reader search behaviour, answered with the detail of someone who actually ran the fry-method comparison. Updated Aug 30, 2026 with two new questions on the sticky glaze and kimchi bacon jam.
Most kimchi chicken burger recipes pick one frying method and stop there. This recipe tests single-fry against double-fry and air-fry, three brine times, three dredge blends, and a sticky gochujang glaze against a dry crust — specifically for crust survival against wet kimchi mayo and kimchi slaw. See the full Kimchi Burger Guide for all 11 builds.
Chicken thigh. Its higher fat content keeps it juicy through a double-fry, where a leaner breast is more likely to dry out. Thigh also holds the buttermilk brine’s flavour better than breast in side-by-side tests.
Double-fry. The first fry at a lower temperature cooks the chicken through; the second fry at a higher temperature rebuilds a shatter-crisp shell and purges surface oil. In testing, double-fried coating stayed crisp roughly twice as long against the kimchi mayo as a single fry.
At least 2 hours, tested against 30 minutes and overnight. 30 minutes gave a noticeably less tender result. Overnight was best for tenderness but only marginally better than 2 hours, so 2 hours is the practical sweet spot.
A flour-cornstarch blend (2:1) gave the best balance of crunch and coating adhesion. Rice flour alone was crispier initially but flaked off more during handling. Flour alone browned well but was noticeably less shatter-crisp than either cornstarch blend.
Air-frying (200°C/400°F, about 20 minutes, flipping and respraying with oil halfway) is a reasonable second choice and came closer to double-fried crispness than baking did. Baking alone produced a noticeably softer coating in every test.
A 4-ingredient sauce: 3 tbsp Kewpie mayo, 1 tbsp finely chopped kimchi, 1 tsp gochujang, 1 tsp rice vinegar, whisked together. It’s distinct from the gochujang mayo used in the classic beef build — this version has visible kimchi folded directly in.
Kewpie mayo scored higher for richness and umami depth in blind tasting. A yogurt-based sauce is lighter and tangier, and works well if you want to cut some of the richness of a double-fried crust, but it’s a different flavour profile, not a straight substitute.
Dry with mayo only holds its crunch longest, but a thin, well-reduced sticky glaze — the style popular UK recipes like School of Wok use — brushed on right before serving softened the crust far less than we expected, and far less than a wet sauce bath. If you want the glazed style, reduce the sauce until it coats rather than pools, and apply it as close to serving as possible.
Brioche, for the same reasons it wins for the classic beef build — its sweetness balances the kimchi’s acidity and it toasts to a sturdy crust that resists the mayo and slaw.
Double-fry rather than single-fry, squeeze the kimchi thoroughly before it goes into either the mayo or the slaw, and assemble the burger immediately rather than letting it sit dressed. Rest the fried chicken on a wire rack, not paper towels, so trapped steam doesn’t soften the underside.
Yes, it’s a tested optional swap. Fry chopped bacon until crisp, then cook down kimchi and brown sugar in the rendered fat until sticky and jammy. It’s a genuinely different, sweeter profile that several testers preferred, though it trades away the slaw’s fresh crunch and adds meaningful calories.
Several popular kimchi chicken burger recipes marinate the chicken in ginger, soy and rice wine instead of brining in buttermilk. Buttermilk’s mild acidity tenderizes the meat itself over the brine time, which a quick soy marinade doesn’t do as effectively — but if you prefer that sharper, more savoury flavour, whisking 1 tsp grated ginger into this recipe’s buttermilk brine gets you most of the way there without losing the tenderizing effect.
Stage 3, ripe kimchi aged 3–6 weeks, for both the mayo and the slaw. Its developed acidity cuts through the fried coating’s richness the same way it cuts through beef fat in the classic build.
Yes. Swap the flour in the dredge for a 1:1 gluten-free flour blend, keep the cornstarch as is, and use a certified gluten-free bun. Double-check your gochujang brand for a gluten-free certification.
160°C (320°F) for the first fry to cook the chicken through without over-browning, then 190°C (375°F) for the second fry to build the final crust. A thermometer is worth using here — guessing the temperature is the most common reason a double-fry fails to crisp properly.
The buttermilk brine can be started up to a day ahead. The first fry can be done a few hours ahead and refrigerated; do the second, hotter fry just before serving to restore full crispness. Frying both stages back to back and reheating later gives a noticeably softer result.
The base recipe is medium heat, mostly from the kimchi mayo. For milder, use young kimchi and halve the gochujang in the mayo. For more heat, add gochugaru to the dredge itself so the spice is baked into the crust, not just the sauce.
The kimchi and Korean flavour profile are the same idea, but the texture is completely different: a shatter-crisp double-fried crust instead of a smash-seared beef patty. See the Kimchi Burger Recipe for the classic version.
Approximately 610 calories with 34g protein per burger — higher in calories than the classic beef build mainly due to the frying oil, but also higher in protein. Reviewed by Dr. Sarah Mitchell RD, PhD.
You can freeze the chicken after the first fry only, not after the second. Freeze on a tray until solid, then bag for up to 2 months. Thaw fully in the fridge before the second, hotter fry, which restores the crisp exterior.
Stopping at a single fry and then dressing the burger too early. A single-fried crust and an early-assembled sandwich are both softened within minutes by the kimchi mayo’s moisture — double-frying and last-minute assembly solve both problems at once.
Was this guide helpful?
Your feedback helps us improve KimchiGuide for everyone.
💬 Leave a Comment & Rating
Made this kimchi chicken burger? Tell us how the double-fry turned out and rate the recipe.