Kimchi Ramen Stir-Fry (Dry Wok-Fried Style)
Every “kimchi noodle stir-fry” recipe online dumps kimchi straight into the pan with the sauce and protein, which releases its liquid all at once and steams the noodles instead of searing them. This is different — kimchi is drained and dry-seared alone for real char, while the brine reduces separately into a glaze added only at the very end. 22 minutes, one pan, genuinely dry and charred.
What Is Kimchi Ramen Stir-Fry?
Kimchi ramen stir-fry is the dry, no-broth stir-fried variation in this silo — noodles and bacon seared hard in a pan and finished with a spicy-sweet kimchi glaze. Unlike every other recipe online, the kimchi isn’t dumped straight into the pan: it’s drained of its brine and dry-seared alone first so the edges genuinely char, while the reserved brine reduces separately into a thick glaze that’s tossed in only during the final 30-45 seconds. That order is what keeps the noodles dry and charred instead of steamed and soggy. Serves 2 in 22 minutes at approximately 540 calories and 17g protein per serving.
How to Make Kimchi Ramen Stir-Fry
Kimchi ramen stir-fry takes 22 minutes: drain the kimchi and reserve its brine, reduce the brine into a glaze separately, par-boil the noodles, render the bacon, dry-sear the kimchi alone, sear the noodles and bacon together and pour in the glaze right at the end, then finish off-heat with sesame oil and garlic.
- Drain: squeeze the kimchi over a bowl to separate solids from brine.
- Reduce: simmer the brine with gochujang, gochugaru, soy sauce, and sugar into a glaze.
- Par-boil: cook the ramen block 90 seconds only, drain very dry.
- Render: crisp the bacon, then set it aside.
- Dry-sear: char the drained kimchi alone for 2-3 minutes, no liquid yet.
- Sear and glaze: toss noodles and bacon in, add the glaze only in the last 30-45 seconds.
- Finish: stir in sesame oil and garlic off-heat, plate with egg and scallion.
Why Kimchi Noodle Stir-Fry Usually Turns Out Soggy
Nearly every “kimchi noodle stir-fry” recipe online does the same thing: kimchi goes into the pan together with the sauce and protein, all at once. Kimchi is mostly water and brine — heating it releases that liquid immediately, and if the noodles are sitting in the pan when that happens, they steam instead of sear. That’s the entire reason home versions come out wet and pale instead of charred.

Draining the kimchi of its brine and charring it in a dry, screaming-hot pan for 2-3 minutes before anything else touches the pan is what builds real caramelized edges instead of a wet stew.

Simmering brine and seasonings down in their own pan, then tossing the thick glaze in for only the last 30-45 seconds, means the noodles never sit in liquid long enough to soften.

A packed pan drops in temperature and traps steam. Cooking the noodles in two batches when the pan is on the smaller side keeps the heat high enough to actually brown instead of boil.

Every competitor recipe found is built around one specific protein. The sear-then-glaze order works exactly the same with pork belly, chicken thigh, or tofu.
Dry-Sear vs Wet-Toss Technique Guide
Nearly every recipe online tosses kimchi, sauce, and protein into the pan together and simmers the whole thing at once. We tested that approach directly against a dry-sear-then-glaze order over 6 batches. The order you cook in decides whether the dish comes out charred and dry or pale and wet.

- Kimchi drained of brine, seared alone 2-3 minutes
- Glaze reduced separately in its own small pan
- Glaze added only in the final 30-45 seconds
- Noodles stay dry and pick up real char
Result: Genuinely charred, dry noodles — the texture this dish is supposed to have.

- Kimchi added straight into the pan undrained
- Sauce poured in immediately alongside it
- Everything simmered together the whole time
- Kimchi’s own liquid steams the noodles
Result: Soft, pale, watery noodles — no char at all, regardless of pan heat.
Cook Order Comparison
| Step | Dry-Sear Method (This Recipe) | Standard Wet-Toss Method |
|---|---|---|
| Kimchi prep | Drained, brine reserved separately | Added straight in, undrained |
| Kimchi cooking | Seared alone, dry, 2-3 min | Cooked together with sauce from the start |
| Sauce | Reduced separately, added at the very end | Poured in at the start, simmered the whole time |
| Pan load | Batched if crowded | Everything added at once |
Kimchi Ramen Stir-Fry Troubleshooting
| Problem | Cause | Fix |
|---|---|---|
| Noodles come out soggy | Kimchi wasn’t drained, or glaze was added too early | Drain kimchi thoroughly and hold the glaze until the last 30-45 seconds |
| Nothing browns even on high heat | Pan is overcrowded | Cook the noodles and protein in two batches instead of one |
| Glaze tastes too sharp | Kimchi is past Stage 4 / very over-ripe | Cut the added soy sauce back slightly and taste before reducing further |
Key Terms — Language & Food Science Entities
These terms clarify what this dish is, how it relates to the wider kimchi noodle silo, and why the dry-sear order matters.
Which Kimchi Stage to Use — Visual Guide
Since the reserved brine becomes the glaze, how much liquid your kimchi holds and how sour it already is both matter here — more than in a broth-based variation where the kimchi is diluted anyway.
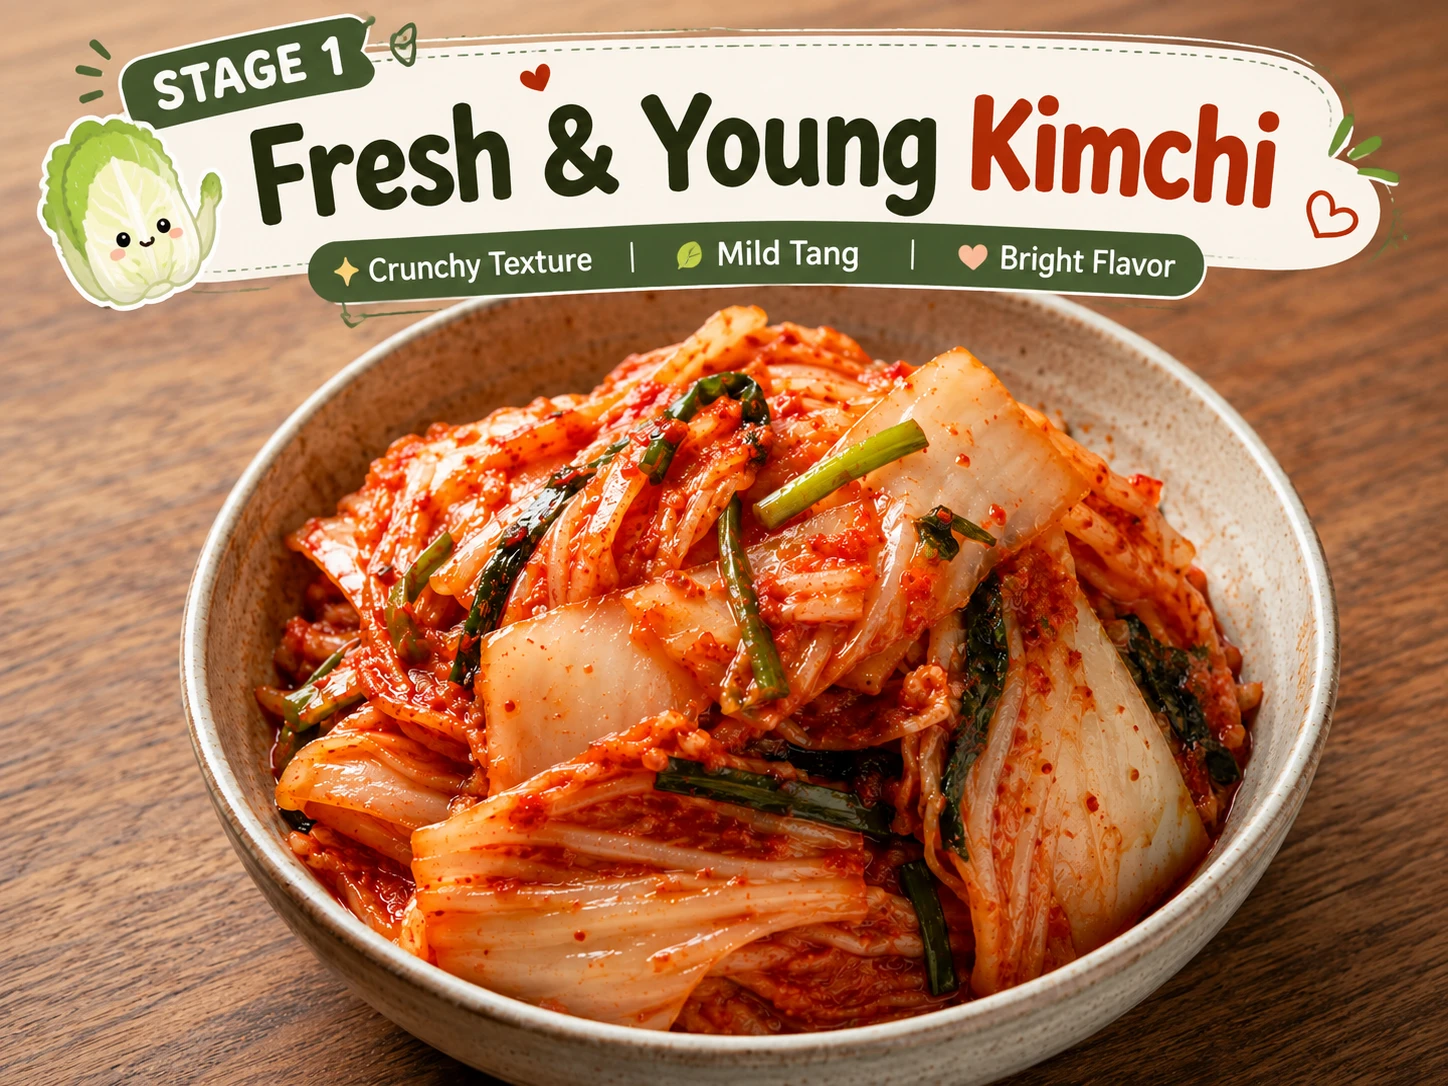
Very little brine to reduce, and what’s there tastes closer to seasoned cabbage water than a glaze base — the sauce ends up thin and flat.
✗ Do Not Use — glaze tastes flat and thin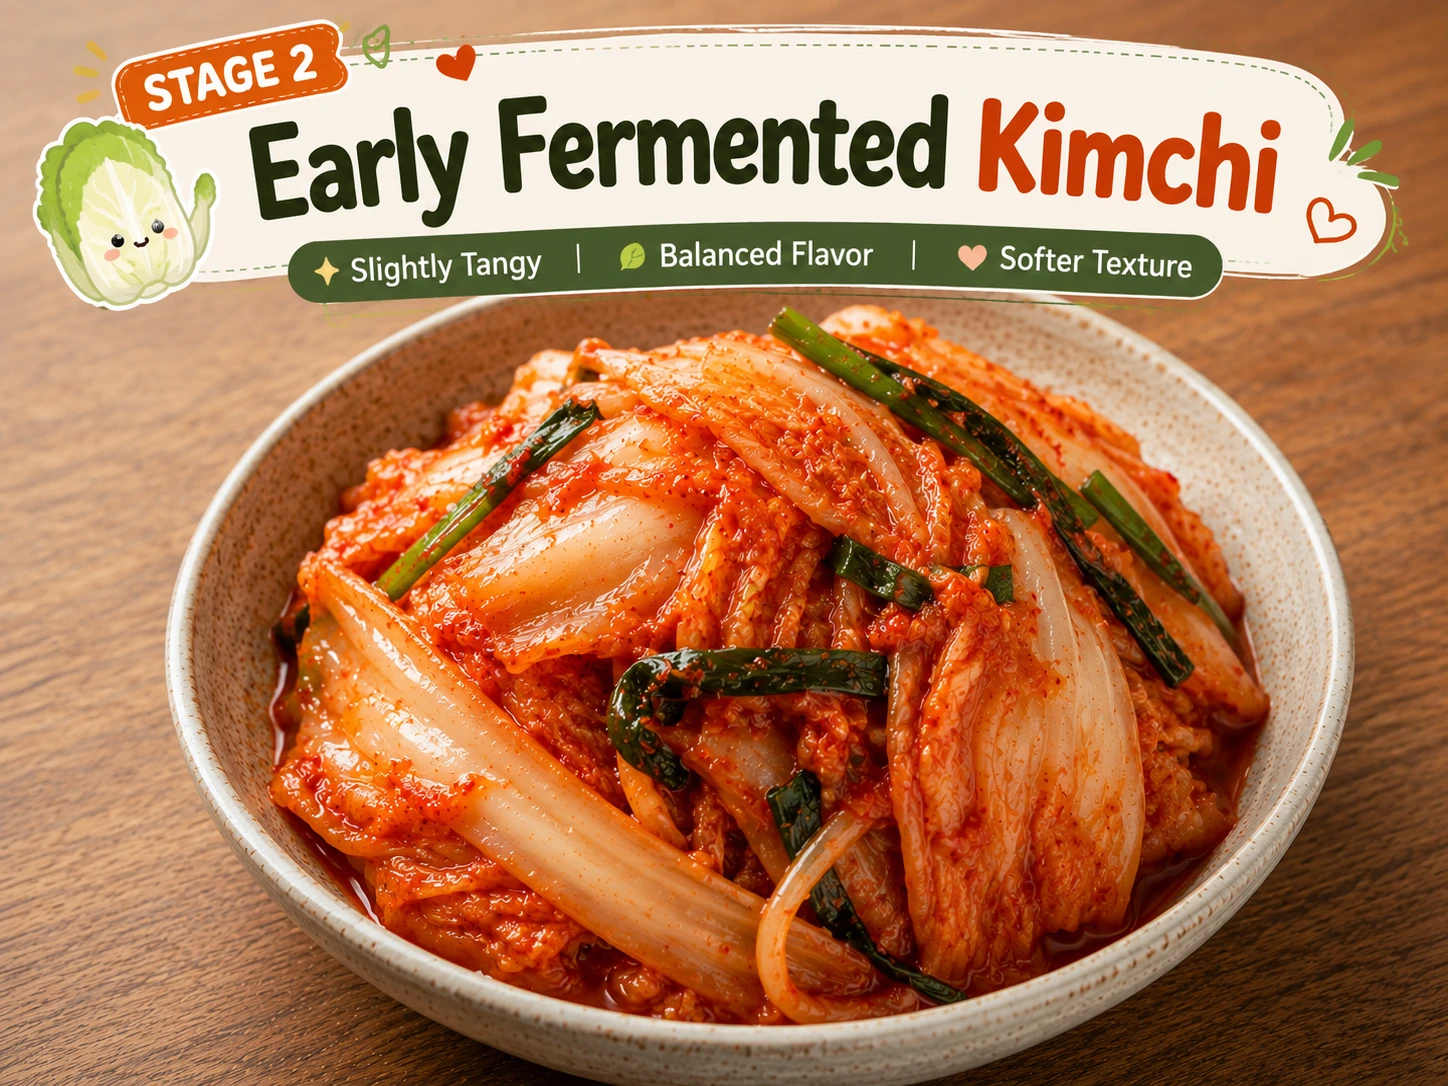
Workable, but the brine needs a longer reduction to thicken into a proper glaze since it hasn’t developed much body yet.
△ Usable — reduce glaze a few minutes longer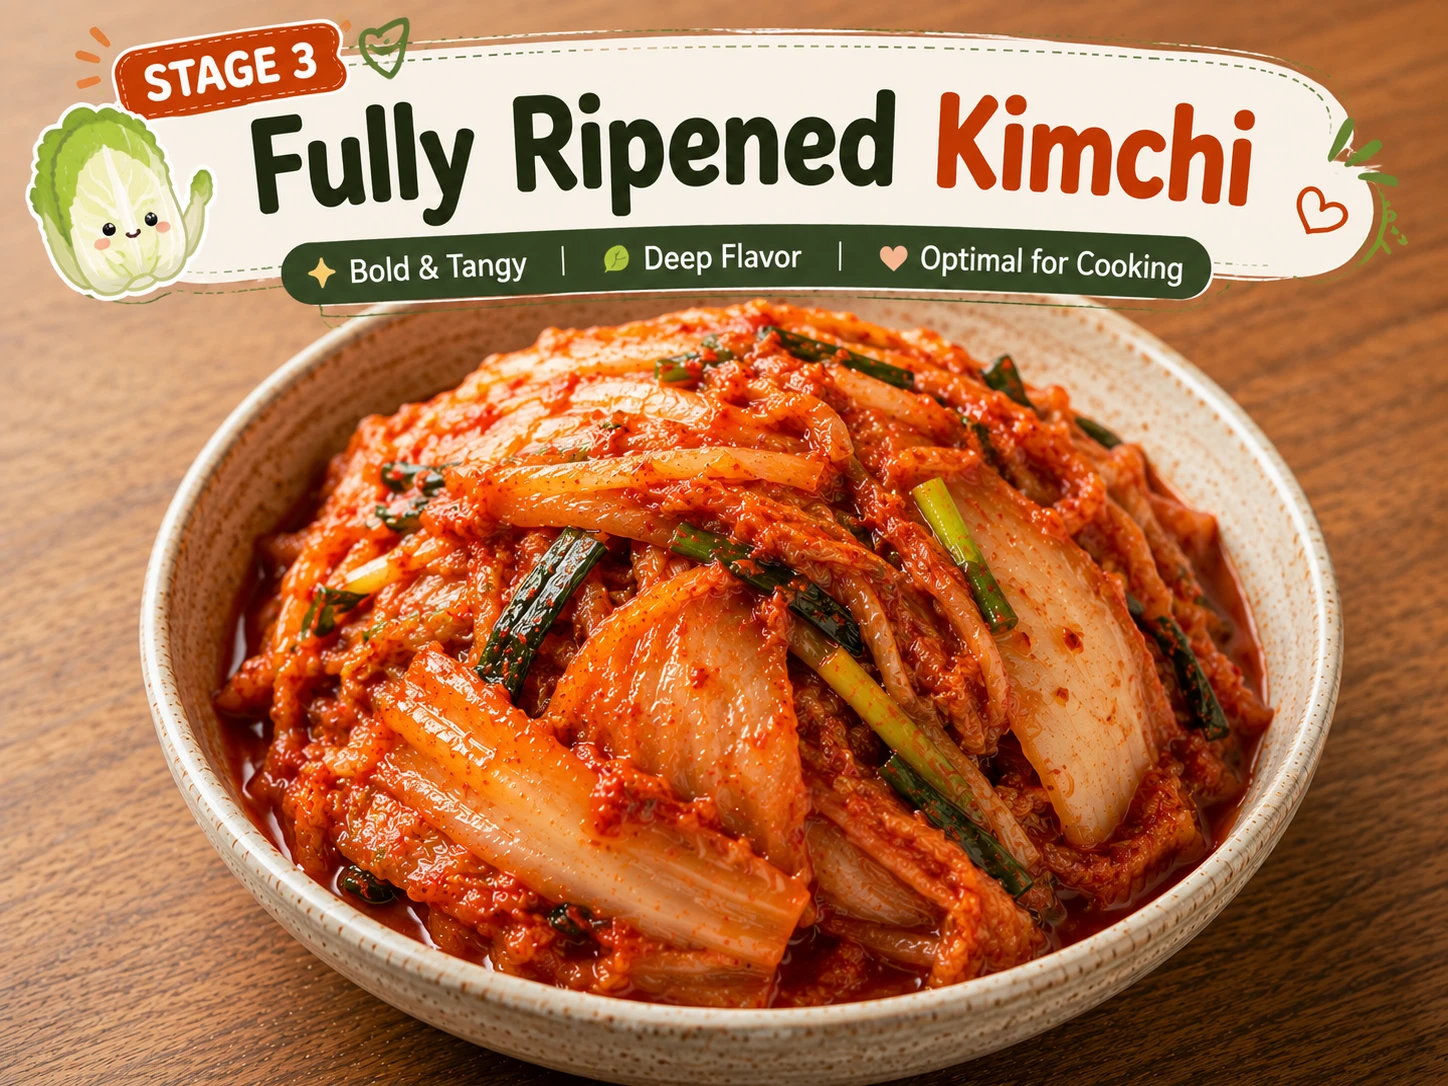
The most reliable starting point — enough brine volume and acidity to reduce into a balanced glaze in the standard 4-5 minutes, without needing adjustment.
★ Correct — recipe timing works as written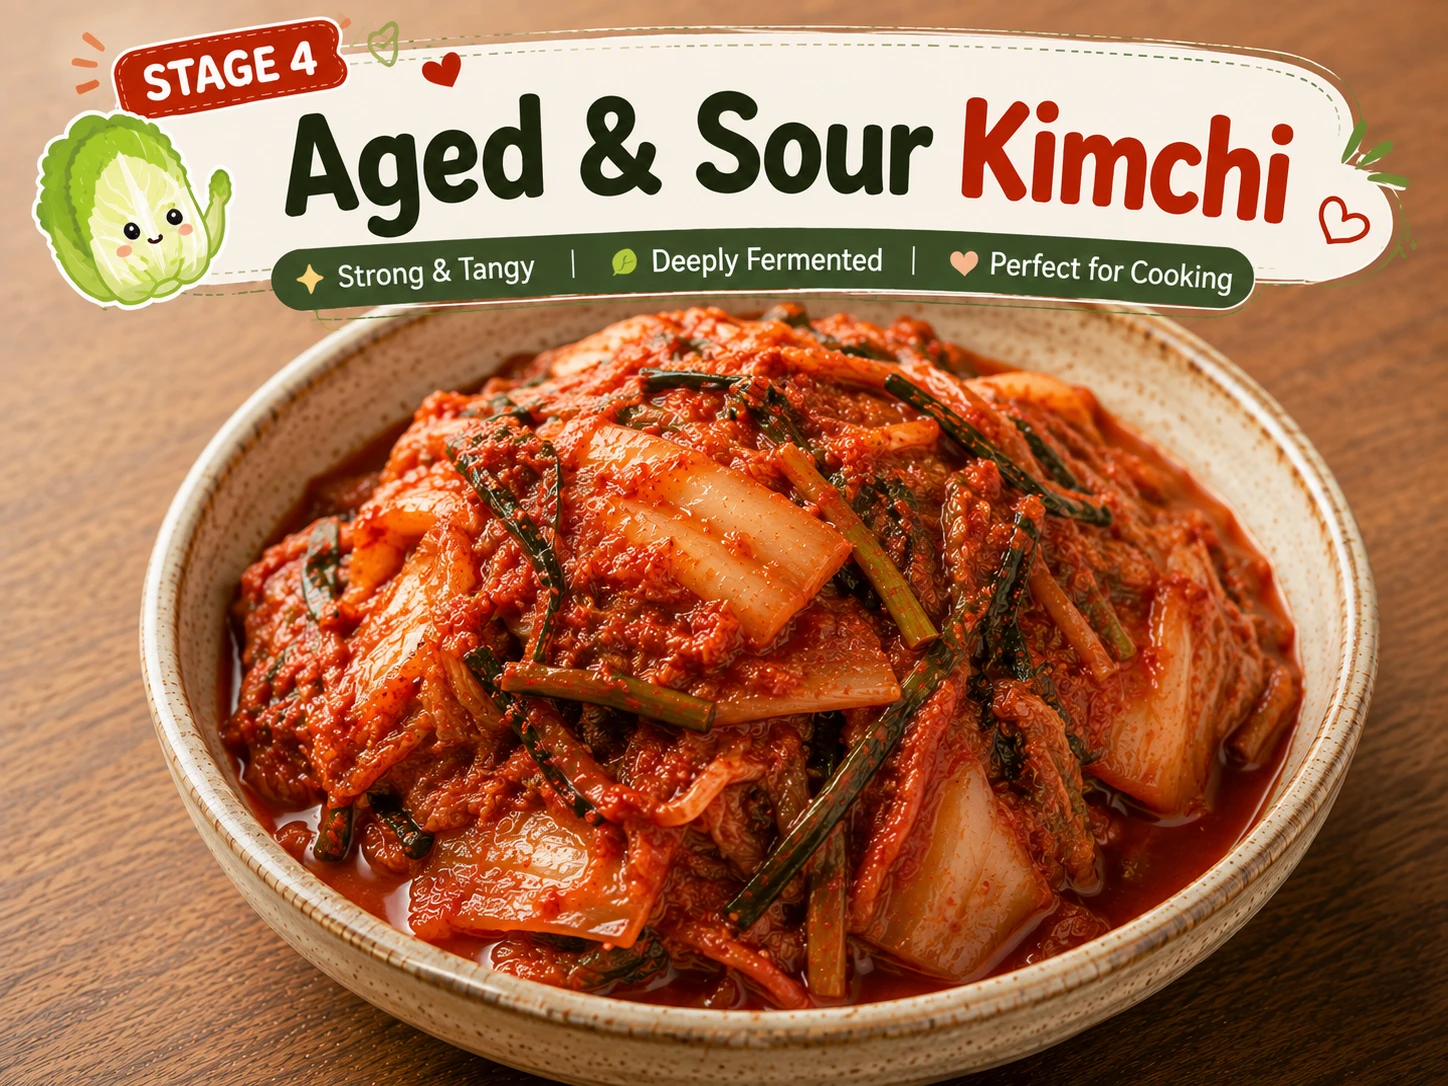
Plenty of brine to reduce, but cut the added soy sauce back slightly or the finished glaze can taste too sharp once concentrated.
△ Usable — cut soy sauce back slightlyHow Difficult Is Kimchi Ramen Stir-Fry?
Beginner-friendly overall, with one real technique to nail: resisting the urge to add the sauce early. Everything else is standard pan-frying — rendering bacon, searing noodles, tossing at the end.
← This Recipe
Ingredients + Scaler
A dry, hot-pan version of this silo’s kimchi base — the same core sauce ingredients, reworked into a reduced glaze. Don’t have kimchi aged enough on hand? Check our Best Store-Bought Kimchi Brands guide, or see How to Make Kimchi from Scratch. Got extra brine left over after measuring out what this recipe needs? See our Leftover Kimchi Juice & Brine Uses guide for ideas.

Amounts scale automatically with the servings control above.
Common Substitutions
| Ingredient | Substitute | Notes |
|---|---|---|
| Bacon | Pork belly, chicken thigh, or firm tofu | Same sear-then-glaze order — see technique guide above |
| Instant ramen | Udon, yakisoba, or spaghetti | Adjust par-boil time to the noodle’s thickness |
| Gochujang | Extra gochugaru + a little more sugar | Glaze loses some body and stickiness without gochujang |
| Egg topping | Skip entirely | Makes the dish vegan when paired with the tofu swap — see FAQ below |
How to Make Kimchi Ramen Stir-Fry
Seven steps, one pan plus a small saucepan for the glaze. The order matters more than in most recipes — keeping the kimchi and the glaze separate from the noodles until the very end is the entire technique.

Chop the kimchi into bite-sized pieces and squeeze it gently over a bowl to separate the solids from as much brine as possible. Keep both — the brine becomes the glaze in the next step, and the drained solids are what actually sears instead of steaming.

In a small saucepan, combine the reserved brine with gochujang, gochugaru, soy sauce, and sugar. Bring to a simmer and cook for 4–5 minutes, stirring occasionally, until noticeably thickened. Set aside off heat — this stays out of the main pan until the very end.

Bring a pot of water to a boil and cook the ramen block for 90 seconds only — it should still be slightly firm and undercooked. Drain thoroughly and shake the colander well. Do not rinse; the surface starch helps the glaze cling later.

In a large pan or wok over medium-high heat, cook the chopped bacon until crisp and most of the fat has rendered out. Remove the bacon with a slotted spoon and set aside, leaving the fat in the pan.

Turn the heat up to high. Add the drained kimchi and sliced onion to the same pan. Spread it into a single layer and leave it undisturbed for 2–3 minutes so the edges genuinely char — resist stirring too soon.

Return the bacon to the pan along with the par-boiled noodles. Toss over high heat for 1–2 minutes to sear — if the pan feels crowded, cook in two batches instead of forcing it all in at once. Pour in the reduced glaze only during the final 30–45 seconds and toss until evenly coated.

Remove the pan from the heat and stir in the sesame oil and minced garlic — adding them off-heat keeps both tasting fresh instead of turning bitter. Divide between two plates and top with a fried egg, sliced scallion, and toasted sesame seeds. Serve immediately, while it’s still hot and crisp.
What We Tested for the Stir-Fry Version
The technique that cannot be skipped: keep the kimchi’s liquid out of the pan until the very end. Drain and dry-sear the solids, reduce the brine into a glaze separately, and don’t crowd the pan — skip any one of these and the dish steams instead of sears.

Ingredient Notes — What Each One Does and Why
A quick amount list only tells you how much. Here’s what each ingredient is actually doing in the pan, and where it’s safe to swap.
All 13 Kimchi Noodle Variations
Same kimchi-noodle foundation, 13 different directions.


What to Serve With Kimchi Ramen Stir-Fry
This is a rich, savory plate on its own, so it pairs well with something cool and light to balance it out. If you’re building a full spread, our Gochujang Mayo Sauce Guide makes a good dipping sauce for a side of dumplings or vegetables.


Storing Kimchi Ramen Stir-Fry
Stir-Fry vs the Rest of the Silo — What Changes Nutritionally
Reviewed by Dr. Sarah Mitchell RD, PhD. This is the richest variation in the silo so far, mostly from the rendered bacon fat — swapping in chicken thigh or tofu brings calories and fat down closer to the Udon variation while keeping the same technique.
| Version | Calories | Fat | Sat. Fat | Protein | Sodium |
|---|---|---|---|---|---|
| Classic Kimchi Ramen | 410 | 14g | 4g | 16g | 980mg |
| Kimchi Udon | 480 | 10g | 2g | 18g | 1120mg |
| Kimchi Noodle Soup | 320 | 6g | 1g | 12g | 780mg |
| Cold Kimchi Noodles | 480 | 12g | 2g | 14g | 950mg |
| Kimchi Ramen Stir-Fry | 540 | 24g | 7g | 17g | 1050mg |
Kimchi Ramen Stir-Fry — 17 Questions Answered
Most recipes dump kimchi straight into the pan along with the sauce and protein. Kimchi releases a lot of its own liquid when heated, and if that liquid hits the pan all at once, the noodles steam in it instead of searing. Draining the kimchi and searing it dry first, then adding a separately reduced glaze only at the end, avoids this.
A dry-sear means cooking an ingredient in a hot, mostly liquid-free pan so it browns and chars instead of stewing. Searing the drained kimchi solids alone for 2-3 minutes before any liquid is added builds real caramelized flavor that a wet, all-at-once stir-fry can’t produce.
Simmering the sauce together with the noodles the whole time keeps them wet and soft. Reducing the brine and seasonings into a thick glaze in a separate pan first, then tossing it in for only the last 30-45 seconds, coats the noodles without ever giving them a chance to steam.
A pan packed too full drops in temperature and traps steam, so ingredients boil instead of sear. If your pan or wok is on the smaller side, cook the noodles and protein in two batches rather than all at once to keep the heat high enough to actually brown things.
Yes — udon, yakisoba, or even spaghetti work with the same technique. Adjust the par-boil time to the noodle (thicker noodles need slightly longer) and always drain very dry before searing.
Yes, the technique is protein-agnostic. Thin-sliced pork belly, chicken thigh, or firm tofu all work using the same order: render or sear the protein first, then dry-sear the kimchi in the same pan.
Swap the bacon for pan-seared tofu or mushrooms and use a vegetarian-labelled kimchi (traditional kimchi often contains fish sauce or salted shrimp). Skip the fried egg topping to make it fully vegan. Our Korean Tofu Guide covers how to press and sear tofu so it holds up the same way the bacon does here.
Stage 3 aged kimchi (2-4 weeks) gives the best balance of acidity and char. Very young kimchi has less brine to reduce into a glaze; very over-ripe kimchi can make the glaze taste sharp unless you cut back the added soy sauce slightly.
Approximately 540 calories per serving. Macros: 56g carbohydrates, 17g protein, 24g fat, 7g saturated fat, 1050mg sodium, 3g fibre.
Yes, unlike the cold noodle variation in this silo, this dish reheats well. Use a hot, dry pan to re-crisp the noodles rather than a microwave, which steams them soft again.
The glaze can be reduced up to 3 days ahead and refrigerated. Par-boil and sear the noodles fresh each time, since pre-cooked noodles lose the texture the dry-sear step is built around.
A short par-boil leaves the noodles slightly undercooked and dry enough to actually sear and pick up char in the pan. Fully boiled, soft noodles just steam and turn mushy instead of browning.
No — this uses noodles instead of rice, and the technique is built specifically around searing kimchi and noodles dry rather than the stir-and-fold method used for fried rice.
Kimchi noodle soup is a light, brothy variation eaten hot with a spoon. This version has no broth at all — noodles are seared dry in a pan and finished with a thick glaze, closer to a stir-fry than a soup.
The two most common causes are not draining the kimchi thoroughly before searing it, or crowding too much into the pan at once. Check both before adjusting anything else.
Written as Korean-standard heat. Increase or reduce the gochugaru in the glaze to taste — the glaze concentrates during reduction, so start with less than you think you need.
Drain the kimchi and reserve the brine, reduce the glaze separately, par-boil the noodles, render the bacon, dry-sear the kimchi alone, sear the noodles and bacon together and add the glaze only at the end, then finish off-heat with sesame oil and garlic.

Ji-Young writes the full Kimchi Ramen silo at KimchiGuide, testing each variation across multiple batches before publishing.
Full Bio →
Dr. Mitchell reviews the nutrition data and health claims across every KimchiGuide recipe for accuracy.
Full Bio →
Leave a Comment
Tried this dry, wok-fried version? Let us know how your noodles turned out.