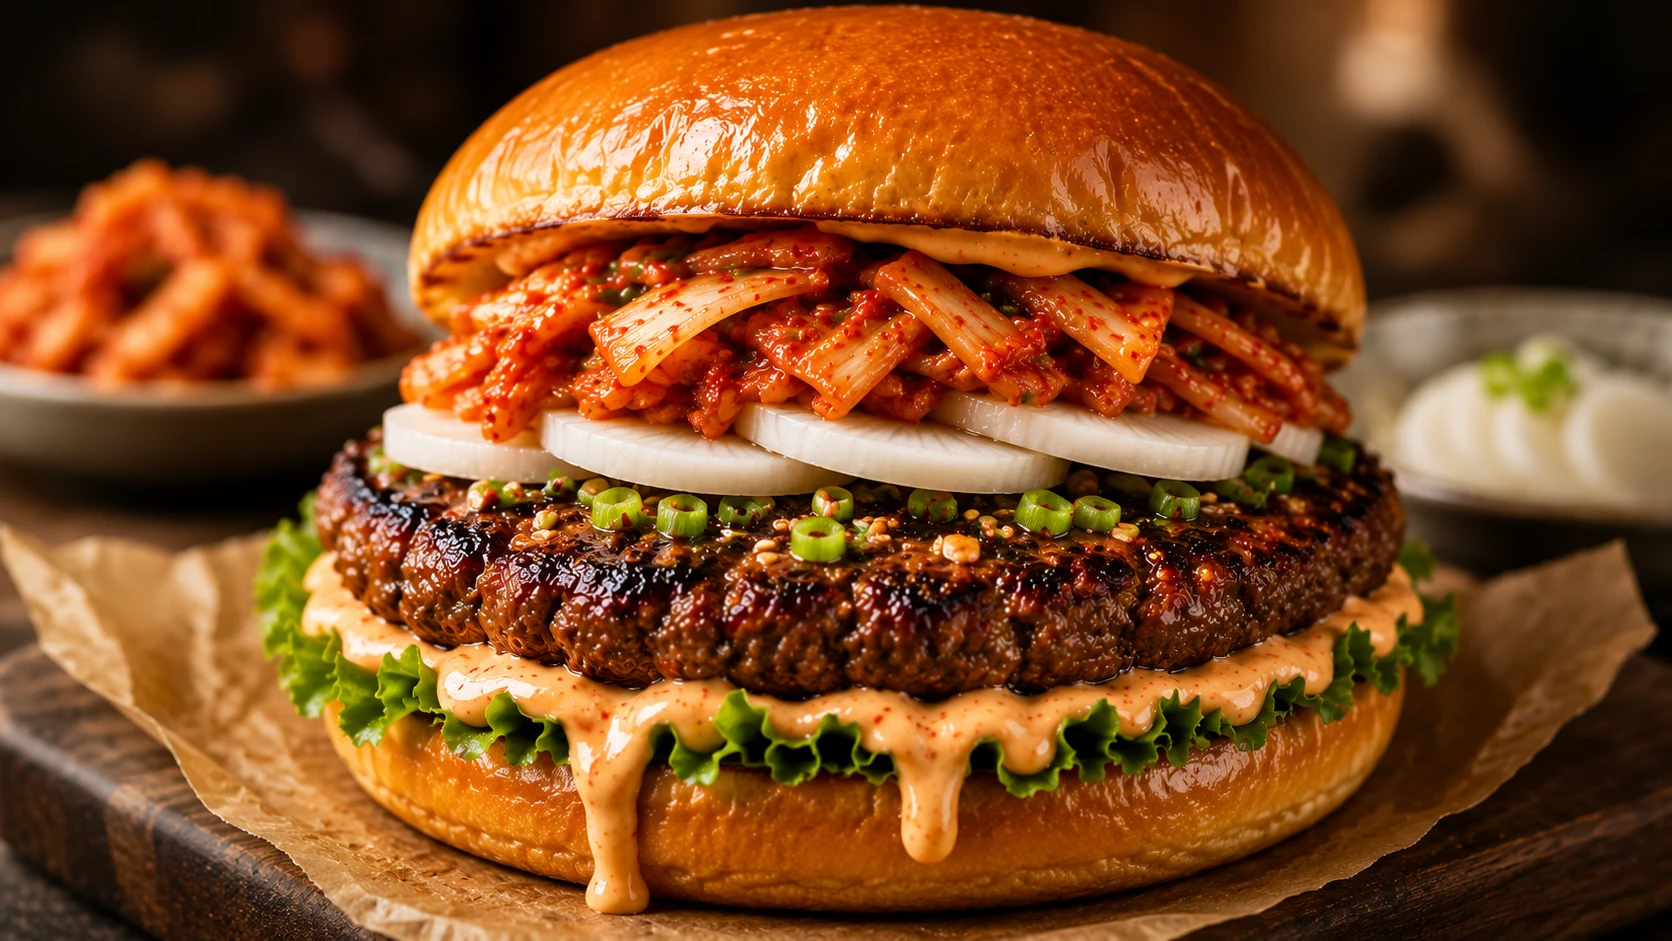
Kimchi Bulgogi Burger Recipe Why the Marinade Goes In the Meat, Not On It
Bulgogi burger recipes split evenly between mixing marinade into raw beef and glazing a plain patty afterward — and none of them test both. We did, plus Asian pear versus kiwi as a tenderizer, exactly where the kimchi belongs, and — new in this update — a tested panko-panade option and optional ginger against the base marinade.


What Is a Kimchi Bulgogi Burger?
A kimchi bulgogi burger is a beef patty made from ground beef mixed with a sweet soy bulgogi marinade before cooking — not glazed on afterward — topped with Kewpie kimchi mayo and quick-pickled daikon on a toasted brioche bun. The three non-negotiables: mix the marinade into the raw beef rather than glazing a plain patty, cook over medium rather than high heat so the sugar doesn’t scorch, and rest the formed patties at least 20 minutes before cooking. A panko panade and a little fresh ginger are both well-tested optional add-ins if you want them — see below.
How to Make a Kimchi Bulgogi Burger
A kimchi bulgogi burger takes 40 minutes: mix a sweet soy marinade into ground beef, rest the patties, then sear gently over medium heat while building the kimchi mayo and pickled daikon.
- Marinate: mix soy, sugar, sesame oil, garlic and pear into the beef (ginger and a panko panade are both optional).
- Rest: form patties, refrigerate at least 20 minutes.
- Sauce: whisk Kewpie mayo, chopped kimchi, gochujang.
- Pickle: quick-pickle sliced daikon in rice vinegar and sugar.
- Sear: medium heat, 3-4 minutes per side, watching for scorching.
What Every Bulgogi Burger Recipe Online Misses
We read the established bulgogi burger recipes — Serious Eats (via Just A Pinch), Once Upon a Chef, OMG Yummy, Nummy Recipes, James Strange, 2CookinMamas, Tablespoon.com, Explore Cook Eat, and blondekimchi.com’s Lotteria-style version. They split roughly evenly on several core decisions and none test them directly. Here is the gap this guide closes.
| Feature / Information | Mixed-In Recipes | Glazed-On Recipes | This Guide |
|---|---|---|---|
| Mixed-in vs glazed marinade tested head to head | △ Uses one method, doesn’t test the other | △ Uses one method, doesn’t test the other | ✓ Both tested, winner explained |
| Why the marinade scorches on high heat | ✗ Not addressed | △ Sometimes mentioned | ✓ Explained with the fix |
| Asian pear vs kiwi tenderizer for ground beef | △ One or the other mentioned | ✗ Not applicable | ✓ Both tested against each other |
| Kimchi placement tested (mayo vs slaw vs side) | ✗ Not tested | ✗ Not tested | ✓ Tested, mayo placement wins |
| Panko panade tested against no panade | △ Several use panko, but don’t test without it or explain why | ✗ Not applicable | ✓ Tested both ways, kept optional |
| Ginger tested in vs out of the marinade | △ Most include it, none test omitting it | ✗ Rarely mentioned | ✓ Tested both ways, kept optional |
| Test kitchen data (multiple batches compared) | ✗ None | ✗ None | ✓ Documented batch results |
| Recipe + FAQPage + ItemList schema together | ✗ None | △ Recipe schema only | ✓ All three, plus Article |
What Makes This Build Different
Five decisions separate a kimchi bulgogi burger with real depth of flavour from one that just tastes like a burger with sauce on it.
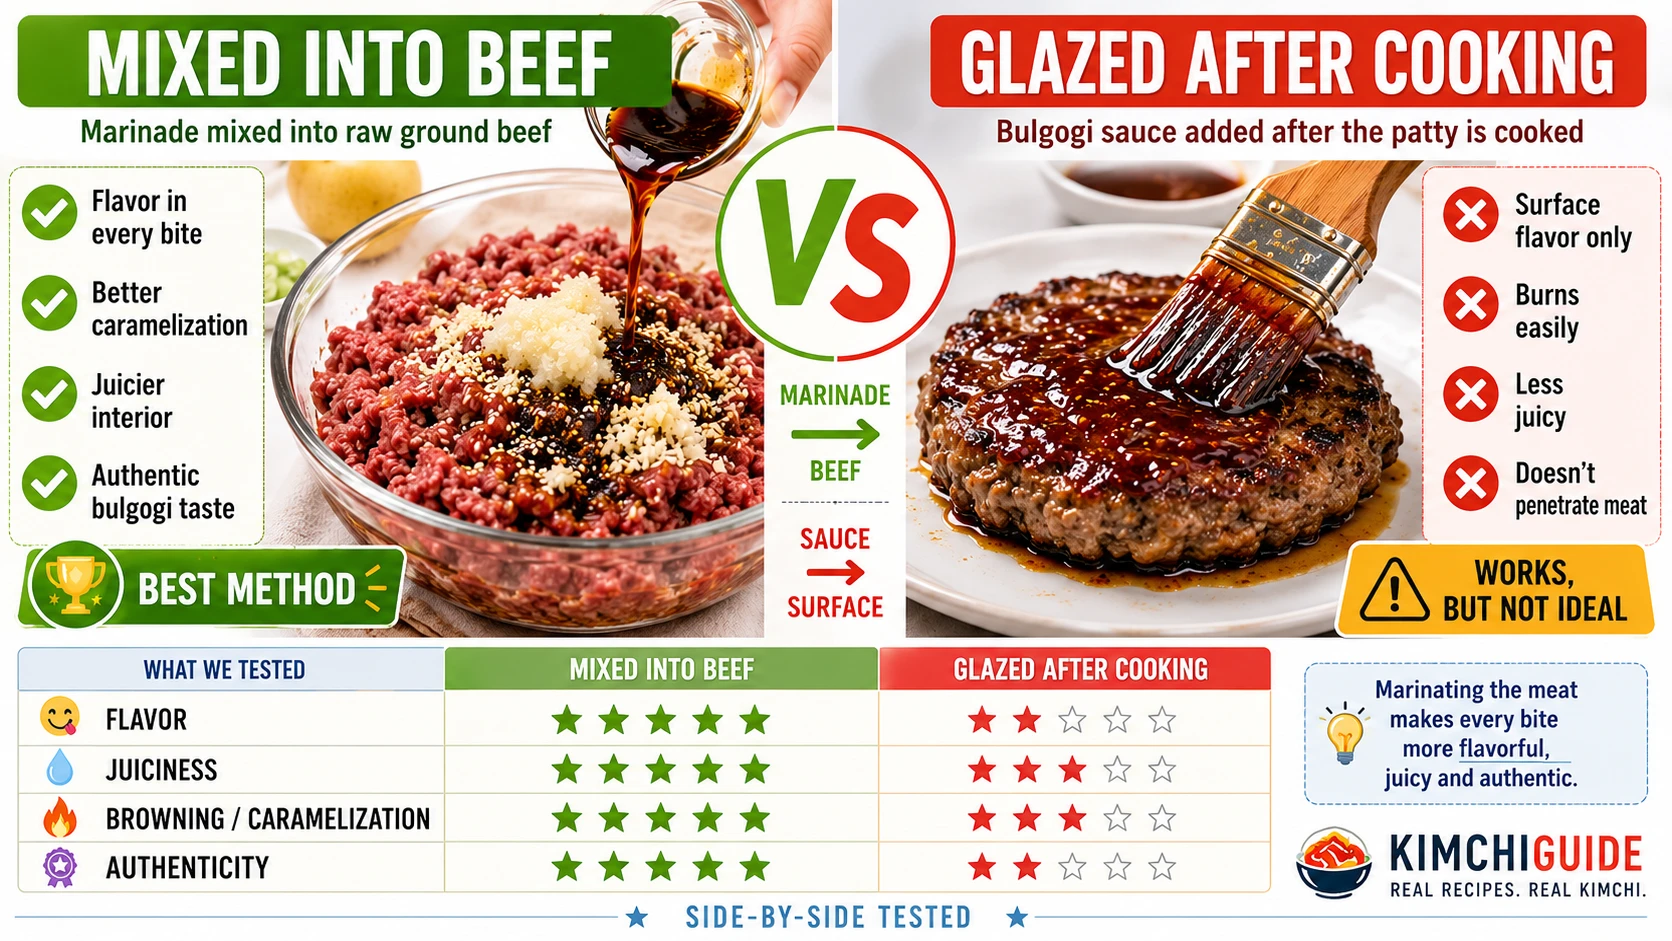
Mixing the marinade into raw beef flavours the entire patty. Glazing a plain patty afterward only coats the surface — noticeably flatter when tasted blind.
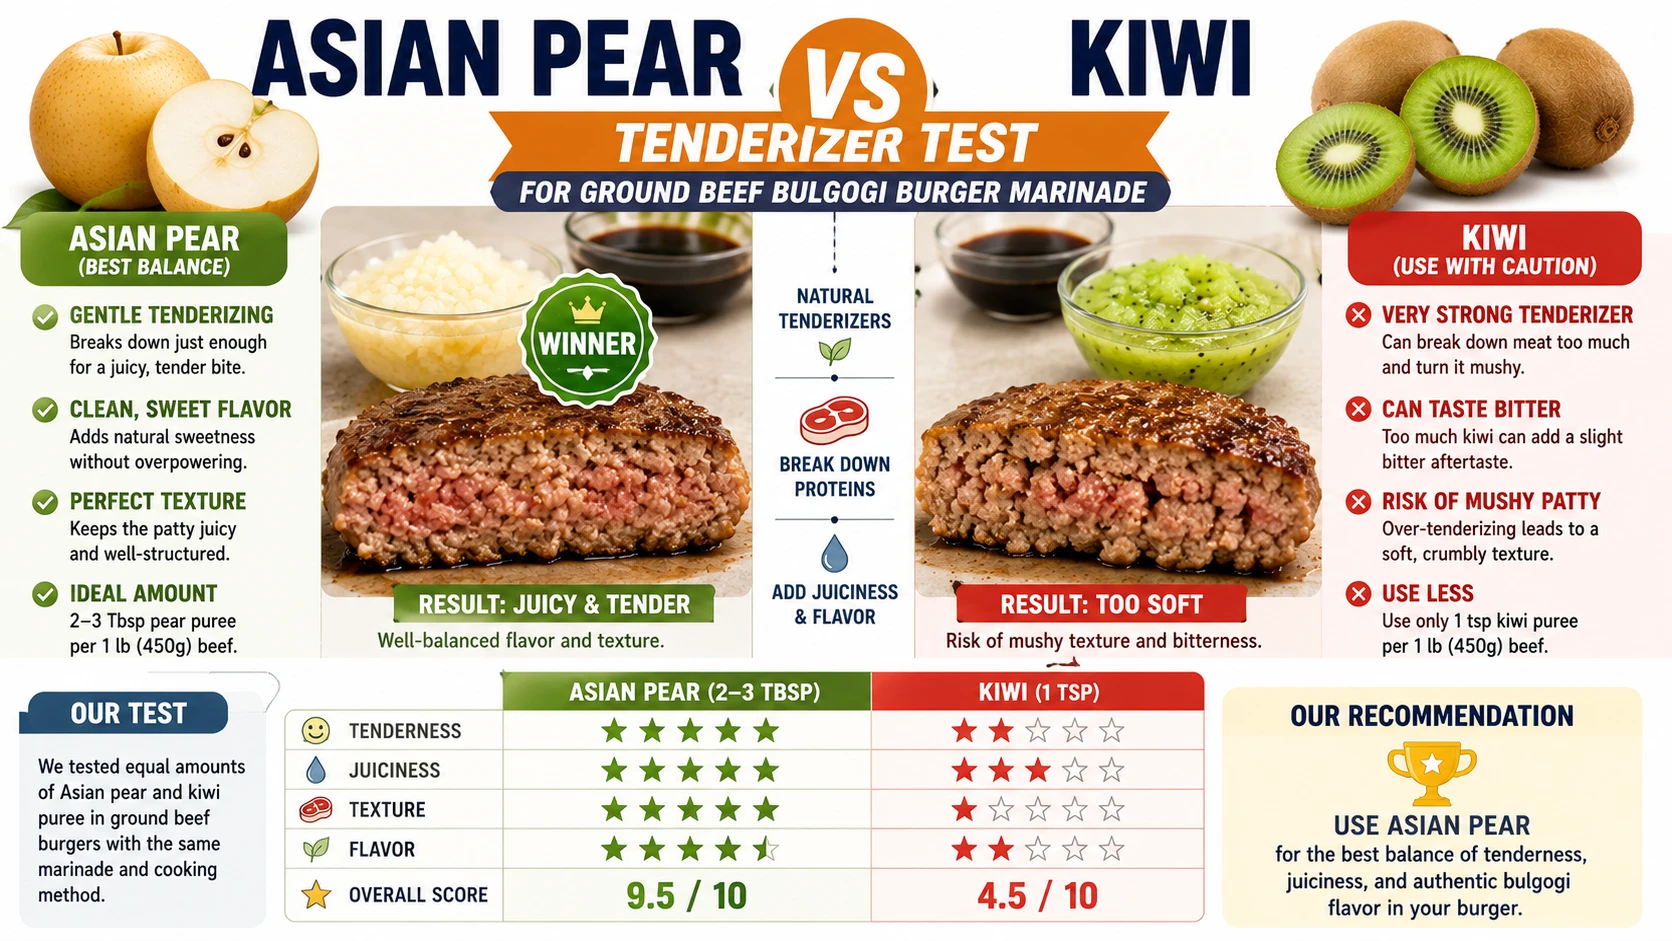
Since grinding already tenderizes the meat, kiwi’s stronger enzymatic effect risks turning the texture mushy. Asian pear’s gentler sweetness and browning boost is the safer, better choice.
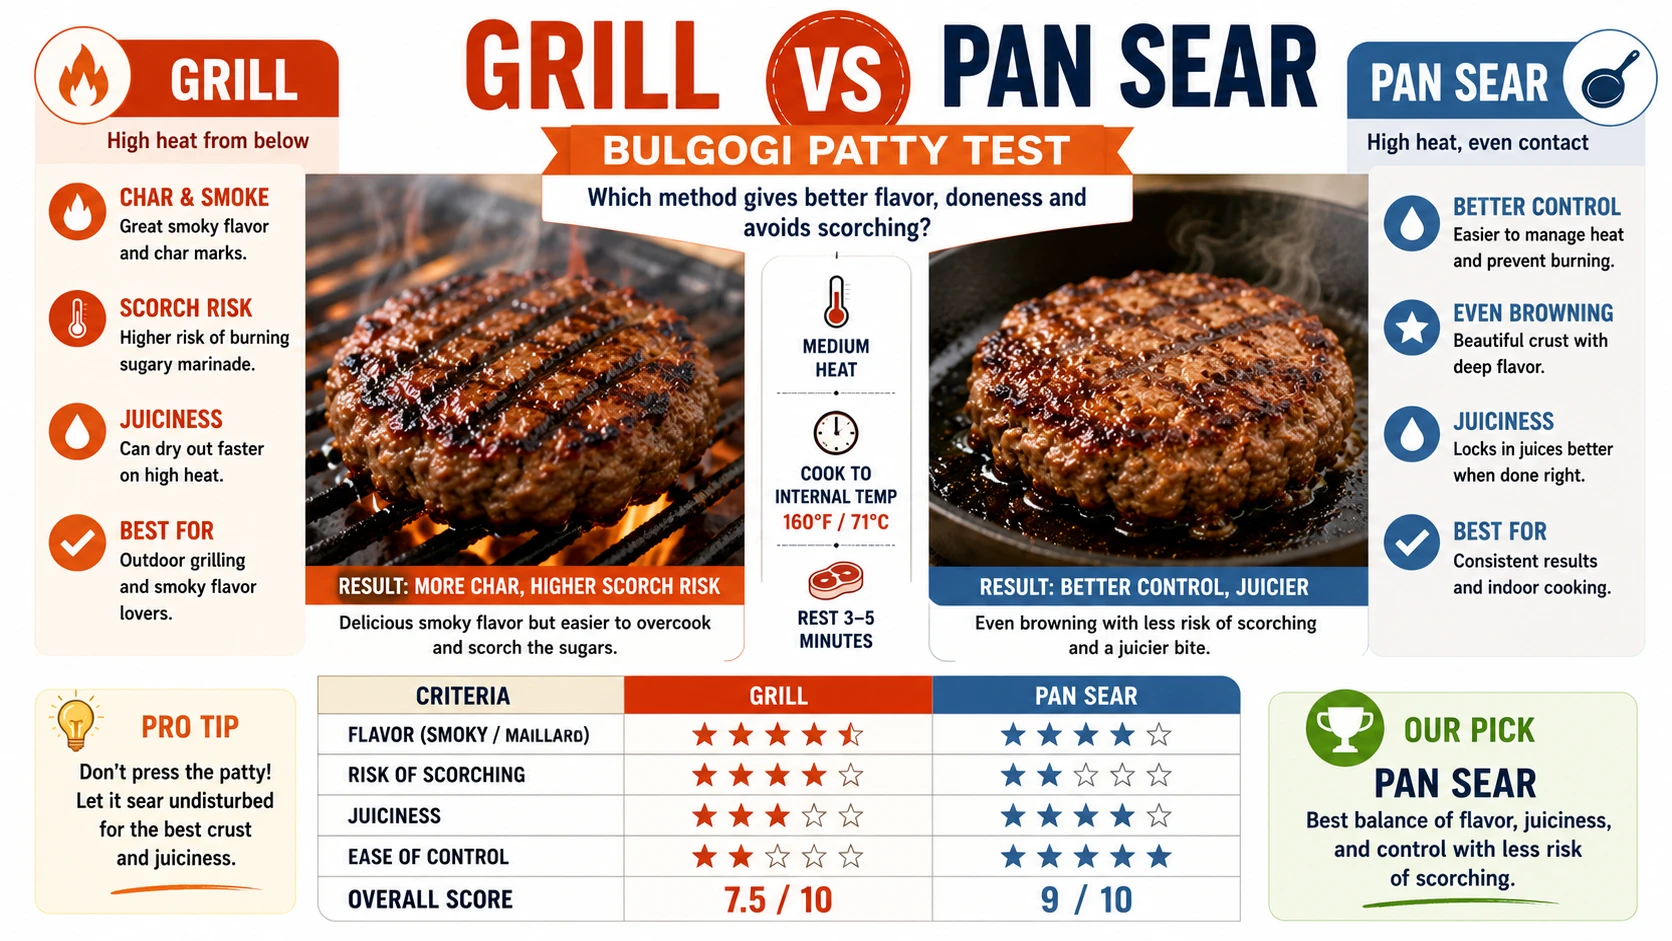
Both grilling and pan-searing scorch a sugar-heavy marinade if the heat is too high. Medium heat with a slightly longer cook worked reliably in both methods.
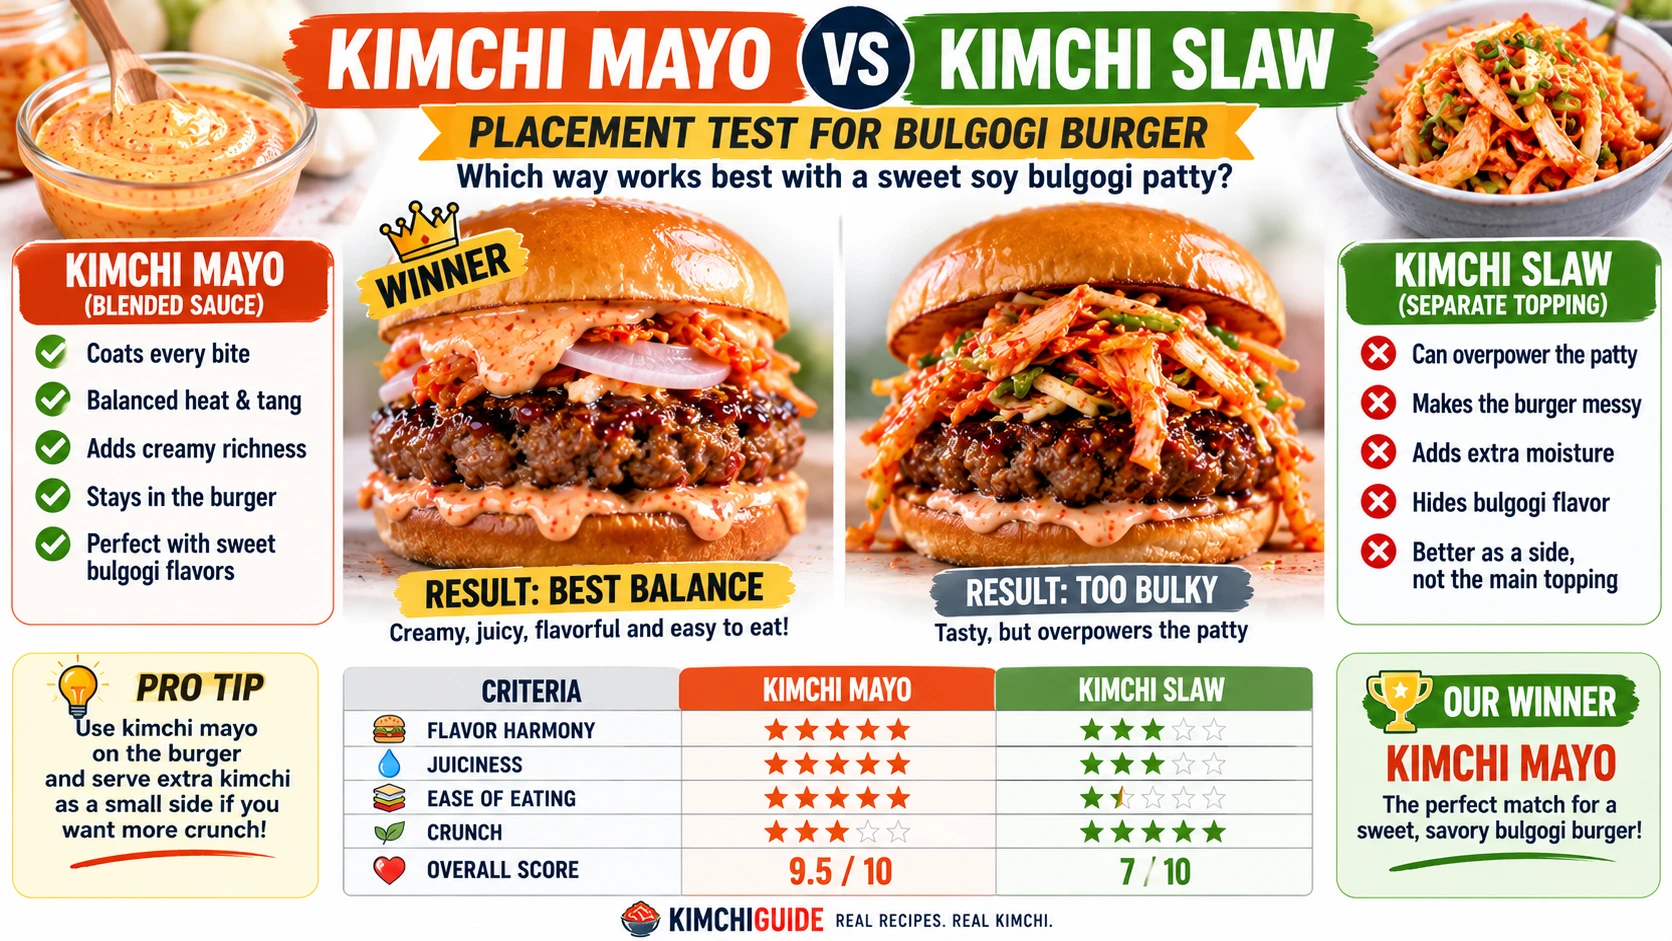
A full separate slaw added too much bulk against an already sweet, saucy patty. Kimchi folded into the mayo kept the whole sandwich balanced.

Panko soaked in a spoonful of the marinade before mixing in held the patty together better and stayed juicier through the medium-heat cook. The no-panade version tastes more purely of beef — both are valid, so it’s left optional.
Key Terms — Language & Food Science Entities
Understanding these terms clarifies why the marinade, tenderizer and panade choices matter specifically for a ground-beef bulgogi patty.
How Difficult Is a Kimchi Bulgogi Burger?
Nothing here needs the split-second timing of a smash burger — the only real skill is resisting the urge to cook it on high heat like a plain patty.
← This Recipe
Which Kimchi Stage to Use — Visual Guide
Against a sweet, caramelised bulgogi patty, kimchi’s job is purely to cut through the sweetness — Stage 3 is the correct choice here too.

Tastes like spiced cabbage — against a sweet bulgogi patty this reads as more sugar rather than the contrast the dish needs.
✗ Not Recommended
Acceptable if ripe kimchi is unavailable, but won’t fully balance the marinade’s sweetness against the mayo.
△ Acceptable
Full sour-umami complexity cuts through the marinade’s sweetness the same way it cuts through beef fat in the plain build — the balance point.
★ Correct — the only real choice
Can actually work well here against the marinade’s strong sweetness if squeezed hard — use slightly more sparingly than in the plain build.
△ Usable — squeeze firstIngredients
Substitution Guide — What Works, What Doesn’t
| Ingredient | Best Substitute | Ratio | Gluten-Free | Taste/Texture Impact |
|---|---|---|---|---|
| Asian pear (tenderizer) | Grated onion | 1 tsp per 1 tbsp pear | ✓ | Loses the subtle sweetness, still tenderizes and browns well. |
| Asian pear (alternative) | Kiwi, used sparingly | Half the pear amount | ✓ | Stronger enzymatic effect — use less or the texture turns mushy. |
| Ground beef (protein swap) | Ground pork, traditional in some bulgogi variations | 1:1 | ✓ | Close match, slightly sweeter finish. |
| Ground beef (lighter option) | Ground chicken/turkey + 1 tbsp cold butter | 1:1 | ✓ | Noticeably lighter, needs added fat for the same sear. |
| Soy sauce | Tamari | 1:1 | ✓ Makes it GF | Virtually identical flavour. |
| Kewpie mayo | Hellmann’s + ½ tsp MSG + ½ tsp rice vinegar | Per 3 tbsp | ✓ | 60% match. Regular mayo alone reads flatter against this sweeter patty. |
| Panko panade (new, optional) | Certified GF panko or torn white bread, soaked the same way | 2 tbsp per patty batch | △ Check brand | Holds the patty together and adds juiciness; omit entirely for a purer beef-forward bite. |
How to Make a Kimchi Bulgogi Burger
Seven steps built around mixing the marinade directly into the beef — the technique this recipe tested and settled on. Step 5, the sear, is where most home cooks go wrong by using too much heat.
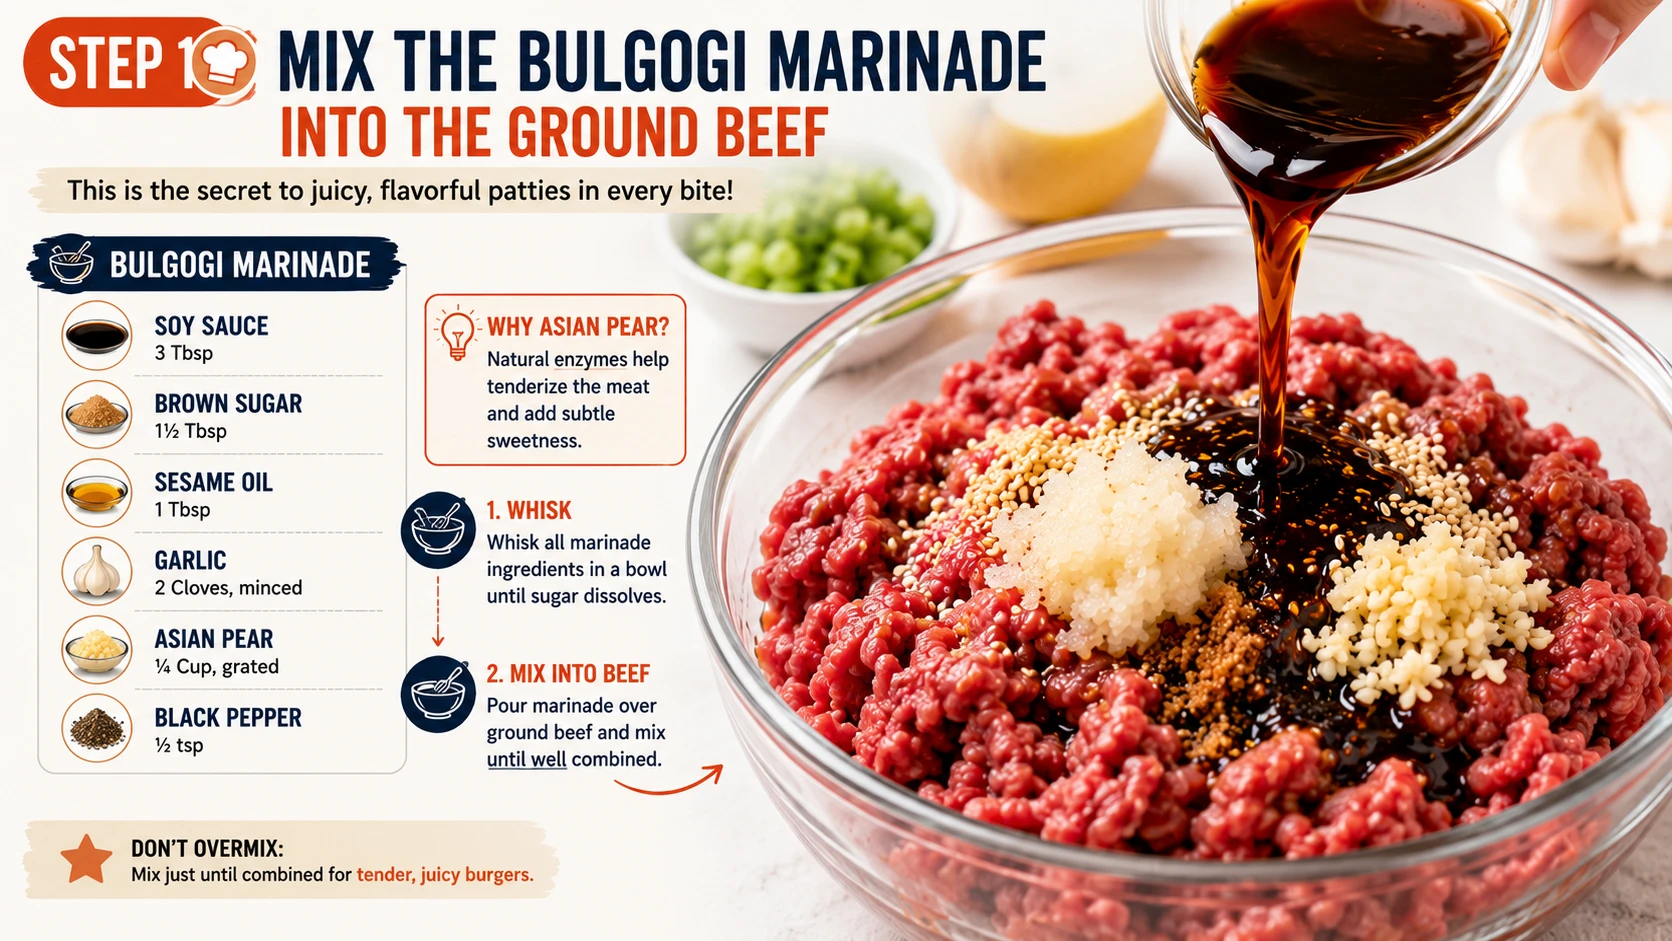
In a bowl, combine the beef mince with soy sauce, brown sugar, sesame oil, grated garlic, grated Asian pear and finely chopped spring onion. If you’re adding the optional ginger, grate it in with the garlic. Mix gently with your hands or a fork just until everything is evenly distributed — stop as soon as it looks combined, since overworking ground beef makes the final texture noticeably tougher and denser.
Optional panko panade: if you want extra insurance against a crumbly patty, soak 2 tbsp panko in 1 tbsp of the marinade for about 2 minutes before you add it to the beef — this is the panade technique several popular bulgogi burger recipes use, and it held the patty together better and stayed juicier in testing. It’s genuinely optional; the base recipe works without it and tastes more purely of beef.
This is the single decision that separates this recipe from about half of what’s published online. Mixing marinade into raw beef means every bite carries the bulgogi flavour, not just the exterior — closer to what a proper bulgogi marinade is meant to do, even though this is ground beef rather than the traditional thin-sliced cut.
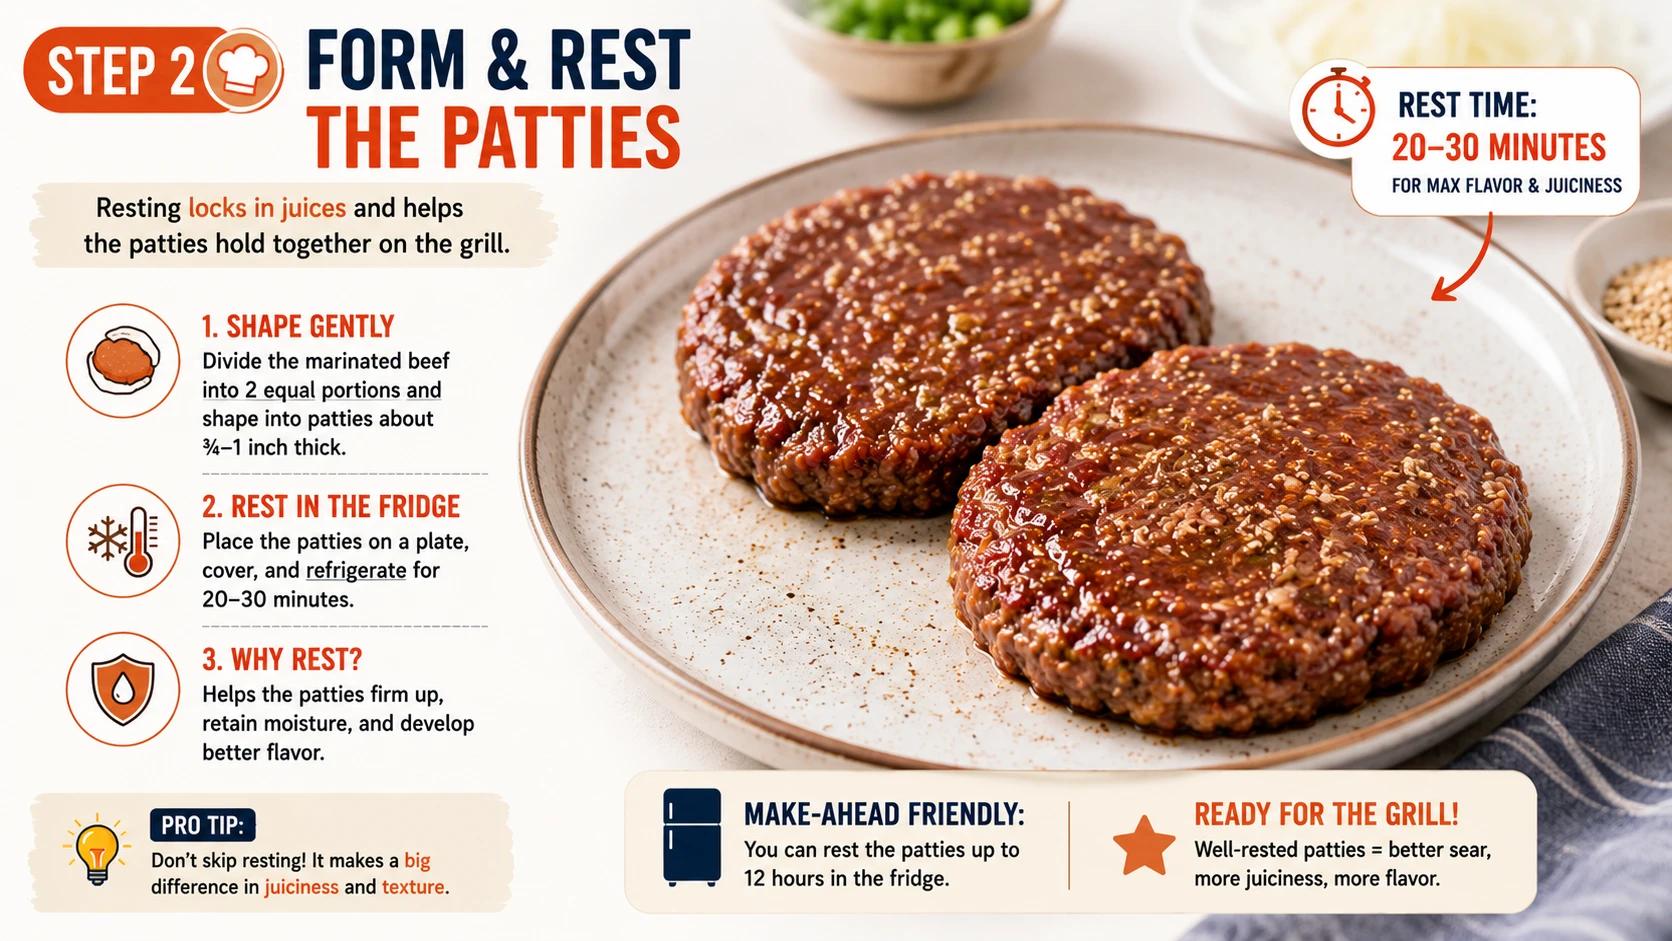
Divide the marinated mixture into two patties, shaping them gently without compacting too firmly. Refrigerate for at least 20 minutes — this isn’t just about food safety or convenience, it gives the salt and sugar in the marinade time to slightly firm up the mixture, which helps the patties hold their shape better once they hit the pan.
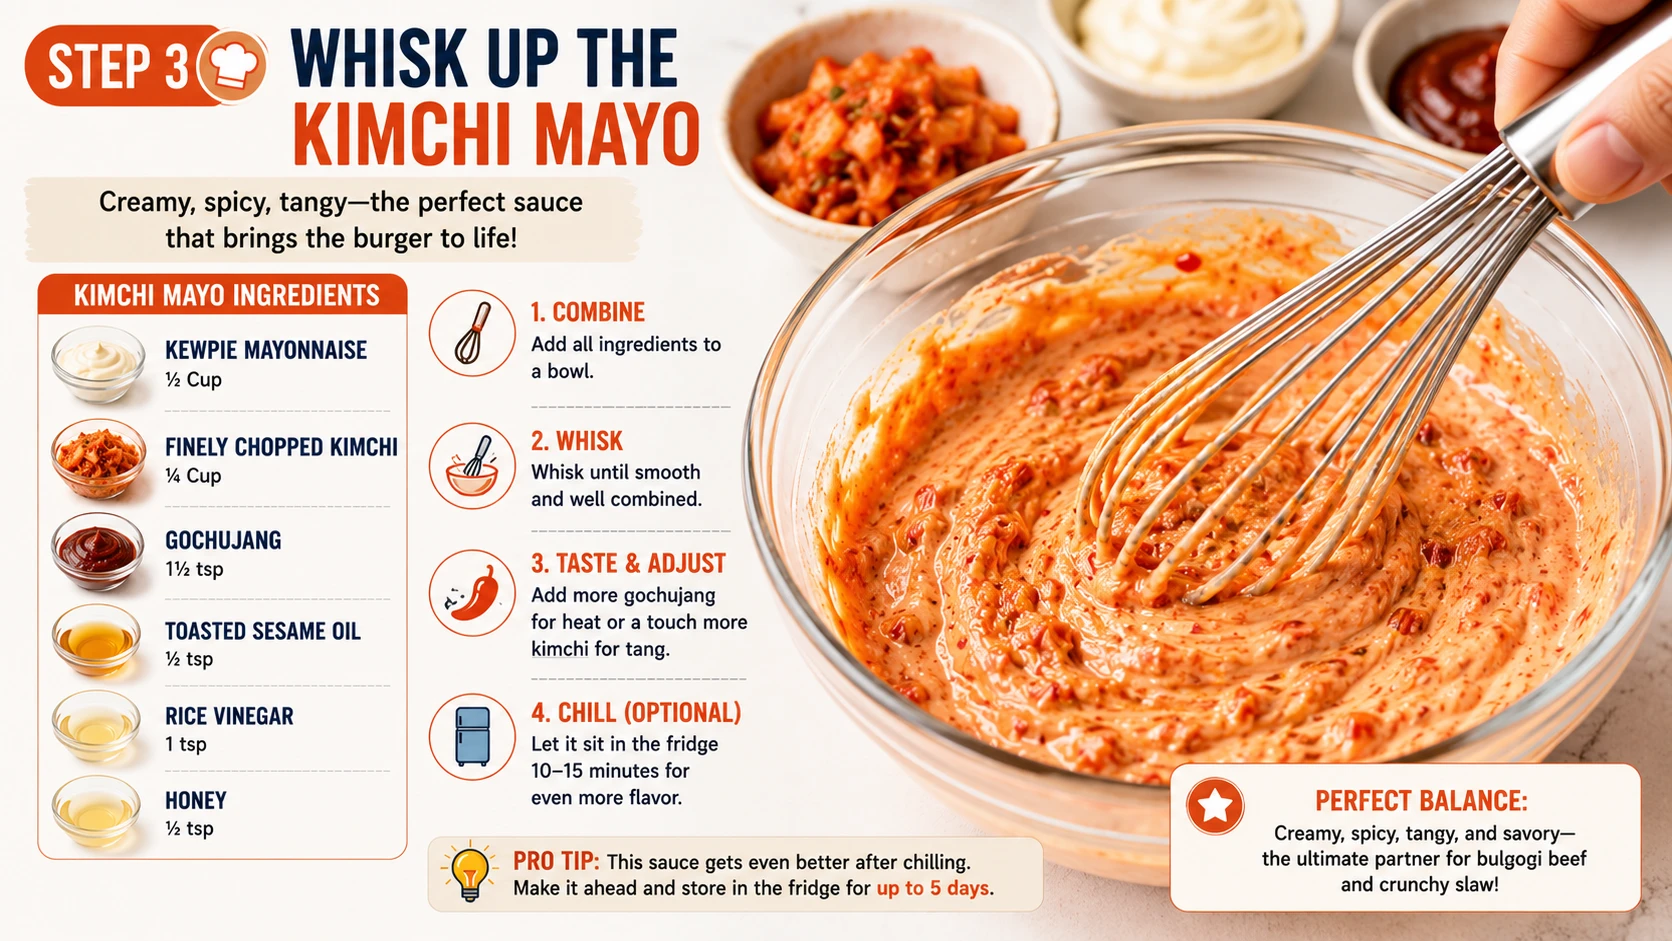
Whisk Kewpie mayo, finely chopped kimchi and gochujang together in a small bowl. This placement — kimchi folded directly into the mayo rather than served as a full separate slaw — was the version that kept the sandwich balanced against the marinade’s sweetness in side-by-side testing. Refrigerate until assembly.
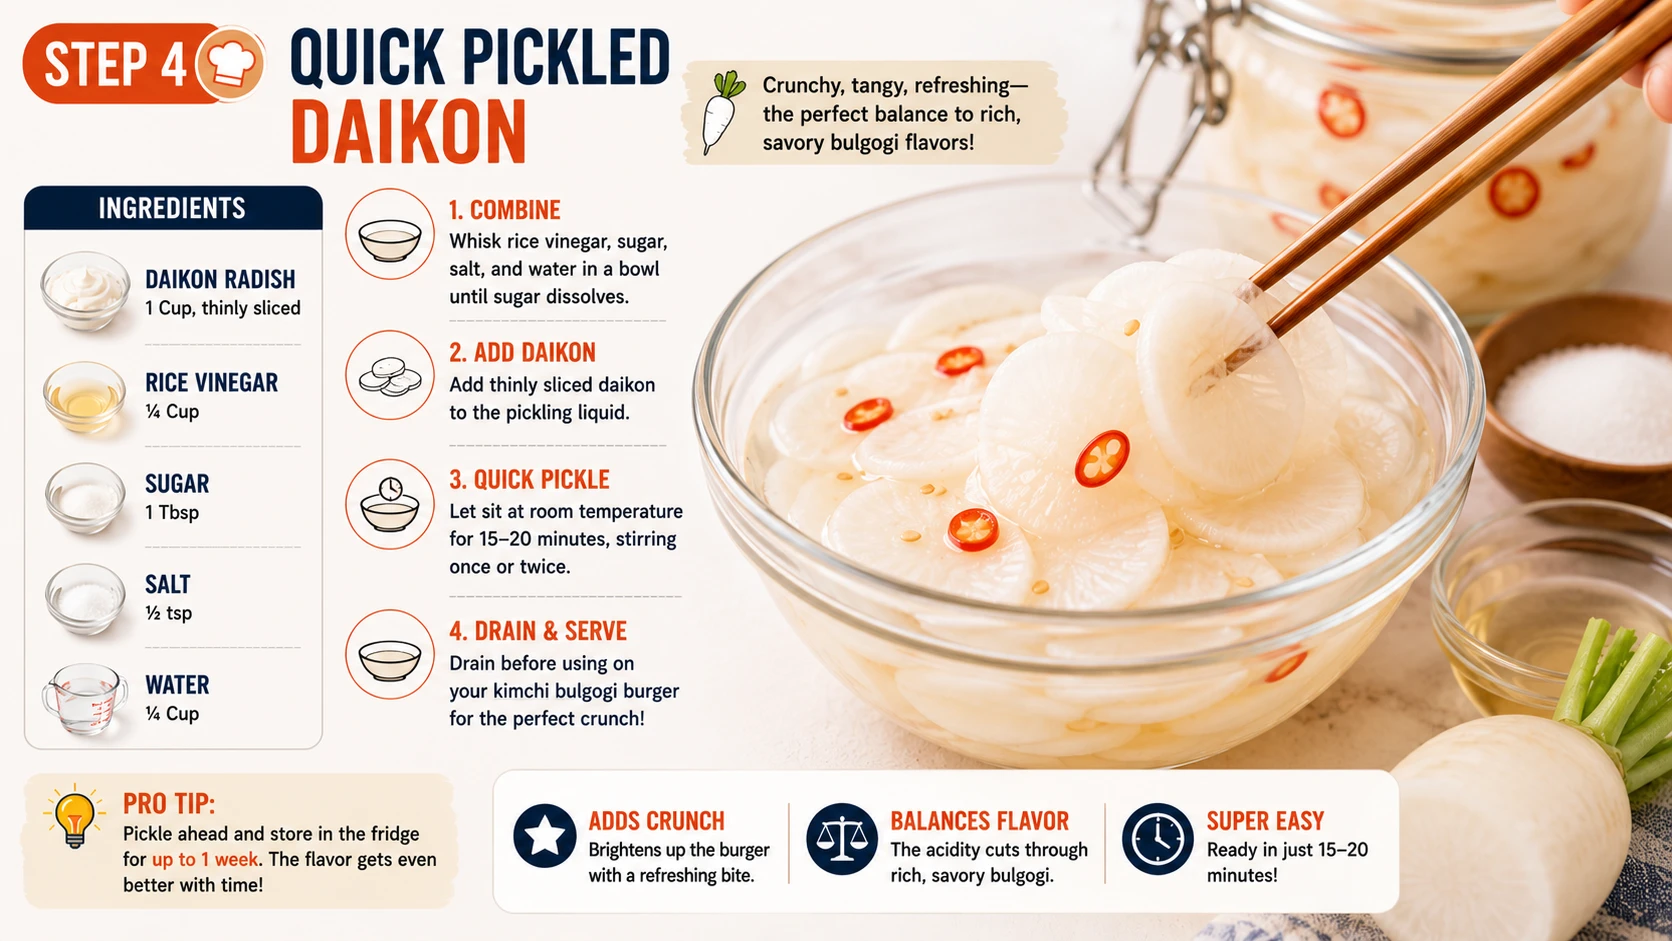
Toss the thinly sliced daikon with rice vinegar and sugar in a small bowl. Let it sit for at least 15 minutes while the patties cook — the daikon should turn slightly translucent and taste clean and sharply tangy, providing a different kind of crunch and acidity than the kimchi does.
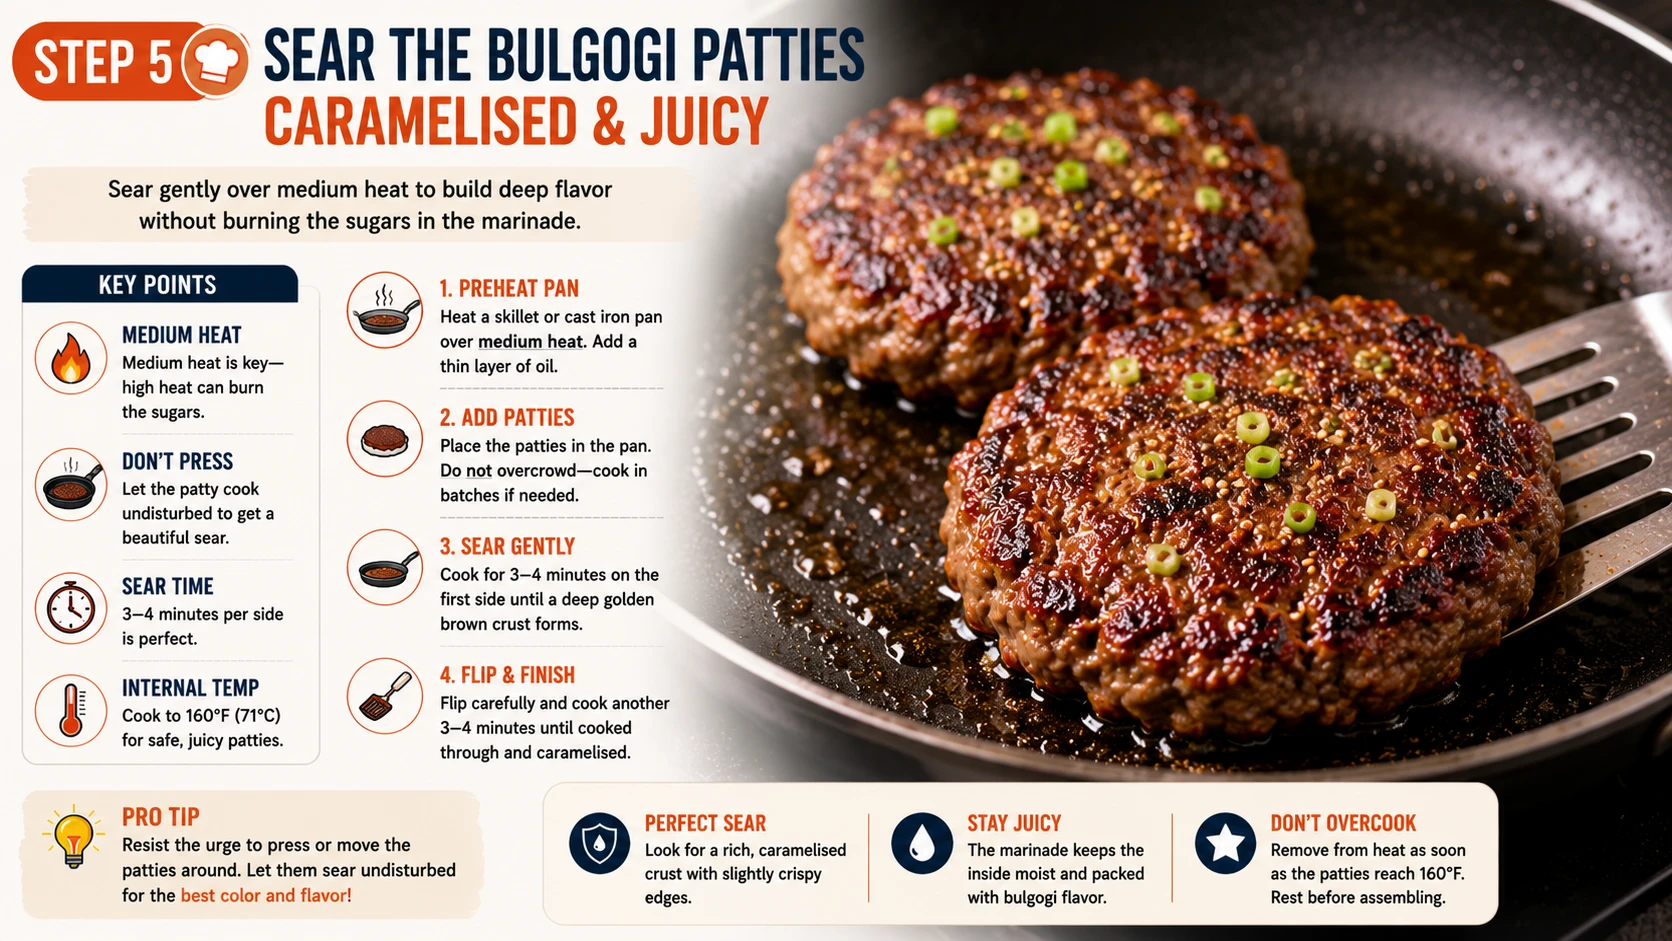
Heat oil in a pan over medium — not high — heat. This is the most important departure from how you’d cook a plain smash patty: the sugar in this marinade caramelises quickly and will scorch black on high heat well before the inside of the patty is properly cooked through. Sear for 3–4 minutes per side, watching the colour closely, until deeply caramelised and cooked through.
If you’re grilling instead of pan-searing, the same logic applies — position the patties slightly off the hottest part of the grill rather than directly over the flame, and expect a marginally longer cook time than you’d give a plain beef patty of the same thickness.
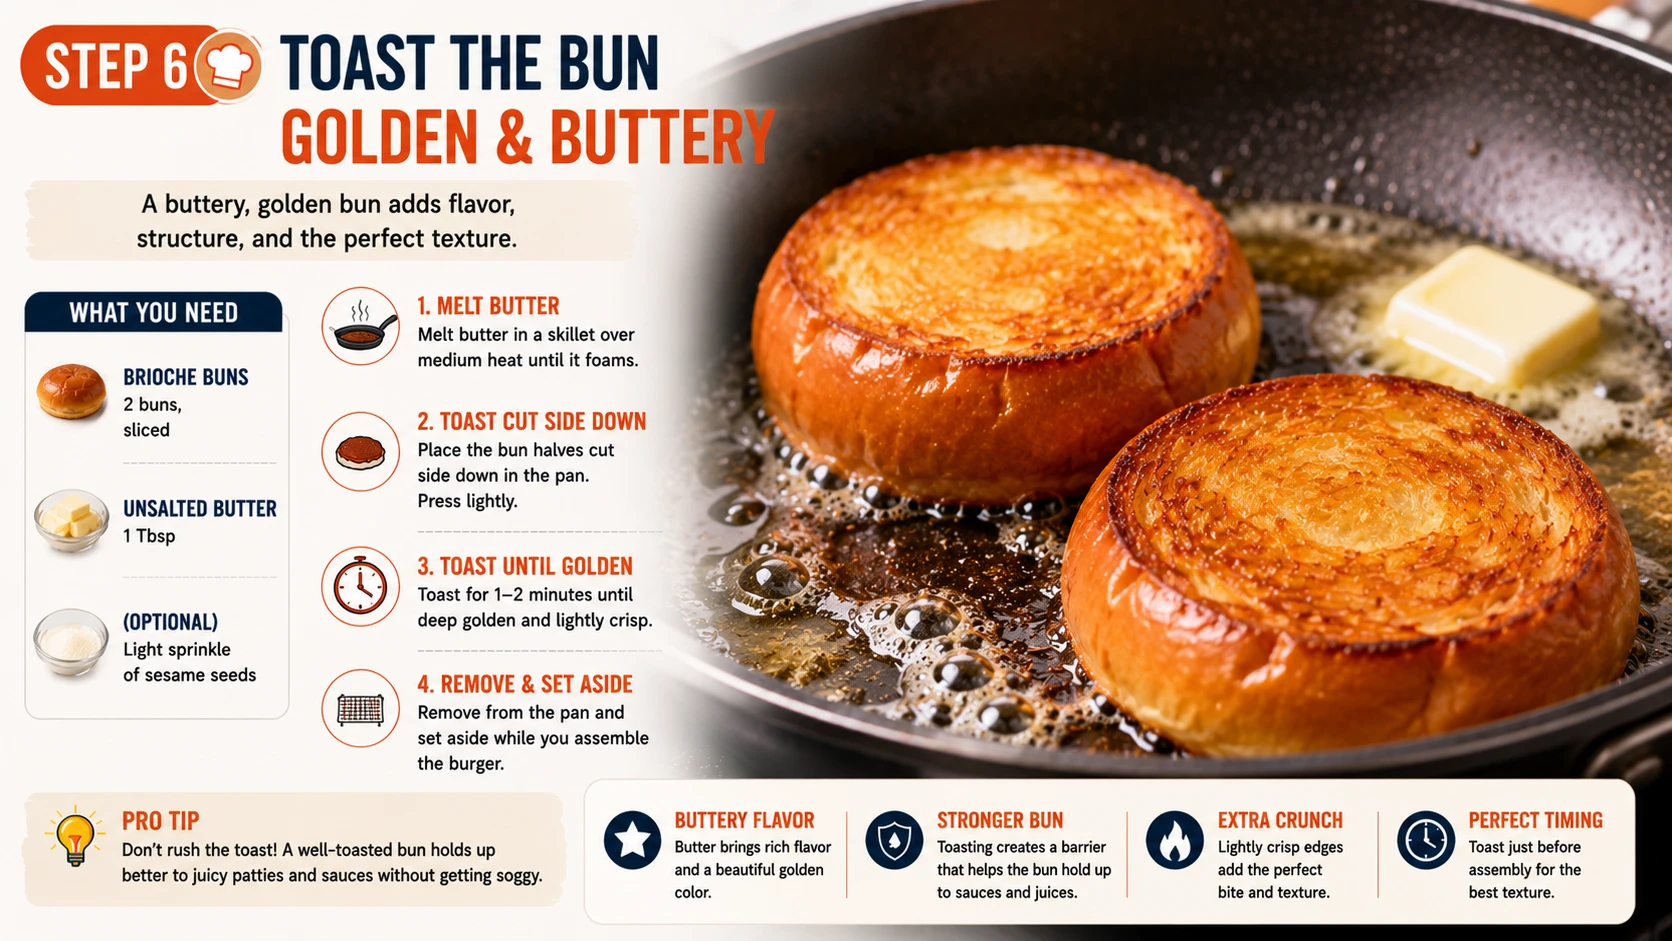
In a clean pan or on the same one, melt the butter over medium heat and toast the brioche buns cut-side down for 60–75 seconds until deep golden. Brioche’s sweetness complements this marinade specifically well, rather than just balancing a fermented, sour topping the way it does on the classic build.
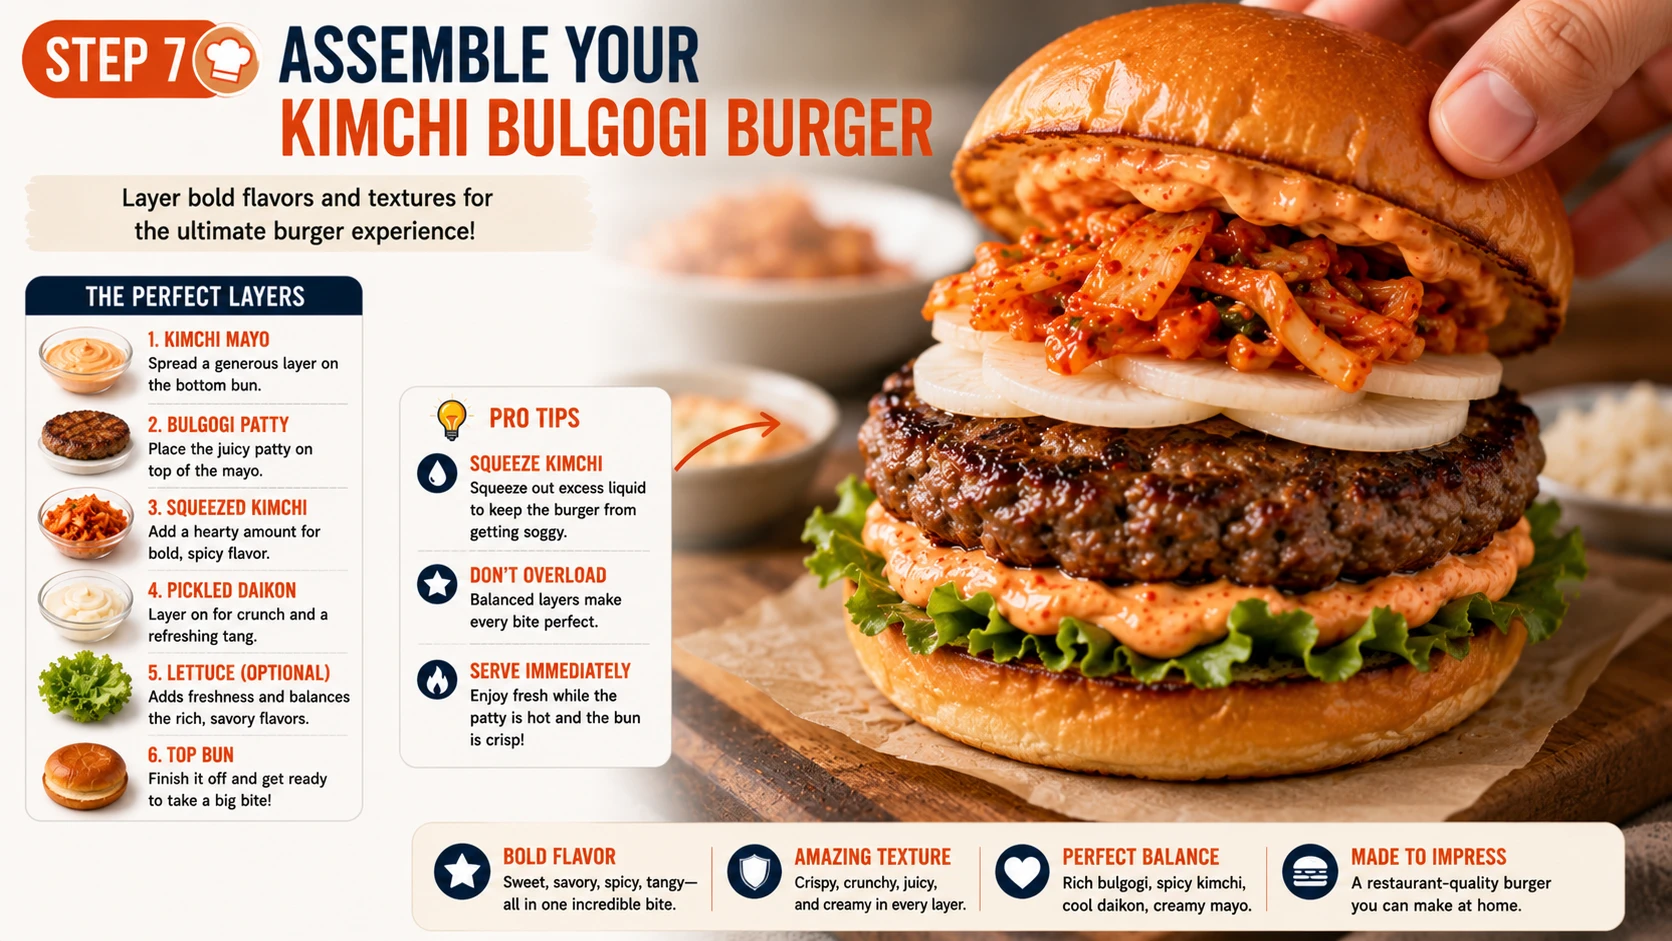
Spread kimchi mayo on both toasted bun halves. Place the patty on the bottom bun, top with a small amount of squeezed whole kimchi and the drained pickled daikon, and scatter fresh spring onion. Cap with the top bun and serve immediately, while the patty is still warm and the daikon still has its crunch.
Test Kitchen Results
Every variable was tested at least twice. These are plain, qualitative results from real side-by-side batches — not manufactured statistics. Updated Aug 30, 2026 with two new batches.
Mixed-in flavoured every bite evenly. Glazed-on tasted noticeably flatter once you got past the first, sauce-coated bite.
Mix into raw beefAsian pear gave good browning and a subtle sweetness. Kiwi’s stronger enzymes made the texture noticeably softer, bordering on mushy, at equal quantities. Onion is a fine substitute with less sweetness.
Asian pear, or onion as backupHigh heat scorched the marinade’s sugar before the inside of the patty finished cooking. Medium heat browned evenly without burning, at the cost of a slightly longer cook time.
Medium heat, alwaysBoth worked well at medium heat. Grilling needed the patties positioned slightly off direct flame to avoid flare-ups from dripping marinade.
Either — heat control matters moreA full slaw added more bulk and acidity than this sweeter patty needed. Kimchi folded into the mayo, plus a small amount served alongside, kept better balance.
Kimchi in the mayoNo rest gave a looser, less cohesive patty. 20 minutes noticeably firmed the mixture. Overnight deepened flavour slightly further but wasn’t dramatically better than 20 minutes.
20 minutes minimumThe panade version held together noticeably better on the flip and stayed juicier after the full medium-heat sear. The no-panade version tasted more purely of beef and marinade, with a slightly looser bite. Both are legitimate — it comes down to preference.
Optional — panade for texture insuranceGinger added a sharper, more traditional bulgogi note that most competitor recipes include. At a full 2 tsp it started to compete with the Asian pear’s sweetness; ½–1 tsp struck a better balance.
Optional — start at ½ tspA kimchi bulgogi burger is fundamentally a heat-management problem dressed up as a flavour question. The marinade itself is straightforward and forgiving — soy, sugar, sesame oil, garlic, a little fruit — but that same sugar content means every other decision in this recipe, from mixing method to cook temperature, exists to get flavour all the way through the patty without burning the outside first. The panade and ginger tests this update added don’t change that core finding; they’re both optional refinements layered on top of it.
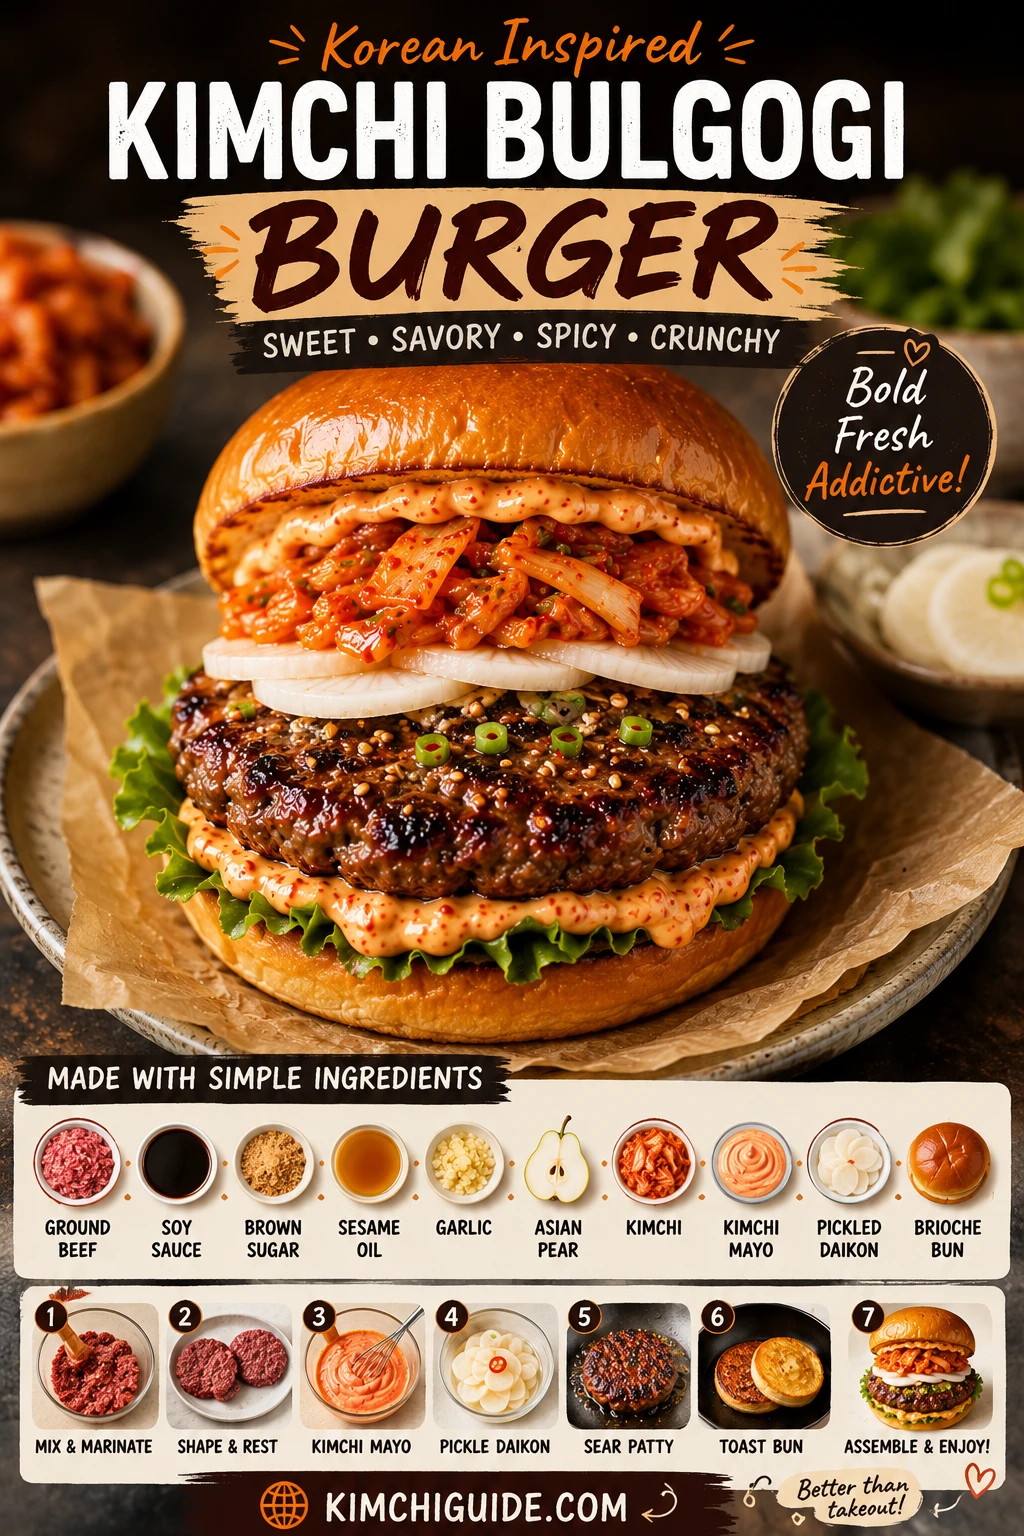
Kimchi Bulgogi Burger
Sweet soy patty · Kimchi mayo · Pickled daikon · 40 minutes
- 300g 80/20 beef mince
- 2 tbsp soy sauce + 1 tbsp brown sugar + 1 tsp sesame oil (marinade)
- 2 garlic cloves, grated + 1 tbsp grated Asian pear
- 1 tsp grated ginger, optional (new — start with ½ tsp)
- 1 spring onion, chopped, for the patty
- 2 tbsp panko, optional, soaked in 1 tbsp marinade (new — panade)
- 80g daikon + 2 tbsp rice vinegar + 1 tbsp sugar (pickle)
- 2 brioche burger buns + 1 tbsp butter
- 3 tbsp Kewpie mayo + 1 tbsp chopped kimchi + 1 tsp gochujang (mayo)
- 150g ripe kimchi (Stage 3), chopped + squeezed dry
- 1 spring onion, sliced, for garnish
- 1Mix soy, sugar, sesame oil, garlic, pear, spring onion (and ginger, if using) into beef. Optional: soak panko in 1 tbsp marinade first, then mix in.
- 2Form 2 patties, refrigerate at least 20 minutes.
- 3Whisk Kewpie mayo, chopped kimchi, gochujang. Refrigerate.
- 4Quick-pickle daikon in rice vinegar and sugar, 15+ minutes.
- 5Sear patties over medium heat, 3-4 min per side.
- 6Toast buns in butter 60-75 sec until golden.
- 7Spread mayo, add patty, top with kimchi and daikon, scatter onion. Serve immediately.
Per serving (2 servings total), base recipe without optional panko/ginger. Reviewed by Dr. Sarah Mitchell RD, PhD · Published July 17, 2026 · Updated August 30, 2026
All 11 Kimchi Burger Builds
This is 1 of 11 builds in the KimchiGuide kimchi burger family. Classic recipe: Kimchi Burger Recipe →. Full comparison + origin story: Kimchi Burger Ultimate Guide →

The flagship. Smash patty, gochujang mayo, kimchi slaw. 520 cal.
Classic Recipe →
Two smashed patties, cheese glue, scaled toppings. 690 cal.
Double Smash →
Double-fried crispy fried thigh. Approx. 610 cal.
Chicken Burger →
Sweet soy marinated patty, kimchi mayo, pickled daikon, tested panko-panade option. 560 cal.
Currently viewing
Black bean patty, vegan mayo, jeotgal-free kimchi. 420 cal.
Vegan Burger →
3-bite party format, same ratios. Approx. 210 cal each.
Sliders →
Certified GF brioche-style bun + GF gochujang. 520 cal.
GF Burger →
Lettuce-wrapped, no bun. Approx. 340 cal.
Burger Bowl →
Pressed sticky rice patties instead of bread — naturally GF. Approx. 480 cal.
Rice Burger →
Bodega-style chopped beef and cheese, kimchi folded in off heat. Approx. 590 cal.
Chopped Cheese →
All 11 builds, comparison table, origin story, FAQs.
Full Guide →Kimchi Bulgogi Burger — Pairing Guide
These pairings lean into the burger’s sweet-savoury Korean BBQ profile.

A larger side portion of the same quick pickle used in the build — clean acidity that resets the palate between bites.

A classic Korean BBQ side dish that shares the same sweet-savoury soy profile as the bulgogi patty itself.

A beloved Korean BBQ side — melted cheese and sweet corn complement the marinade’s sweetness rather than fighting it.

Light carbonation cuts through the marinade’s sweetness and the mayo’s richness without competing with the kimchi.
Storage and Reheating
The marinated, formed patties keep well refrigerated — the flavour actually deepens over this time. If using the panko panade, texture holds fine over this window too.
Sealed container, clean spoon each time. Do not freeze — the emulsion separates on thawing.
Keeps well refrigerated in its pickling liquid — actually improves after the first day as it absorbs more flavour.
Reheat in a covered pan over low heat to avoid scorching the marinade a second time. Microwaving is acceptable in short bursts if you’re not concerned about texture.
Where This Build Sits Among All 11 Kimchi Burgers
| Build | Calories | Protein | Vegan? | Best For |
|---|---|---|---|---|
| Kimchi Burger Bowl | 340 | 27g | No (beef) | Low-carb, lettuce wrap |
| Vegan Black Bean | 420 | 18g | ✅ Fully vegan | Plant-based, egg-free |
| Kimchi Burger Sliders (each) | 210 | 13g | No | Portion control, parties |
| Kimchi Burger Recipe (Classic Smash) | 520 | 31g | No | The flagship recipe |
| Gluten-Free Version | 520 | 31g | No | Same build, GF bun/gochujang |
| Kimchi Bulgogi Burger ← This page | 560 | 29g | No | Sweeter, caramelised profile |
| Kimchi Chicken Burger | 610 | 34g | No | Crispy fried texture |
| Double Smash | 690 | 42g | No | Bigger appetite, more crust |
Kimchi Bulgogi Burger FAQ
Sourced from real competitor gaps and reader search behaviour, answered with the detail of someone who actually tested the marinade methods. Updated Aug 30, 2026 with two new questions on the panko panade and ginger.
Recipes split roughly evenly between mixing bulgogi marinade into raw ground beef and glazing a plain patty with bulgogi sauce afterward, and none test both side by side. This recipe does, and explains why the mixed-in method wins for a ground-beef burger specifically. It also tests a panko panade and optional ginger, two things most competitor recipes use inconsistently without explaining why. See the full Kimchi Burger Guide for all 11 builds.
Mixed in. Glazing a plain patty after cooking only flavours the surface, while mixing the marinade into the raw ground beef flavours the whole patty and is closer to how bulgogi actually works. The trade-off is needing a 20-minute rest before cooking, which glazing skips.
Bulgogi is Korean marinated grilled beef, traditionally sliced thin and marinated in soy, sugar, garlic and sesame oil. A bulgogi burger applies that same marinade to a ground beef patty. The classic kimchi burger uses a plain, unmarinated smash patty with all the Korean flavour coming from the toppings instead.
It’s optional, and tested both ways. Several popular bulgogi burger recipes soak panko in the marinade before mixing it into the beef, which held together better and stayed juicier through this recipe’s medium-heat cook. The base recipe leaves it out so the patty tastes purely of beef and marinade, but 2 tbsp panko soaked in 1 tbsp of the marinade is a well-tested add if you want extra insurance against a crumbly patty. See the Test Kitchen section for the side-by-side result.
Optional. Fresh grated ginger appears in most competitor bulgogi marinades alongside garlic and adds a sharper, more traditional bulgogi note. It’s left out of the base recipe here because at full quantity it can compete slightly with the Asian pear’s sweetness — start with ½ tsp grated ginger if you want to add it, and adjust up from there next time.
Asian pear, in moderation. For ground beef, which is already tenderized by grinding, the enzymatic tenderizing matters less than for sliced bulgogi — the main benefit is the natural sugars aiding browning. Kiwi is more potent and easy to overuse, turning the texture mushy if you add too much.
Either works, but medium heat matters more than the method. The marinade’s sugar content scorches quickly on high heat, whether on a grill or a pan, so keep the heat moderate and watch closely rather than searing as aggressively as a plain smash patty.
The sugar in the marinade caramelises fast and can scorch before the inside of the patty is cooked through, especially over direct high heat. Move to medium heat and, if grilling, keep the patties slightly off the hottest zone.
In the mayo, finely chopped, for this build specifically — a separate slaw added too much bulk against an already sweet, saucy patty in testing. A small amount of squeezed whole kimchi alongside the pickled daikon still adds texture without overwhelming the sandwich.
Brioche, for the same reasons it wins across the rest of the kimchi burger family — its sweetness complements rather than fights the marinade, and it toasts to a sturdy crust.
Yes. Ground pork is a close substitute and traditional in some bulgogi variations. Ground chicken or turkey works too, though it benefits from 1 tbsp grated cold butter mixed in to compensate for the lower fat content.
At least 20 minutes after mixing and forming the patties, mainly to let the sugar and salt content firm the mixture up slightly before cooking. Longer, up to a few hours refrigerated, deepens the flavour further.
Similar in spirit but not identical. Lotteria’s fast-food version typically glazes a plain patty with a simplified powder-based bulgogi sauce, while this recipe mixes a fresh marinade directly into the beef and adds kimchi mayo and pickled daikon, which Lotteria’s version doesn’t include.
Stage 3, ripe kimchi aged 3-6 weeks, the same as the classic build. Its acidity cuts through the sweetness of the bulgogi marinade the way it cuts through beef fat in the plain build.
Yes. Swap the soy sauce for tamari or a certified gluten-free soy sauce, use a certified GF bun, check your gochujang brand for a gluten-free certification, and skip the optional panko panade or swap it for a certified GF breadcrumb.
Squeeze the kimchi thoroughly, drain the pickled daikon well before adding it, and toast the bun until deeply golden to form a moisture barrier. Assemble immediately before serving.
Yes — this is one of the more meal-prep-friendly builds in the family. The marinated raw patties keep refrigerated up to 24 hours, and the pickled daikon and kimchi mayo both keep several days.
The base recipe is mild-to-medium, since bulgogi itself is sweet and savoury rather than spicy — most of the heat comes from the gochujang in the mayo. Increase the gochujang for more heat, or add a thin layer of gochugaru to the patty mixture for heat that carries through the meat itself.
The classic build uses a plain smash patty with all the Korean flavour in the toppings. This build marinates the beef itself in a sweet soy bulgogi marinade, giving a caramelised, umami-sweet profile rather than a purely fermented-sour one. See the Kimchi Burger Recipe for the classic version.
Approximately 560 calories with 29g protein per burger, slightly higher in carbohydrates than the classic build due to the marinade’s sugar content and the pickled daikon. Reviewed by Dr. Sarah Mitchell RD, PhD.
Yes. Freeze the raw marinated, formed patties on a tray until solid, then bag for up to 3 months. Thaw fully in the fridge before cooking rather than cooking from frozen, since the marinade’s sugar makes even cooking from frozen more prone to scorching on the outside.
Cooking over the same high heat used for a plain smash patty. The marinade’s sugar content scorches well before that heat level is appropriate — medium heat and a slightly longer, gentler cook is the fix.
Was this guide helpful?
Your feedback helps us improve KimchiGuide for everyone.
💬 Leave a Comment & Rating
Made this kimchi bulgogi burger? Tell us how the marinade turned out and rate the recipe.