Buchu KimchiGarlic Chive Kimchi · 부추김치
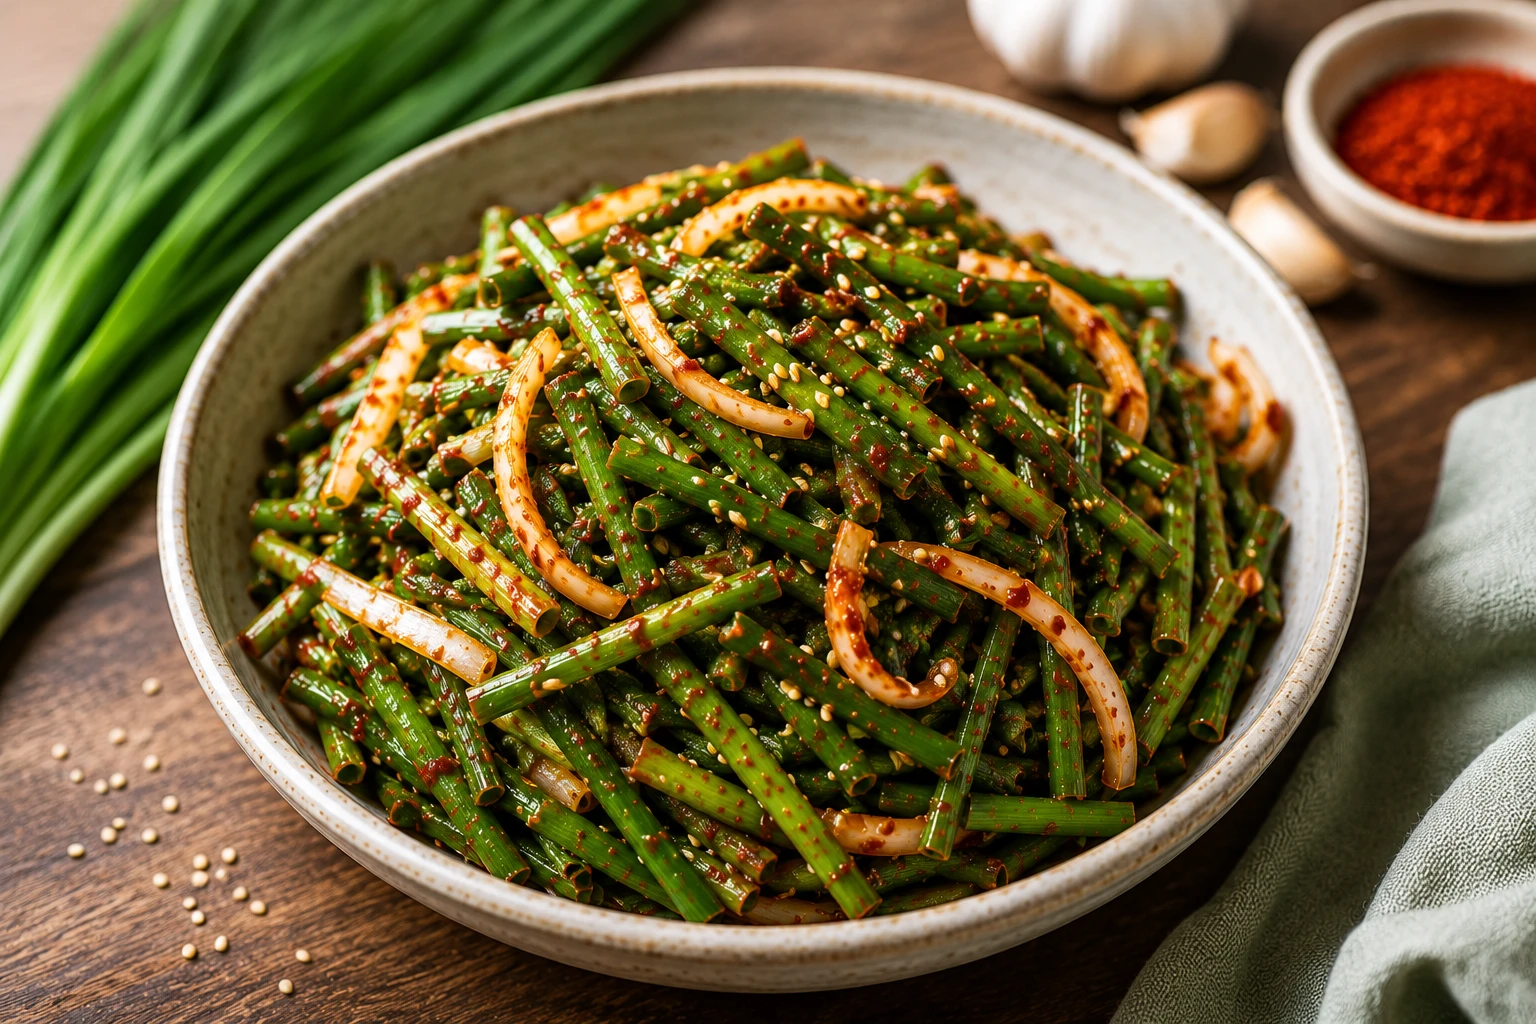
Buchu kimchi — Korean garlic chive kimchi — is one of the fastest kimchi types you can make at home, built from chives instead of napa cabbage, with no pre-salting and no days of waiting. Here’s how it’s different from regular kimchi, a full recipe with step photos, and how to serve it.
What Is Buchu Kimchi?
Buchu kimchi (부추김치) swaps napa cabbage for buchu — Korean garlic chives (Allium tuberosum) — tossed in the same gochugaru-based seasoning used across most kimchi types. The defining difference: it skips pre-salting entirely, since thin chives don’t hold the excess water that dense cabbage does. It’s especially popular in Korea’s southern provinces, Jeolla-do and Gyeongsang-do, and can be eaten fresh the same day or short-fermented for a mild tang. Ready in as little as 15 minutes of active prep, roughly 35 calories per half-cup serving.
How to Make Buchu Kimchi
Buchu kimchi takes about 15 minutes of active prep: make a thin rice-flour porridge, wash and cut the chives, mix the porridge with gochugaru and fish sauce into a seasoning paste, gently hand-toss the chives in the paste, then eat fresh or let it rest at room temperature for a mild ferment.
- Porridge: whisk rice flour into water, simmer until thickened, cool completely.
- Prep chives: wash thoroughly, cut into 2–3 inch lengths.
- Build paste: combine cooled porridge, gochugaru, fish sauce, sugar or plum syrup.
- Coat gently: hand-toss the chives in the paste — never rub or squeeze.
- Rest & serve: eat fresh, or rest 2 hours–2 days for a mild tang, then refrigerate.
Why Buchu Kimchi Isn’t Just “Kimchi With Chives”
Most recipes treat buchu kimchi as a drop-in cabbage-kimchi swap. It isn’t — the technique changes because the vegetable itself behaves completely differently.
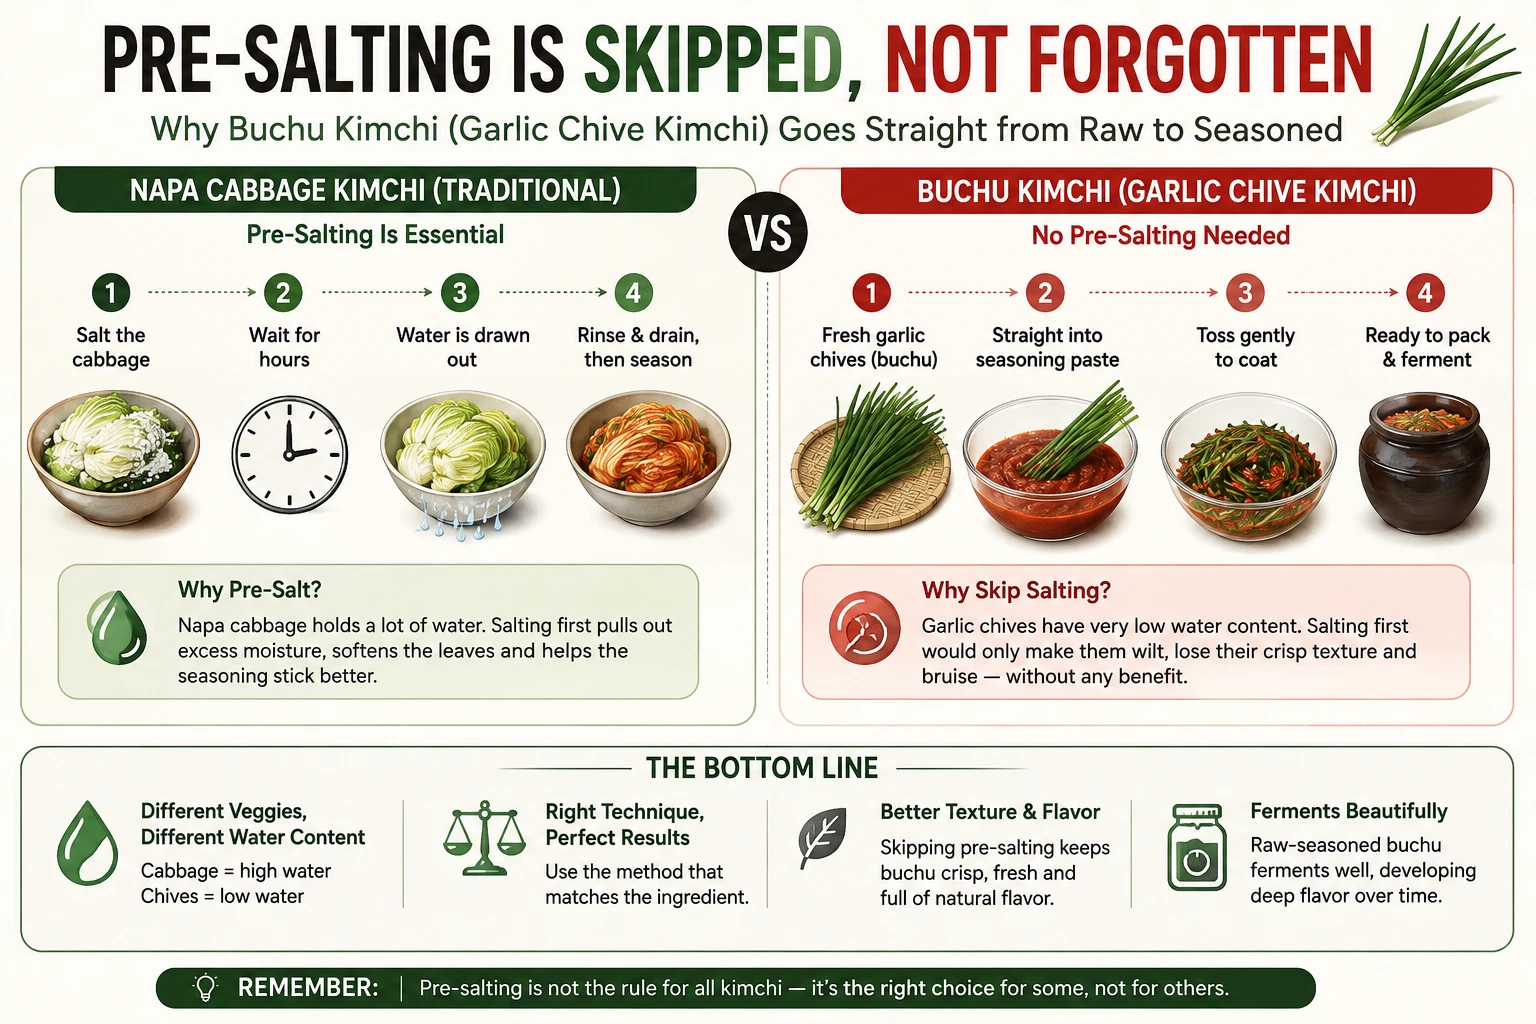
Napa cabbage kimchi salts the cabbage for hours to pull out water first. Chives don’t carry that excess water, so salting them first would only wilt and bruise them for no benefit — the seasoning goes on raw.
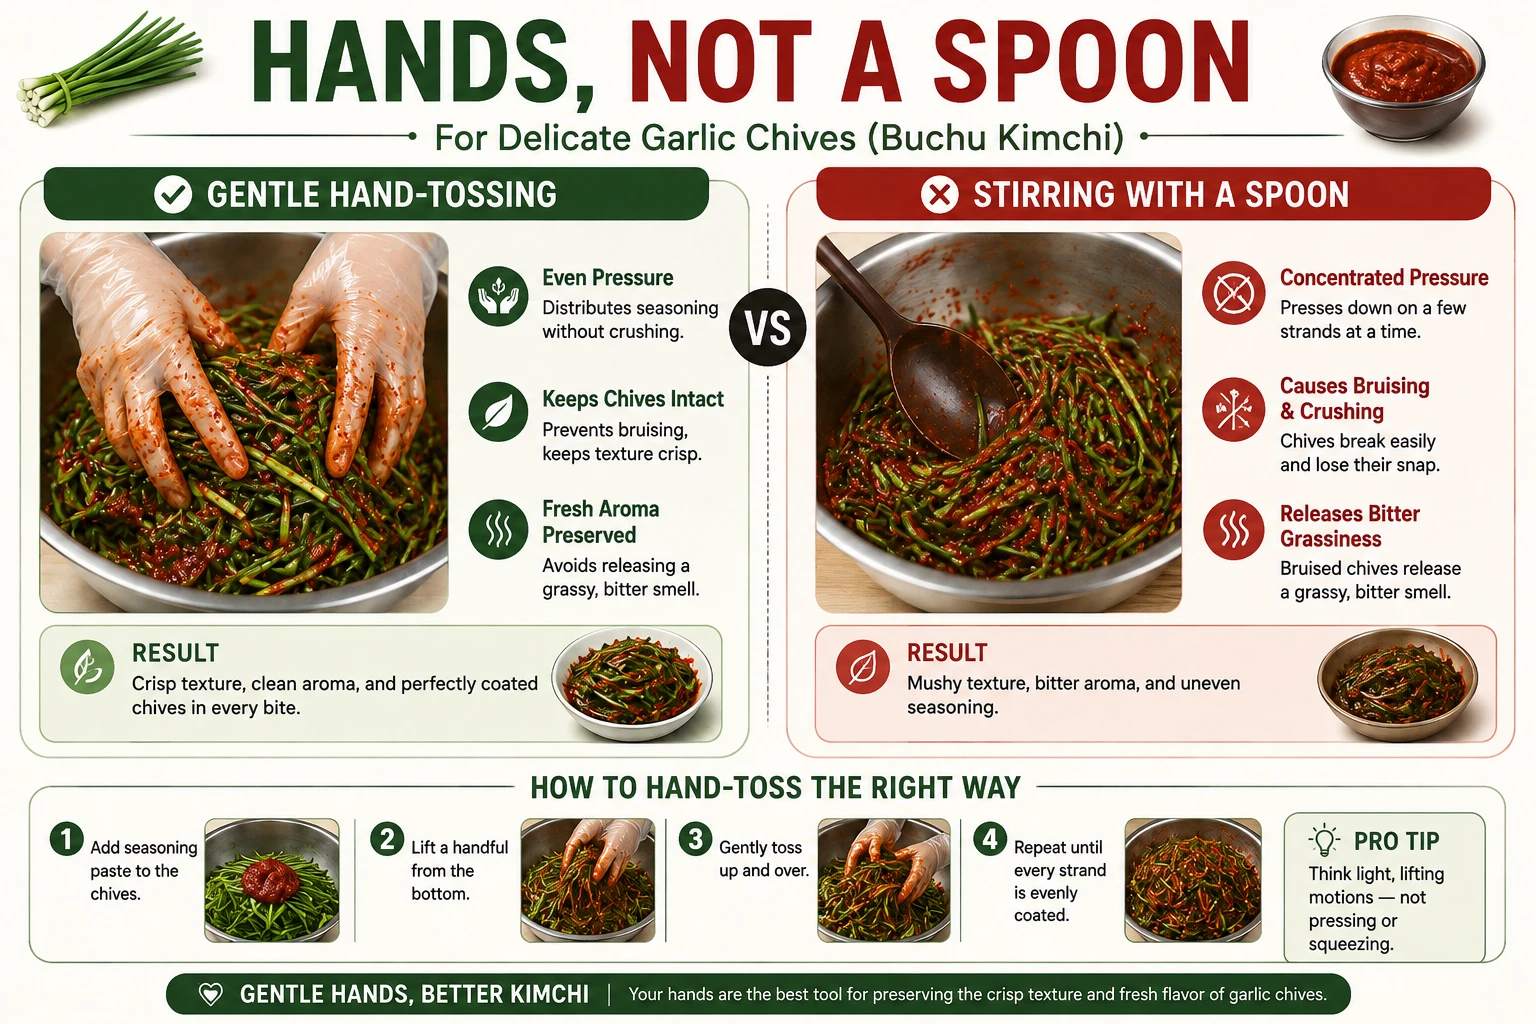
Chives bruise far more easily than cabbage leaves. A spoon concentrates pressure on a few strands at a time and crushes them, releasing a grassy, bitter smell. Gentle hand-tossing spreads the pressure evenly.
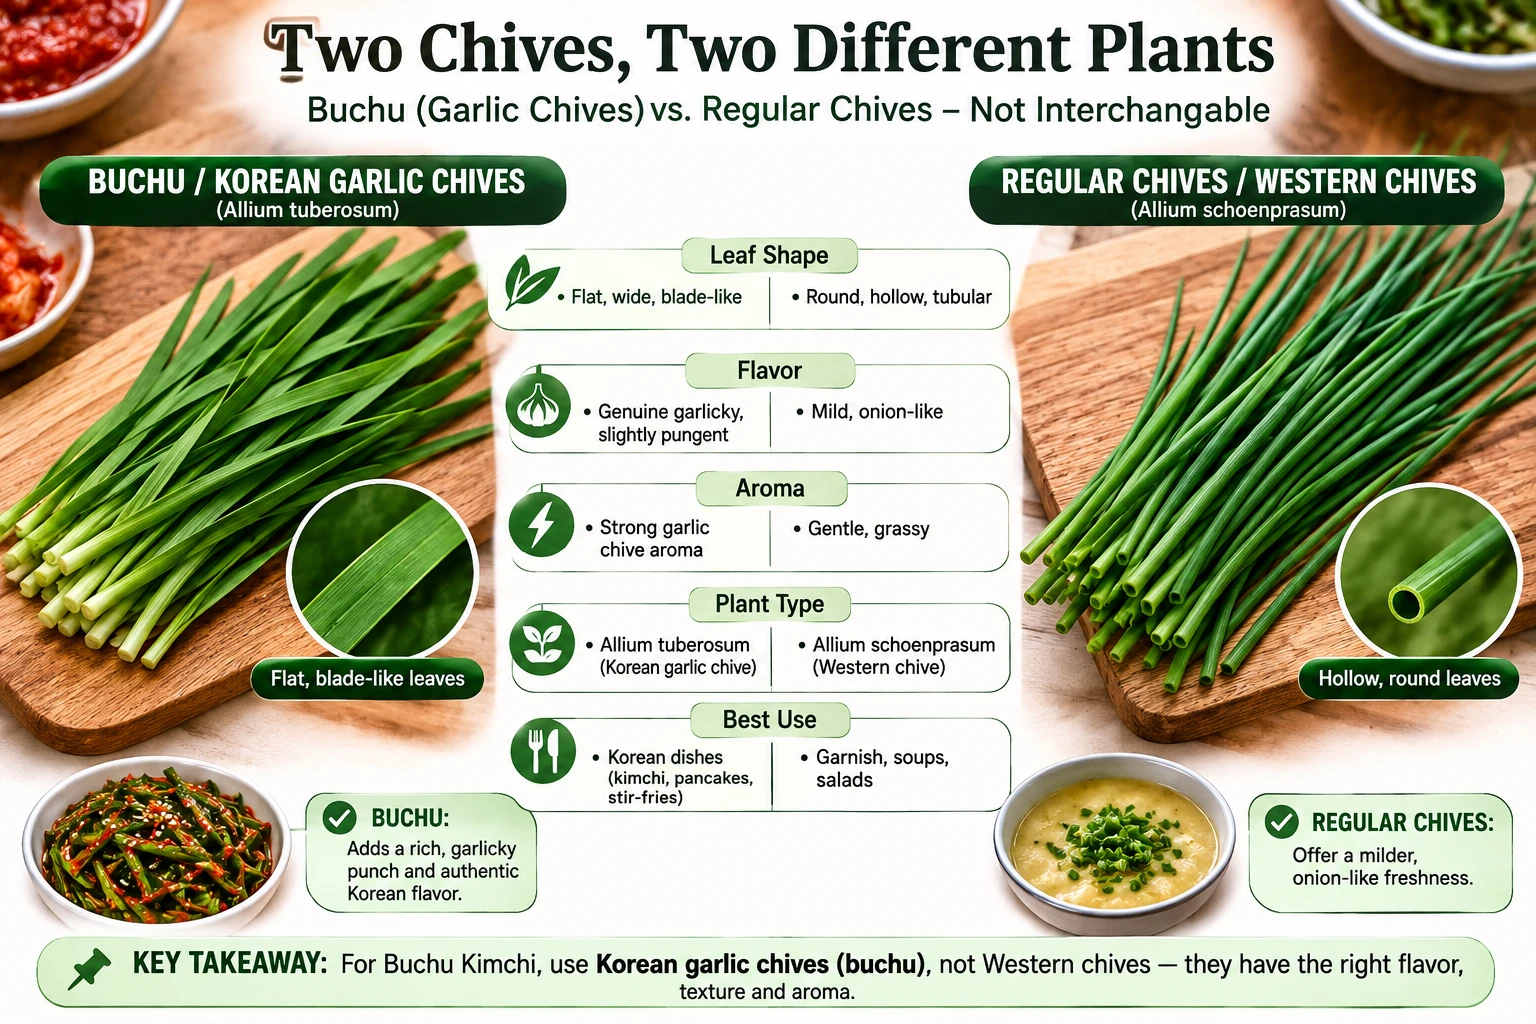
Buchu (garlic chives) are flat-bladed with a genuinely garlicky bite. The round, hollow chives sold at most Western grocery stores are a different plant entirely, with a much milder onion flavor.
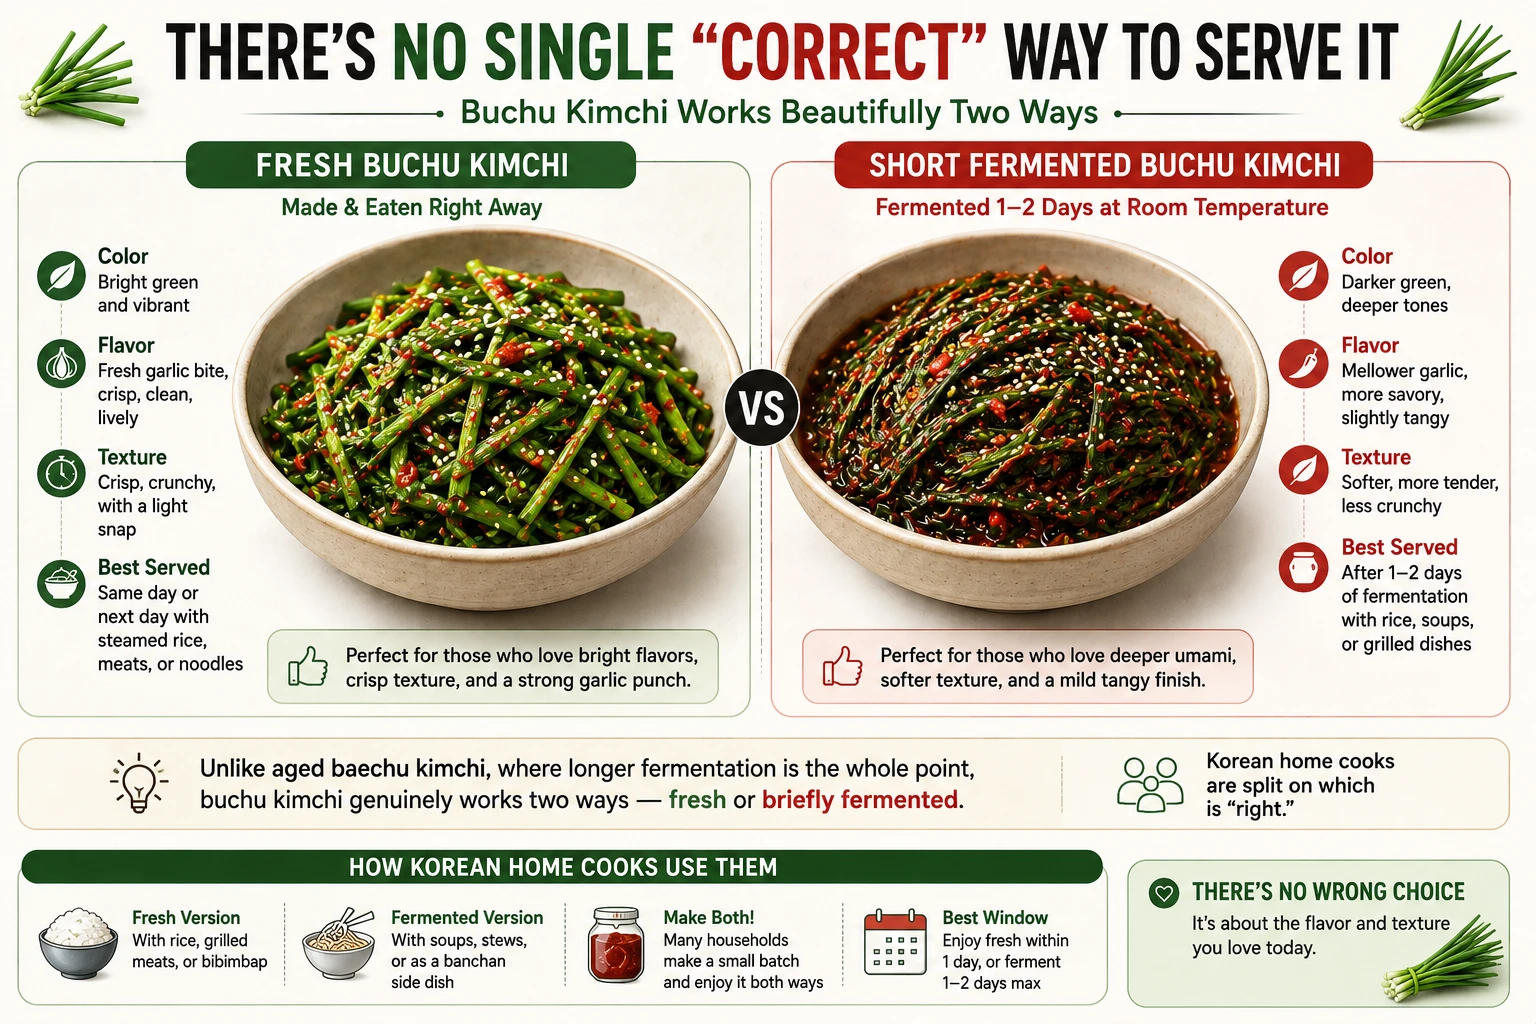
Unlike aged baechu kimchi, where longer fermentation is the whole point, buchu kimchi genuinely works two ways — fresh or briefly fermented — and Korean home cooks are split on which is “right.”
Fresh vs. Short-Fermented — Compared
This isn’t a technique with a wrong answer, unlike most kimchi timing questions — it’s genuinely a matter of preference, and both styles are traditional.
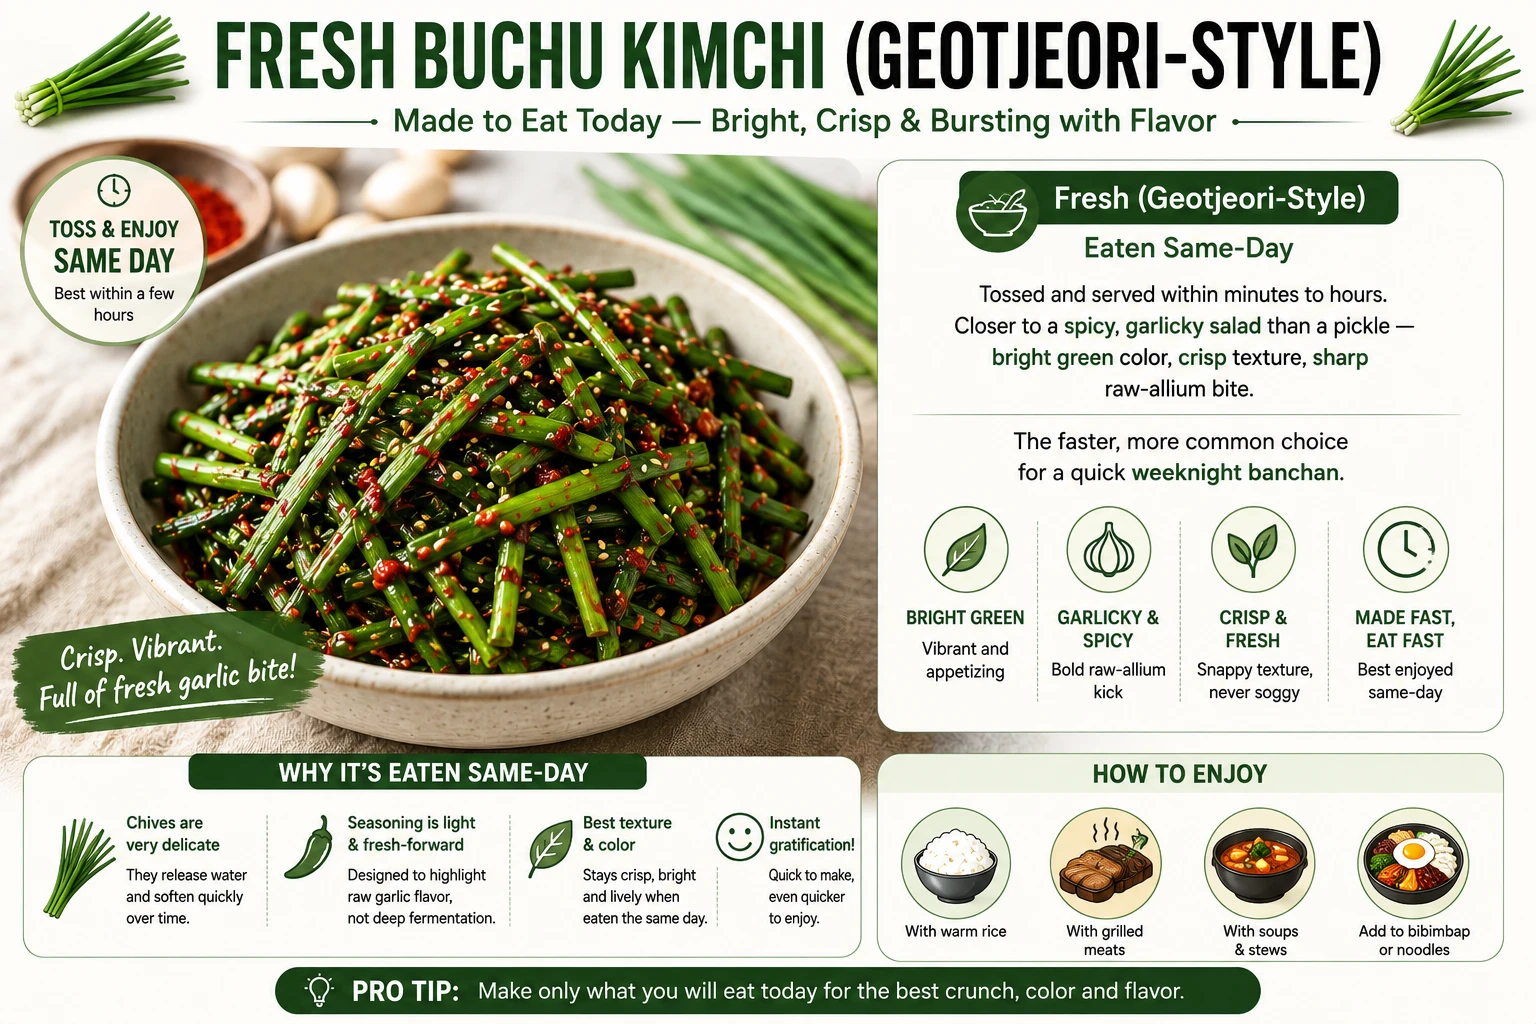
Tossed and served within minutes to hours. Closer to a spicy, garlicky salad than a pickle — bright green color, crisp texture, sharp raw-allium bite. The faster, more common choice for a quick weeknight banchan.
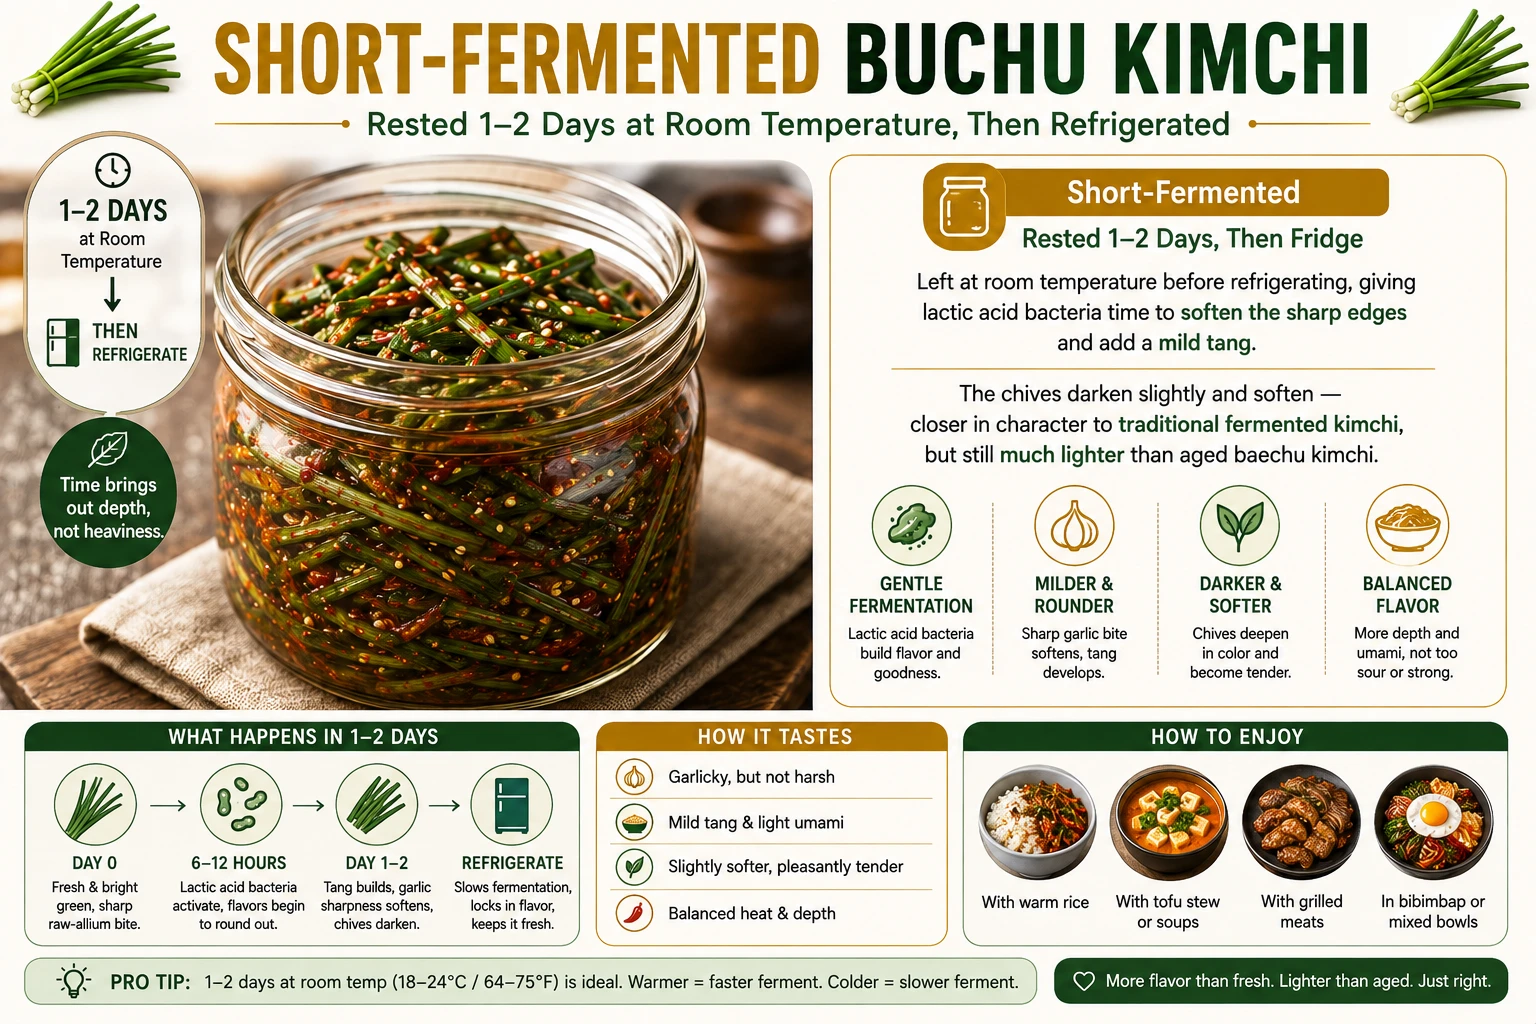
Left at room temperature before refrigerating, giving lactic acid bacteria time to soften the sharp edges and add a mild tang. The chives darken slightly and soften — closer in character to traditional fermented kimchi, but still much lighter than aged baechu kimchi.
Style Comparison at a Glance
| Style | Texture | Flavor | Best For |
|---|---|---|---|
| Fresh | Crisp, bright green | Sharp, raw garlic bite | Quick weeknight side, pairing with grilled pork |
| Short-Fermented | Slightly softened | Mild tang, mellower | Those who prefer traditional fermented flavor without waiting weeks |
Key Terms & Buchu vs. Regular Chives
How Difficult Is This Recipe?
Genuinely one of the easiest kimchi types to make at home. There’s no pre-salting to plan around and no fermentation crock needed.
Ingredients + Scaler
Buchu is the only ingredient that needs sourcing thought — everything else is standard kimchi pantry staples. Look for it at a Korean or Asian grocery store.
Amounts scale automatically with the servings control above.
Common Substitutions
| Ingredient | Substitute | Notes |
|---|---|---|
| Fish sauce | Soy sauce | Makes it fully vegan — see Vegan & Substitutions below |
| Salted shrimp | Extra fish sauce, or omit | Safe for shellfish allergies when combined with soy sauce |
| Gochugaru | Gochujang, reduced by half | Saltier — cut back the fish sauce or soy sauce to compensate |
| Glutinous rice flour | All-purpose flour | Slightly less glossy porridge, same thickening function |
How to Make Buchu Kimchi — 5 Steps
One bowl, five steps. The step to slow down for is the last one — tossing by hand, not with a spoon.
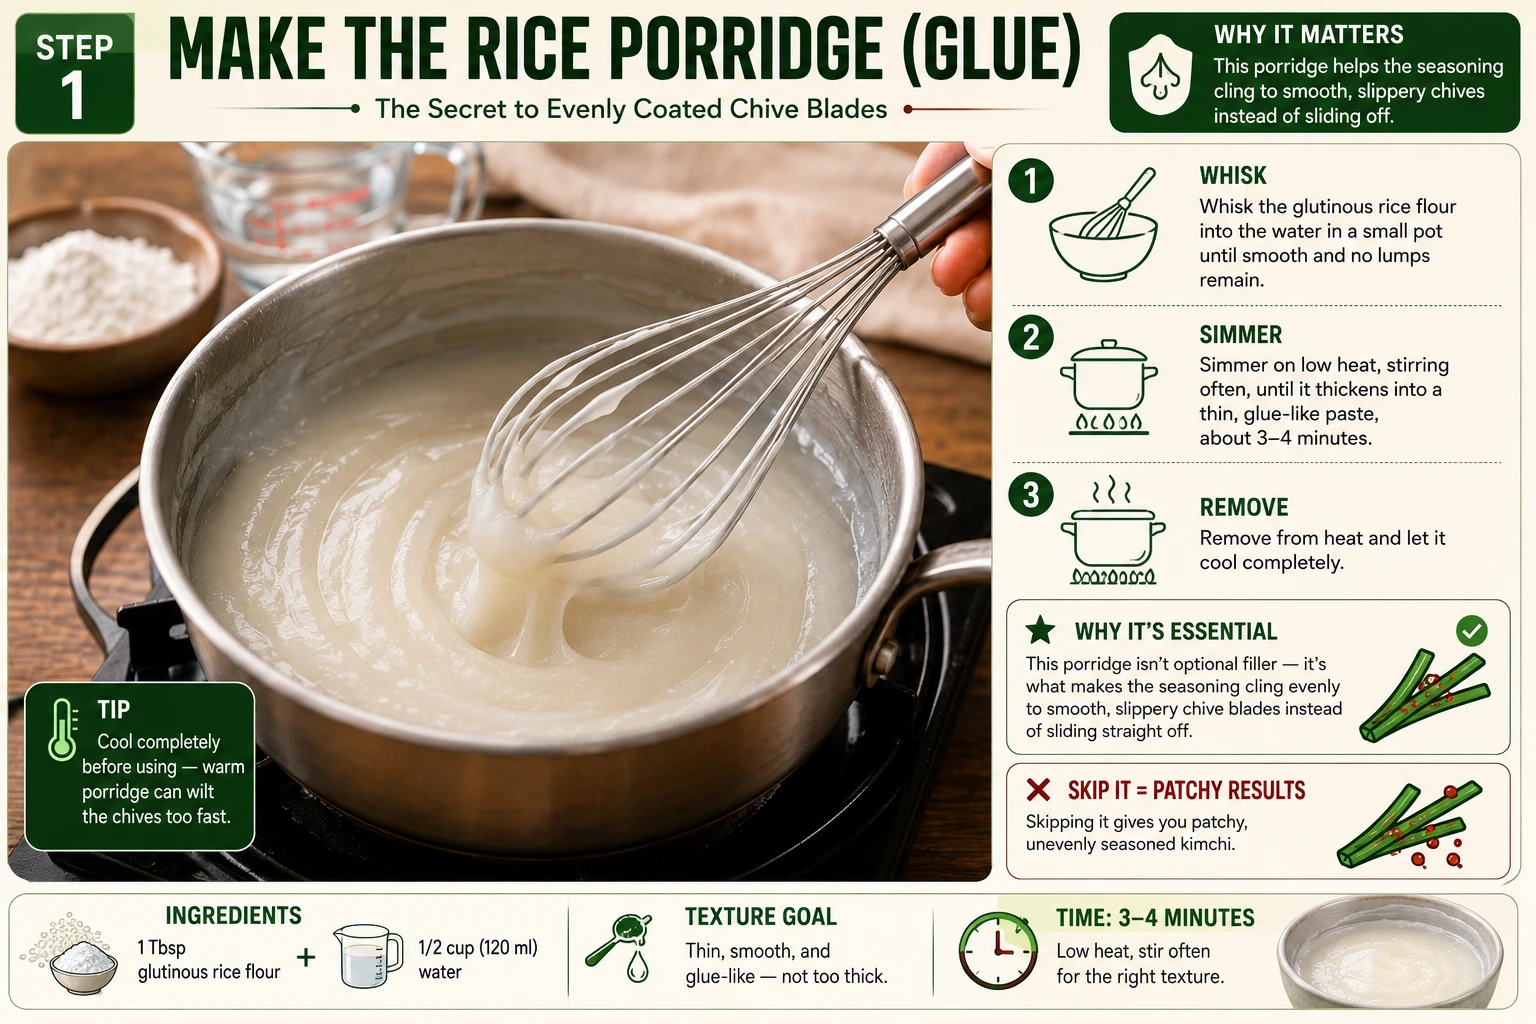
Whisk the glutinous rice flour into the water in a small pot. Simmer on low heat, stirring often, until it thickens into a thin, glue-like paste, about 3–4 minutes. Remove from heat and let it cool completely — a warm paste will wilt the chives too fast.
This porridge isn’t optional filler — it’s what makes the seasoning cling evenly to smooth, slippery chive blades instead of sliding straight off. Skipping it gives you patchy, unevenly seasoned kimchi.
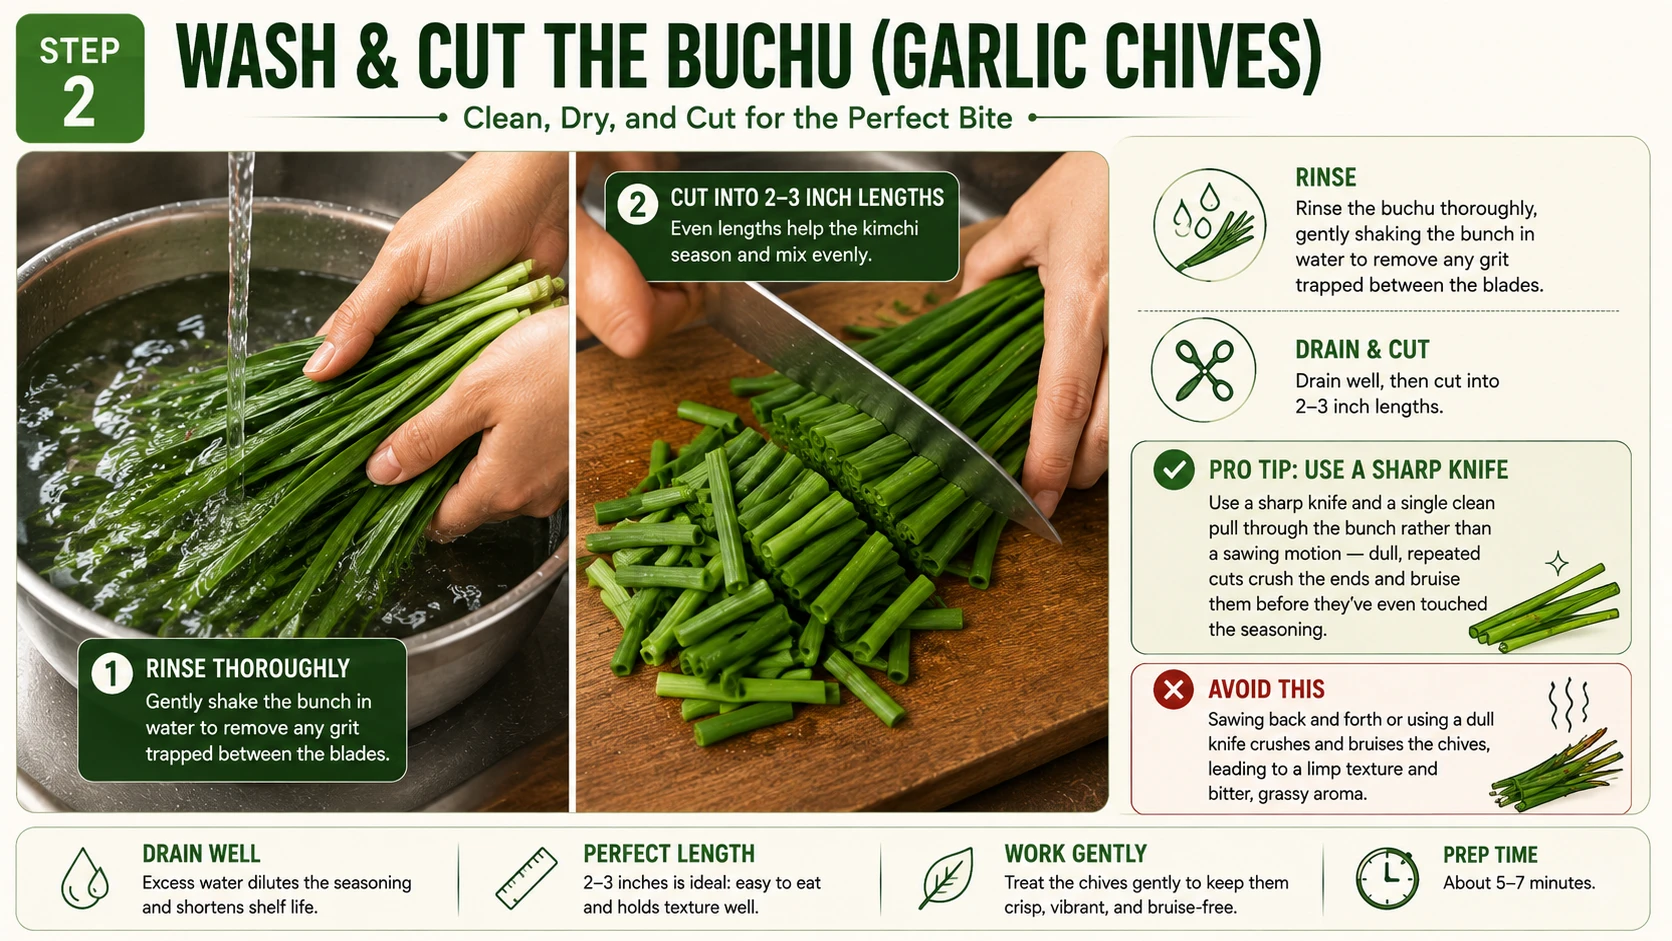
Rinse the buchu thoroughly, gently shaking the bunch in water to remove any grit trapped between the blades. Drain well, then cut into 2–3 inch lengths.
Use a sharp knife and a single clean pull through the bunch rather than a sawing motion — dull, repeated cuts crush the ends and bruise them before they’ve even touched the seasoning.
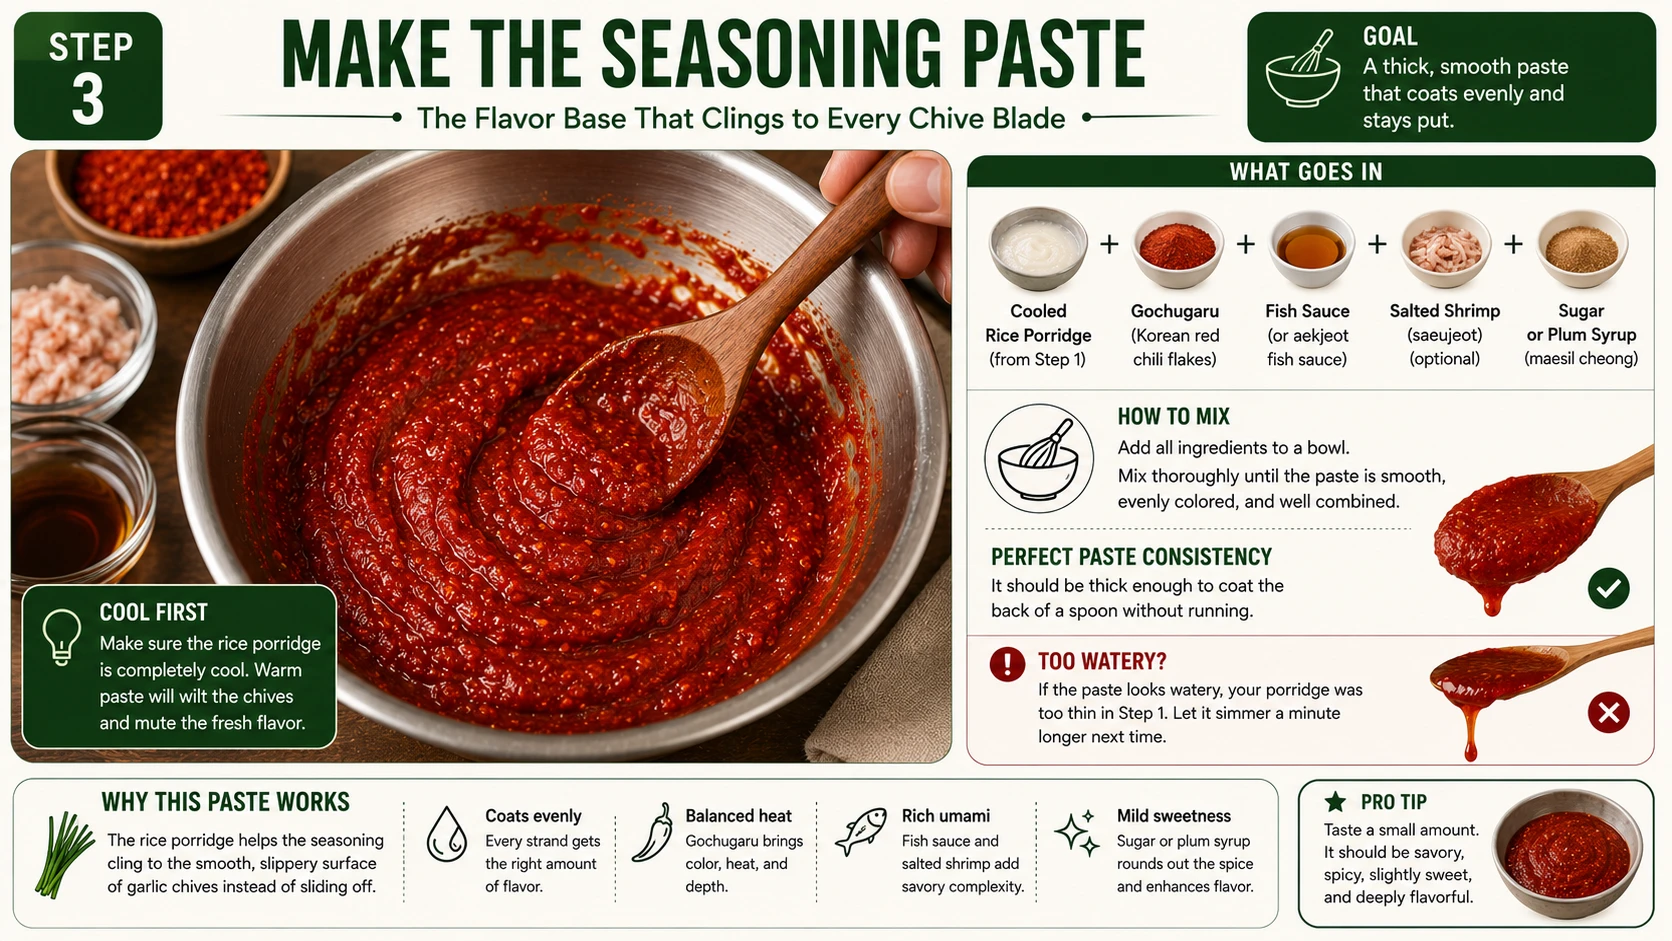
In a bowl, combine the cooled porridge, gochugaru, fish sauce, salted shrimp (if using), and sugar or plum syrup. Mix into a smooth, evenly colored paste.
The paste should be thick enough to coat the back of a spoon without running — if it looks watery, your porridge was too thin in step 1; let it simmer a minute longer next time.
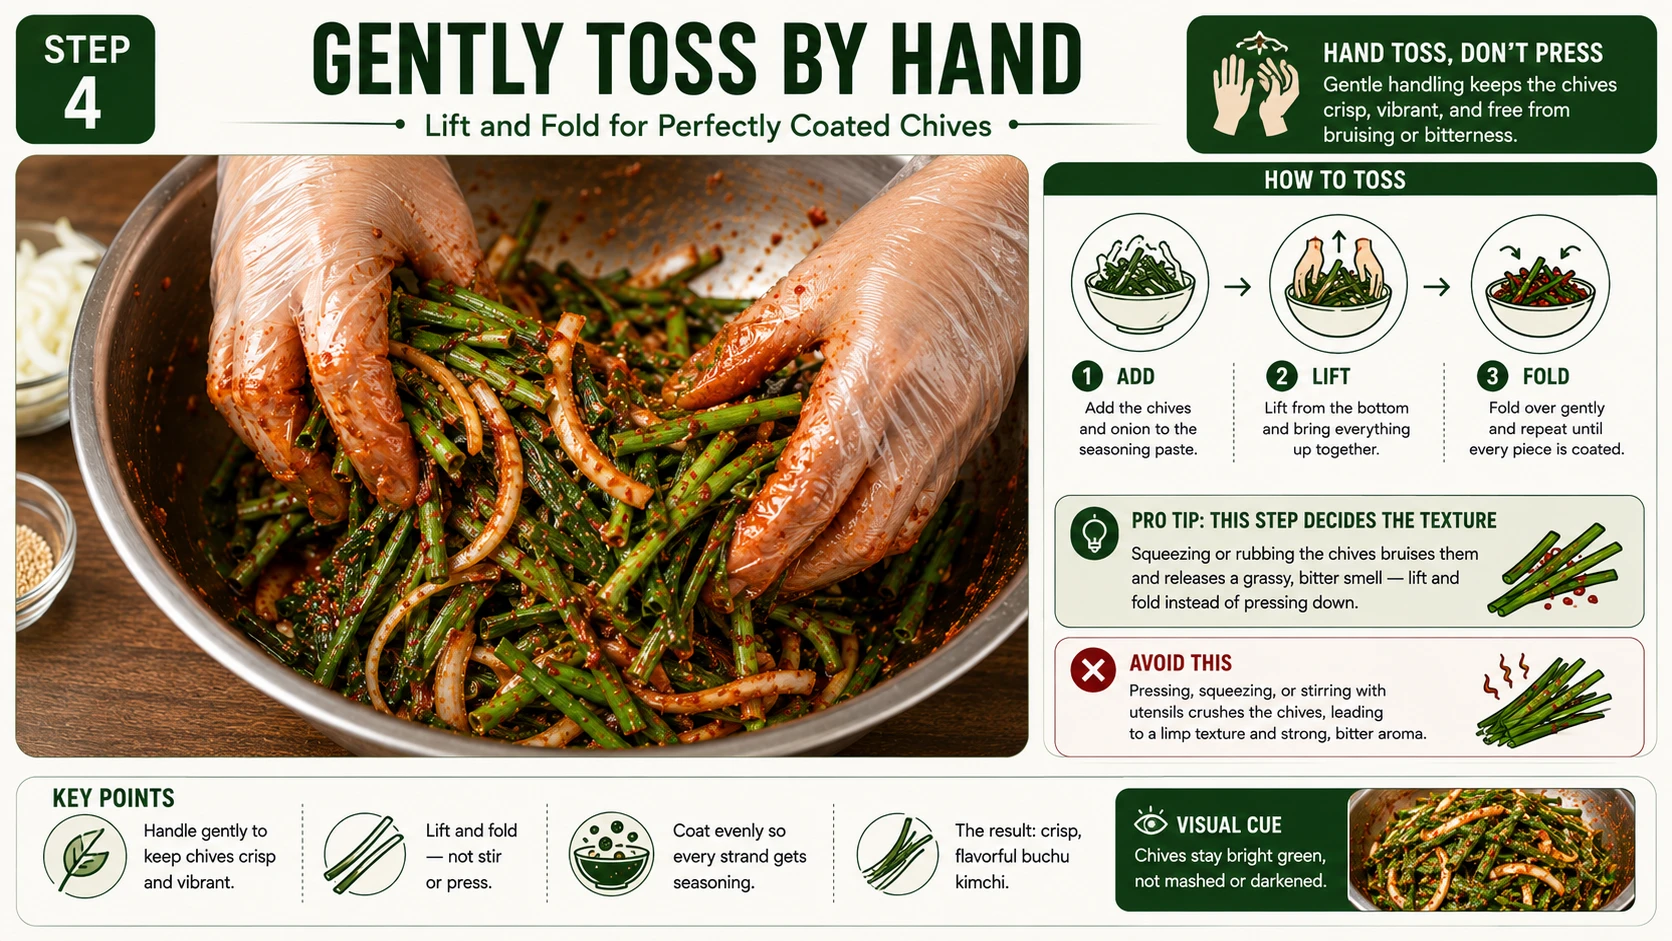
Add the chives and onion to the seasoning paste. Gently toss by hand, lifting and folding rather than stirring, until every piece is coated.
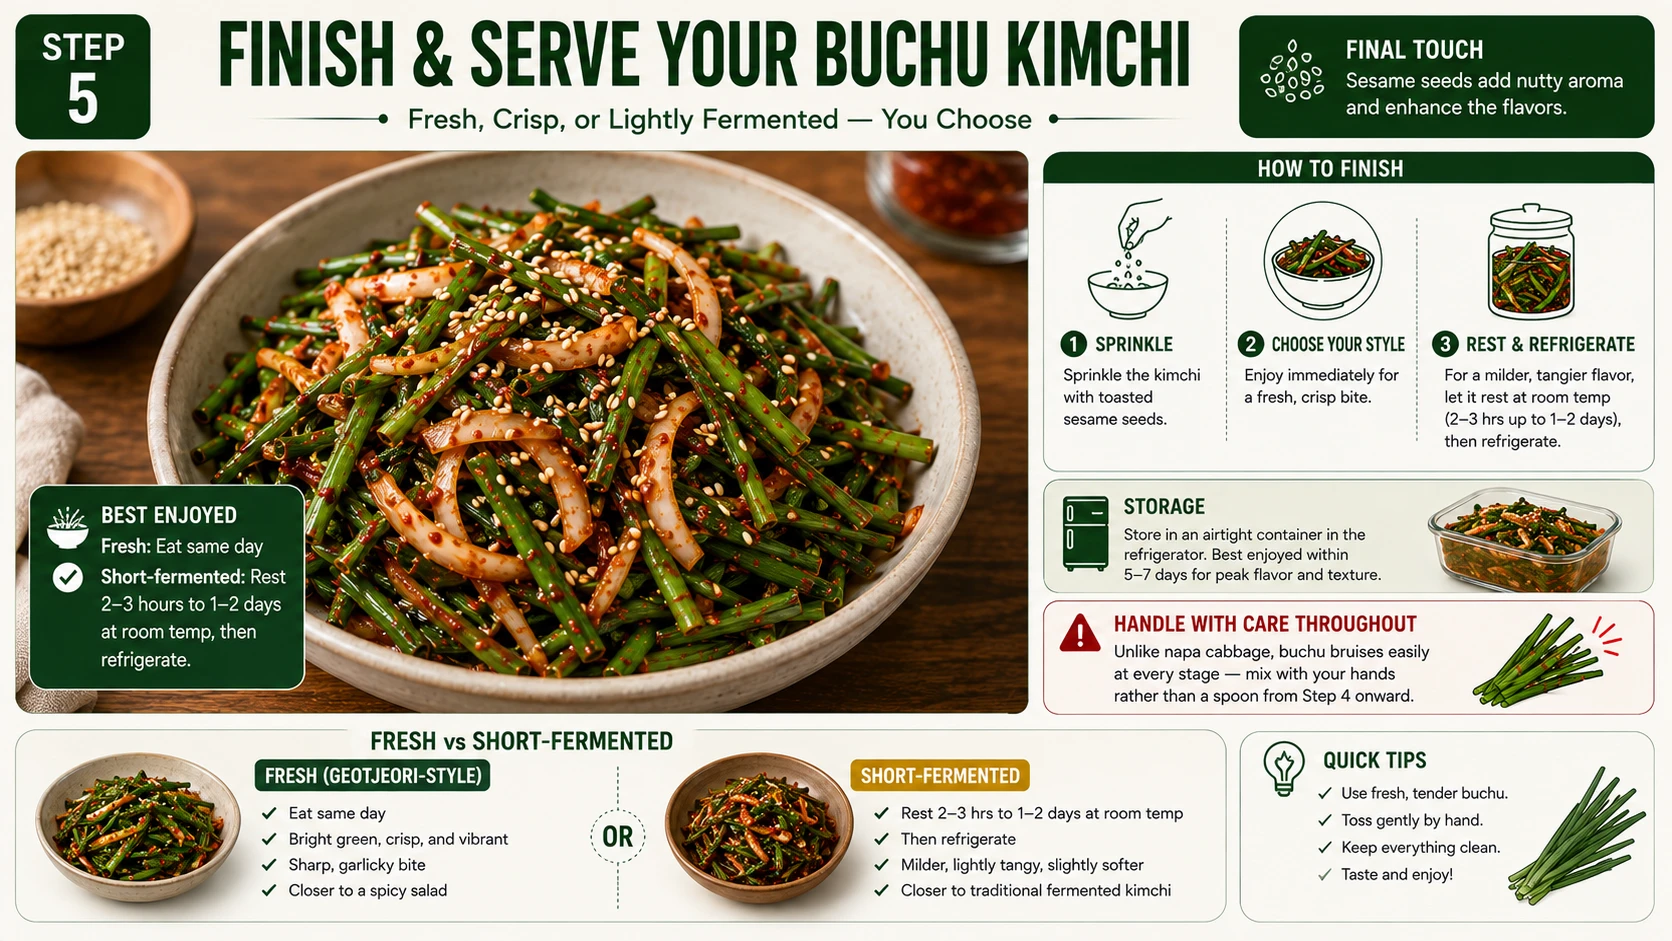
Sprinkle with sesame seeds. Eat right away as a fresh side dish, or let it sit at room temperature for 2–3 hours up to 1–2 days to soften and develop a mild tang, then refrigerate.
Buchu Kimchi — Recipe Card
부추김치 · Fresh or Short-Fermented · 15 Minutes Active. Save this to Pinterest, print it, or copy it straight to your notes app.
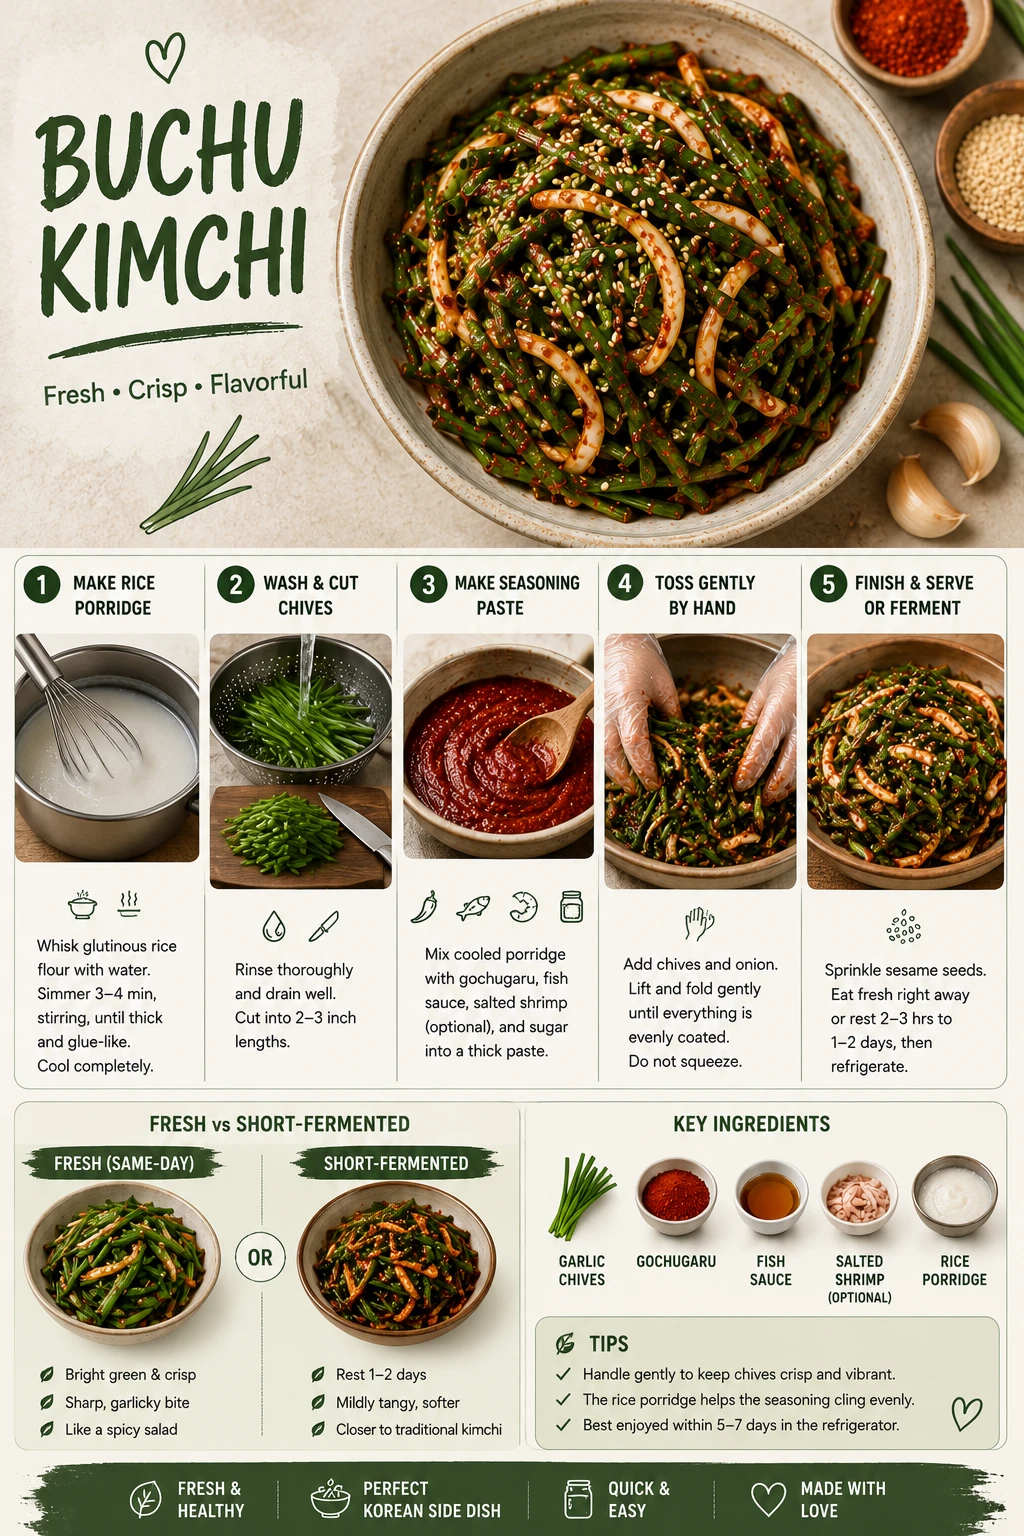
- 450g buchu (garlic chives), cut 2–3 in.
- 1 tbsp glutinous rice flour
- 1/2 cup water
- 4 tbsp gochugaru
- 3 tbsp fish sauce (or soy sauce)
- 1 tbsp salted shrimp — optional
- 1 tsp sugar or 1–2 tbsp plum syrup
- 1/2 small onion, sliced — optional
- 1 tsp sesame seeds
- 1Whisk rice flour into water, simmer 3–4 min to a thin paste, cool fully before continuing.
- 2Wash chives thoroughly to remove grit, drain, then cut into 2–3 inch lengths.
- 3Mix the cooled porridge with gochugaru, fish sauce, salted shrimp, and sugar into a smooth paste.
- 4Add chives and onion to the paste. Hand-toss gently, lifting and folding — never squeeze or stir with a spoon.
- 5Sprinkle with sesame seeds. Eat fresh, or rest 2 hrs–2 days at room temp for a mild tang, then refrigerate.
Per serving (6 servings total). Reviewed by Dr. Sarah Mitchell RD, PhD · Updated August 13, 2026
Ingredient Notes — What Each One Does and Why
A quick amount list only tells you how much. Here’s what each ingredient is actually doing, and where it’s safe to swap.
Where Buchu Kimchi Fits in the Kimchi Family
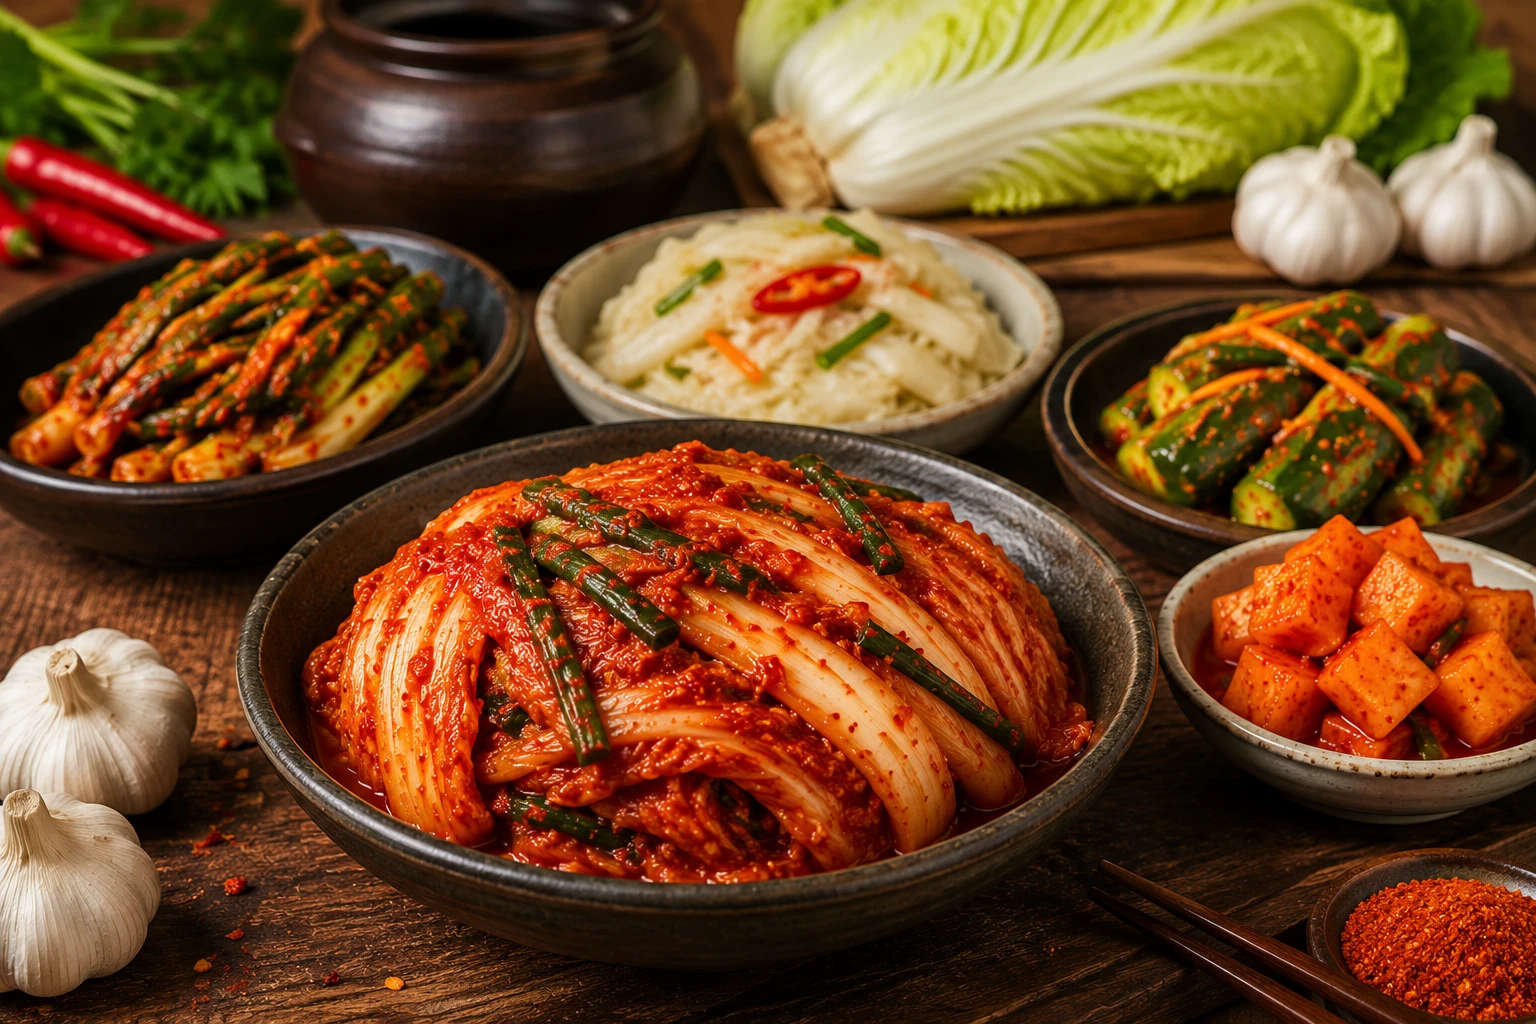
Buchu kimchi is one of 18+ varieties covered on our pillar guide — here’s how its texture and technique compare to two close relatives.
Pairing Guide — Buchu Kimchi
Its bright, sharp flavor is built to cut through rich, fatty foods — this is where it earns its place on the table.


Storage & Reheating
How Buchu Kimchi Compares to Other Types
Figures below are drawn from our Types of Kimchi nutrition table, approximate per 100g serving.
| Variety | Calories | Sodium | Probiotic Load | Notes |
|---|---|---|---|---|
| Baechu Kimchi | ~15–23 kcal | ~450–750mg | High (long-fermented) | The most-studied variety in kimchi nutrition research. |
| Dongchimi | ~8–14 kcal | Lowest of the common types | Moderate | Mostly water-based brine, so both figures run low. |
| Geotjeori | ~10–16 kcal | ~300–500mg | Minimal (unfermented) | Fresh-salad style, closest comparison to fresh buchu kimchi. |
| Buchu Kimchi (fresh) ← This page | ~25–30 kcal | ~320–380mg | Minimal, unless short-fermented | Slightly higher than geotjeori due to the rice-porridge paste base. |
Buchu Kimchi FAQ — 11 Questions
No. Unlike napa cabbage kimchi, buchu kimchi is often eaten fresh the same day, closer to a spicy salad than a long-fermented pickle. Letting it sit at room temperature for a few hours to a couple of days develops a mild tang if you prefer that flavor, but fermentation is optional here, not required.
They’re seasoned almost identically, but the vegetable is different: buchu kimchi uses garlic chives (buchu), while pa kimchi uses thin Korean scallions (jjokpa) tied in small bundles. You can generally use the same seasoning paste for both.
Yes. Swap the fish sauce for soy sauce (Korean soup soy sauce if you can find it) and skip the salted shrimp entirely. The flavor will be a little less savory-briny, but the texture and heat level stay the same.
Use soy sauce in place of the fish sauce, and leave out the salted shrimp. Most Korean fish sauce is anchovy-based rather than shellfish-based, but always check the label if you have a severe allergy, since recipes and brands vary.
About 3 to 4 weeks refrigerated in an airtight container. It’s best in the first week or two, when the chives are still bright and a little crisp; the flavor keeps deepening as it ages.
It’s not a true substitute — regular chives are hollow and round with a much milder, oniony flavor, while buchu (garlic chives) are flat-bladed with a stronger, garlicky bite that the seasoning is built around. If you truly can’t find Korean or Chinese garlic chives at an Asian grocery store, regular chives will give you a milder, less traditional result rather than a direct swap.
Pre-salting exists to draw excess water out of dense vegetables like napa cabbage before seasoning. Chives are thin and don’t hold that kind of excess water, so salting them first would only wilt and bruise them without any real benefit — the seasoning paste goes straight onto raw chives instead.
Buchu chives bruise much more easily than napa cabbage. A spoon concentrates pressure on a few strands at a time and crushes them, which releases a grassy, bitter smell. Tossing gently by hand spreads the pressure evenly across the whole batch.
Yes — the ratios scale linearly, so doubling every ingredient works fine. The only adjustment is time: a larger volume of chives takes a few extra minutes to toss evenly by hand without bruising them.
The paste isn’t specific to chives — it’s the same base used for scallions (pa kimchi) or thinly sliced onion. If you have extra, toss it with sliced cucumber or scallions for a quick side rather than letting it go to waste — see our guide on leftover kimchi juice and brine uses for more ideas.
It’s moderately spicy at the amounts in this recipe, but the heat is easy to control — the chives themselves aren’t spicy, so reducing the gochugaru and adding a little extra sugar or plum syrup to balance will bring the heat down without changing the texture.
Was this guide helpful?
Your feedback helps us improve KimchiGuide for everyone.
Explore More
More guides and recipes from KimchiGuide.
See how buchu kimchi fits among 18+ other varieties.
Read the guide →How to choose and use Korean chili flakes.
Read the guide →
The same fresh-vs-fermented choice, for napa cabbage kimchi.
Read the guide →A fast way to use up any extra kimchi.
Get the recipe →A deeply savory kimchi stew to pair alongside.
Get the recipe →Another fast, satisfying way to use leftover kimchi.
Get the recipe →
Ways to use kimchi once it’s fully aged.
Read the guide →In a hurry? See what’s actually worth buying.
Read the guide →Not making it yourself? Here’s where to find it.
Read the guide →About the Author & Reviewer

Ji-Young Park
12 years writing about Korean home cooking, with 200+ kimchi batches tested for KimchiGuide, including regional and lesser-known varieties like buchu kimchi.
View Full Bio →
Dr. Sarah Mitchell
Registered dietitian specializing in fermented foods and gut health, reviewing nutrition and food-safety claims across KimchiGuide’s kimchi guides.
View Full Bio →
Which Kimchi Style Do You Prefer?
Fresh, same-day buchu kimchi or short-fermented? Let us know in the comments.