Kimchi Cheese Ramen (치즈 김치라면 — Off-Heat Melt Method)
The move most cheese ramen recipes get wrong: dropping a cheese slice into a hard-boiling kimchi broth, where it breaks into oily, stringy clumps instead of melting in. Here, the broth is built the same tested way as our classic version, then the pot comes off the heat and shredded cheese is melted in gradually — smooth, glossy, never greasy. 25 minutes, one pot.
What Is Kimchi Cheese Ramen?
Kimchi cheese ramen is our classic simmer-in-broth kimchi ramen finished with shredded melting cheese stirred in off-heat — a rich, glossy version rather than a clear one. The same base rules still apply: Stage 3 aged kimchi and its brine are simmered directly in the pot with garlic and gochugaru before the stock goes in. The one extra rule that defines this version: the cheese goes in off-heat — the pot pulled off the burner entirely, cheese added in small handfuls — so it never hits a hard boil and breaks into oily clumps. Finished with a soft-boiled egg and scallion. Serves 2 in 25 minutes at approximately 520 calories and 19g protein per serving.
How to Make Kimchi Cheese Ramen
Kimchi cheese ramen takes 25 minutes: bloom garlic and gochugaru, simmer kimchi and its brine in the pot, build the broth with stock, cook the noodles in that broth, take the pot off the heat and melt in shredded cheese gradually, then finish with sesame oil and a soft-boiled egg.
- Bloom: warm garlic and gochugaru in a little oil for 30 seconds.
- Simmer the kimchi: add chopped kimchi and its brine, cook 2–3 minutes.
- Build the broth: add stock and soy sauce, simmer 5 minutes.
- Cook the noodles: add the noodle blocks straight into the broth, 3–4 minutes.
- Melt in the cheese off-heat: pull the pot off the burner, add shredded cheese in small handfuls, stirring until smooth. Splash in reserved noodle water if it looks oily.
- Finish: stir in sesame oil, top with soft-boiled egg and scallion.
Why Kimchi Cheese Ramen Isn’t Just “Add a Slice”
Most quick cheese versions online drop a slice or handful of shreds into a boiling, acidic kimchi broth — and it breaks into stringy, oily clumps instead of melting in. The fix isn’t a different cheese, it’s a different sequence: build the same well-tested classic broth first, then pull it off the heat entirely before the cheese ever goes near it.

Direct heat on an acidic, simmering broth makes cheese proteins seize up and the fat separate out. Taking the pot fully off the burner before the cheese goes in keeps it smooth instead of greasy.

A whole slice dropped in has to melt from the outside in and often clumps before the centre softens. Shredding first gives far more surface area, so it melts faster and more evenly in small handfuls.

This isn’t a modern mashup — Korea has paired spicy kimchi broth with melting American cheese since the 1950s, when surplus processed cheese from U.S. army bases near Uijeongbu was combined with kimchi and gochujang to make Budae-jjigae. This recipe applies that same logic to instant noodles.

The starchy water left over from cooking the noodles acts like a light thickener — it helps keep the melted cheese suspended in the broth instead of pooling as an oily film on top.
Off-Heat Melt vs Direct Boil-In — Compared
Nearly every “cheese kimchi ramen” recipe online just says “stir in cheese.” We tested both approaches across 6 batches. The difference decides whether the broth stays smooth and glossy or turns oily and stringy.

- Pull the pot completely off the burner
- Add shredded cheese in 2–3 small handfuls
- Stir continuously until each handful is fully melted
- Splash in reserved starchy noodle water if it looks oily
Result: Smooth, glossy broth in every batch test, with the cheese fully emulsified rather than floating in clumps.

- Broth left at a hard, rolling boil
- Cheese slice or shreds dropped straight in
- No off-heat pause, no gradual stirring
Result: Visible oily clumping and stringy, unmelted pockets in 5 of 6 test batches — a greasy slick instead of a glossy broth.
Method Comparison at a Glance
| Method | Broth Texture | Time | Verdict |
|---|---|---|---|
| Off-Heat Melt ⭐ | Smooth & glossy | +2 min | Always use this |
| Direct Boil-In | Oily/clumpy | Faster | Avoid — high break risk |
Cheese Type Comparison
| Cheese | Melt Behaviour | Flavour | Best Use |
|---|---|---|---|
| American cheese slices ⭐ | Melts smoothest — has emulsifiers | Mild, salty | Stirring into the broth |
| Sharp/mild cheddar, shredded | Can break if overheated — needs off-heat + starch water | Bold, tangy | Good flavour, with care |
| Low-moisture mozzarella | Stringy, doesn’t dissolve into broth | Very mild | Cheese-pull topping only |
| Korean cheese sticks / rings | Extremely stretchy, holds shape | Mild | Cheese-pull topping only |
Drag to Compare the Two Methods
A visual side-by-side of the two techniques tested above — drag the handle to see the difference for yourself.
Drag the slider (or tap anywhere on the image) to compare.
Key Terms — Language & Food Science Entities
These terms clarify what this dish is, how it relates to the wider kimchi noodle silo, and why the melting technique steps matter.
Which Kimchi Stage to Use — Visual Guide
Melted cheese richness needs a strong acid to cut through it, so the kimchi stage matters even more here than in the classic version — under-fermented kimchi simply disappears under the cheese.
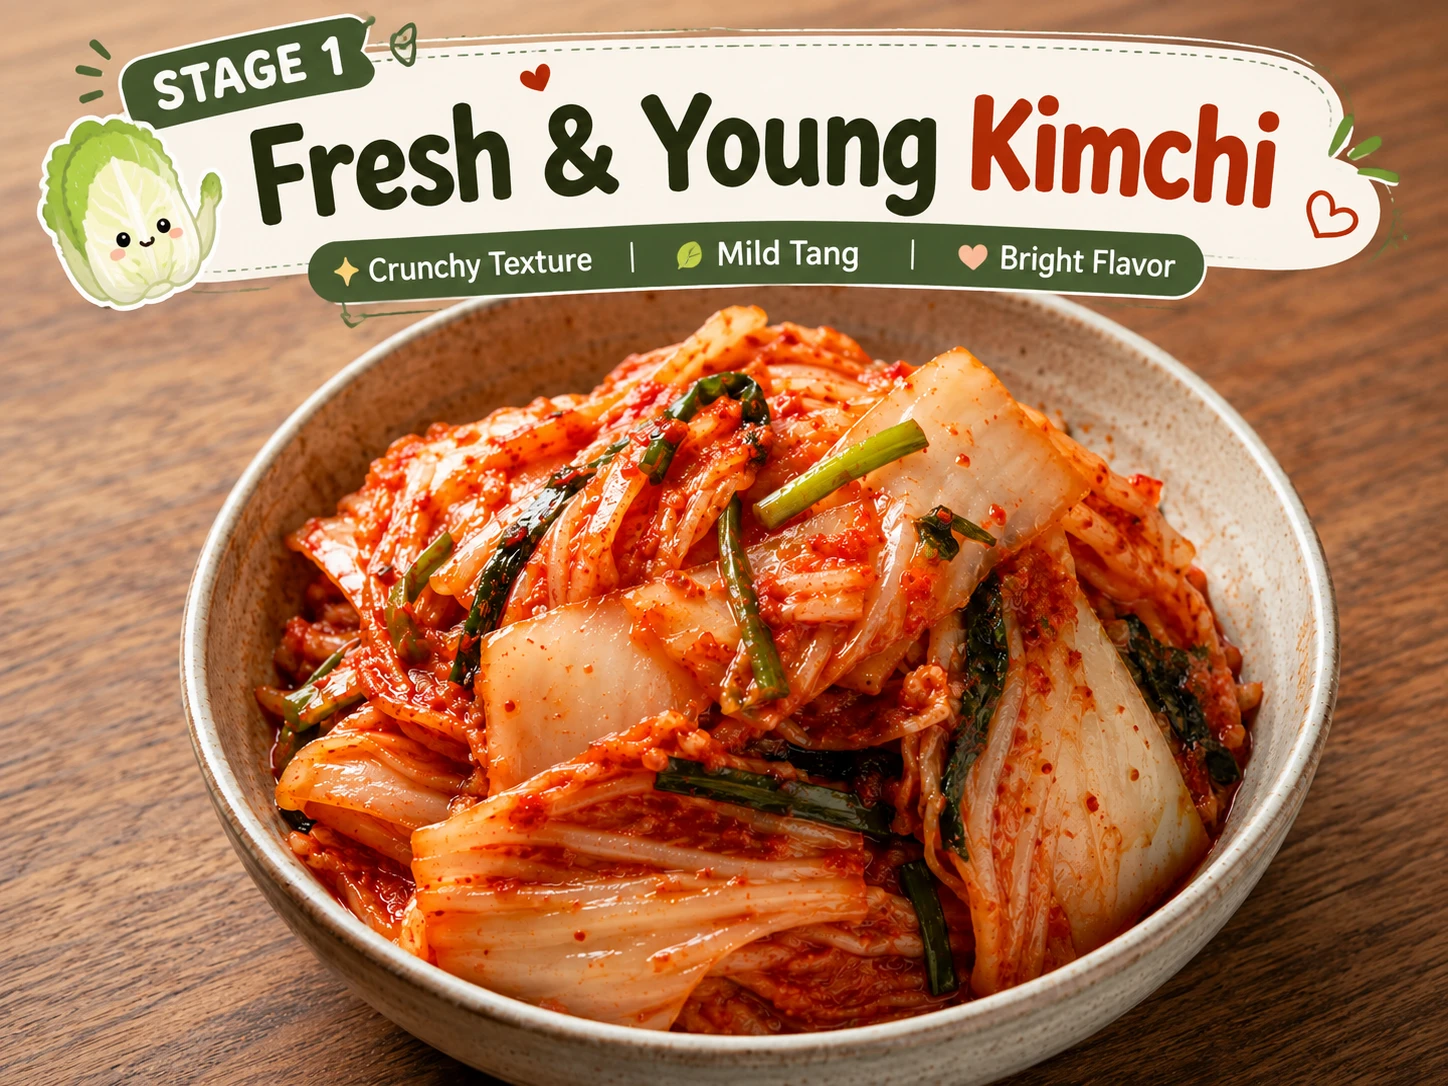
Already mild before the cheese goes in — once melted cheese is added, this stage tastes like plain cheese broth with cabbage.
✗ Do Not Use — disappears under the cheese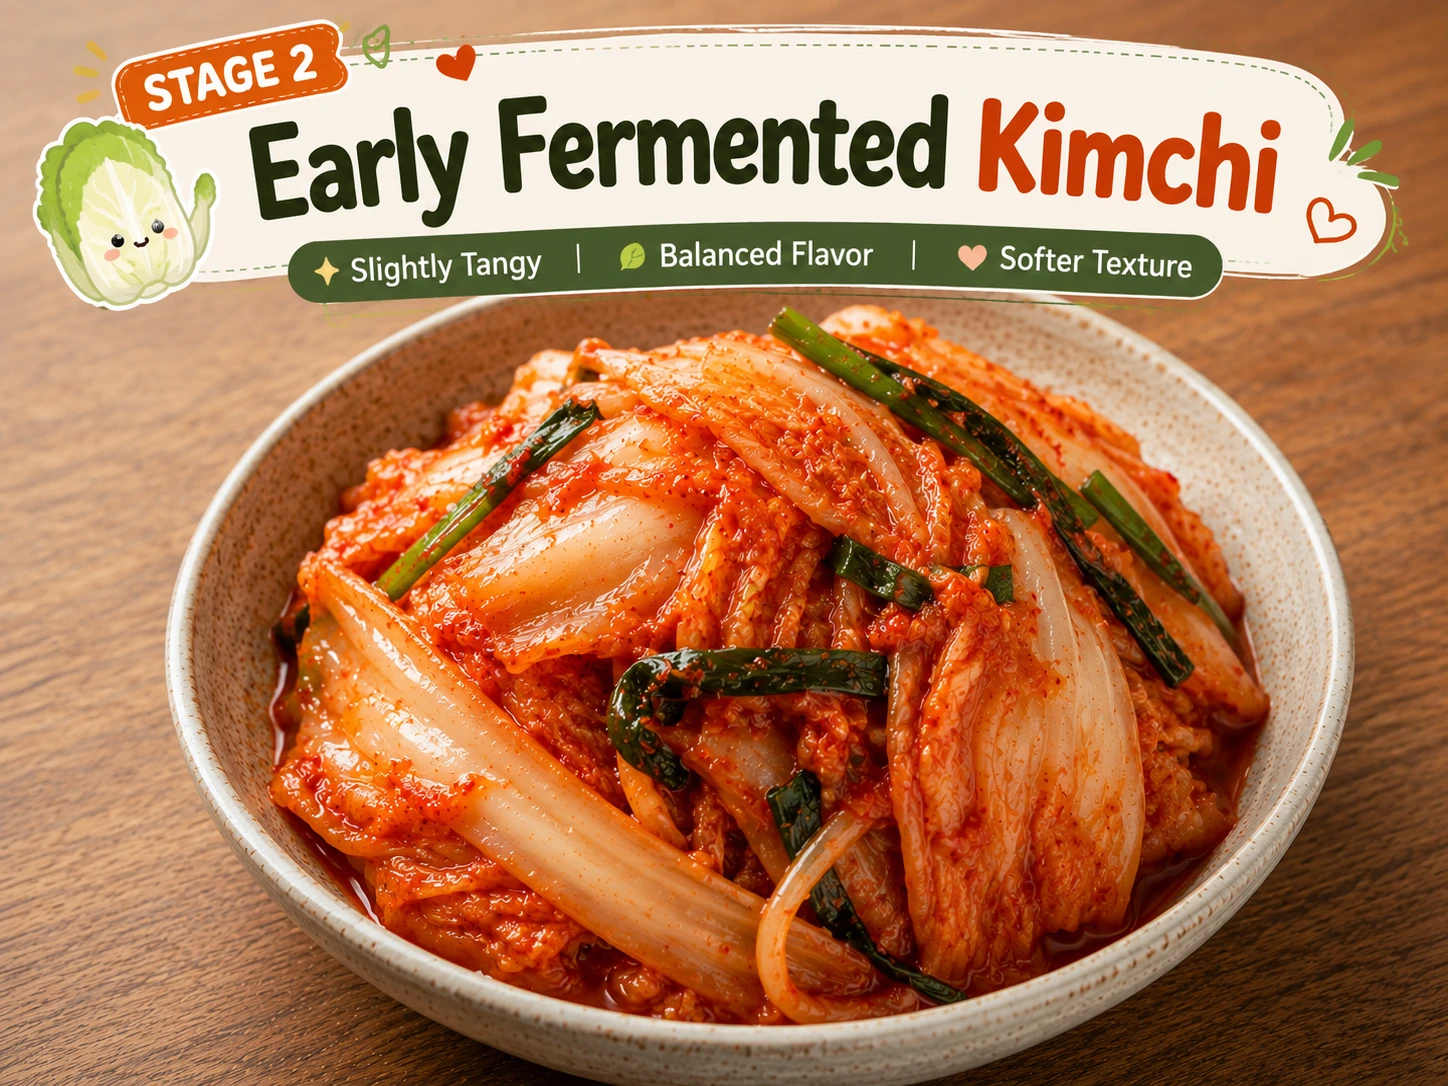
Still gets softened considerably by the cheese. Acceptable as a last resort with a little extra gochugaru added to the broth before the cheese goes in.
△ Last Resort — add extra gochugaru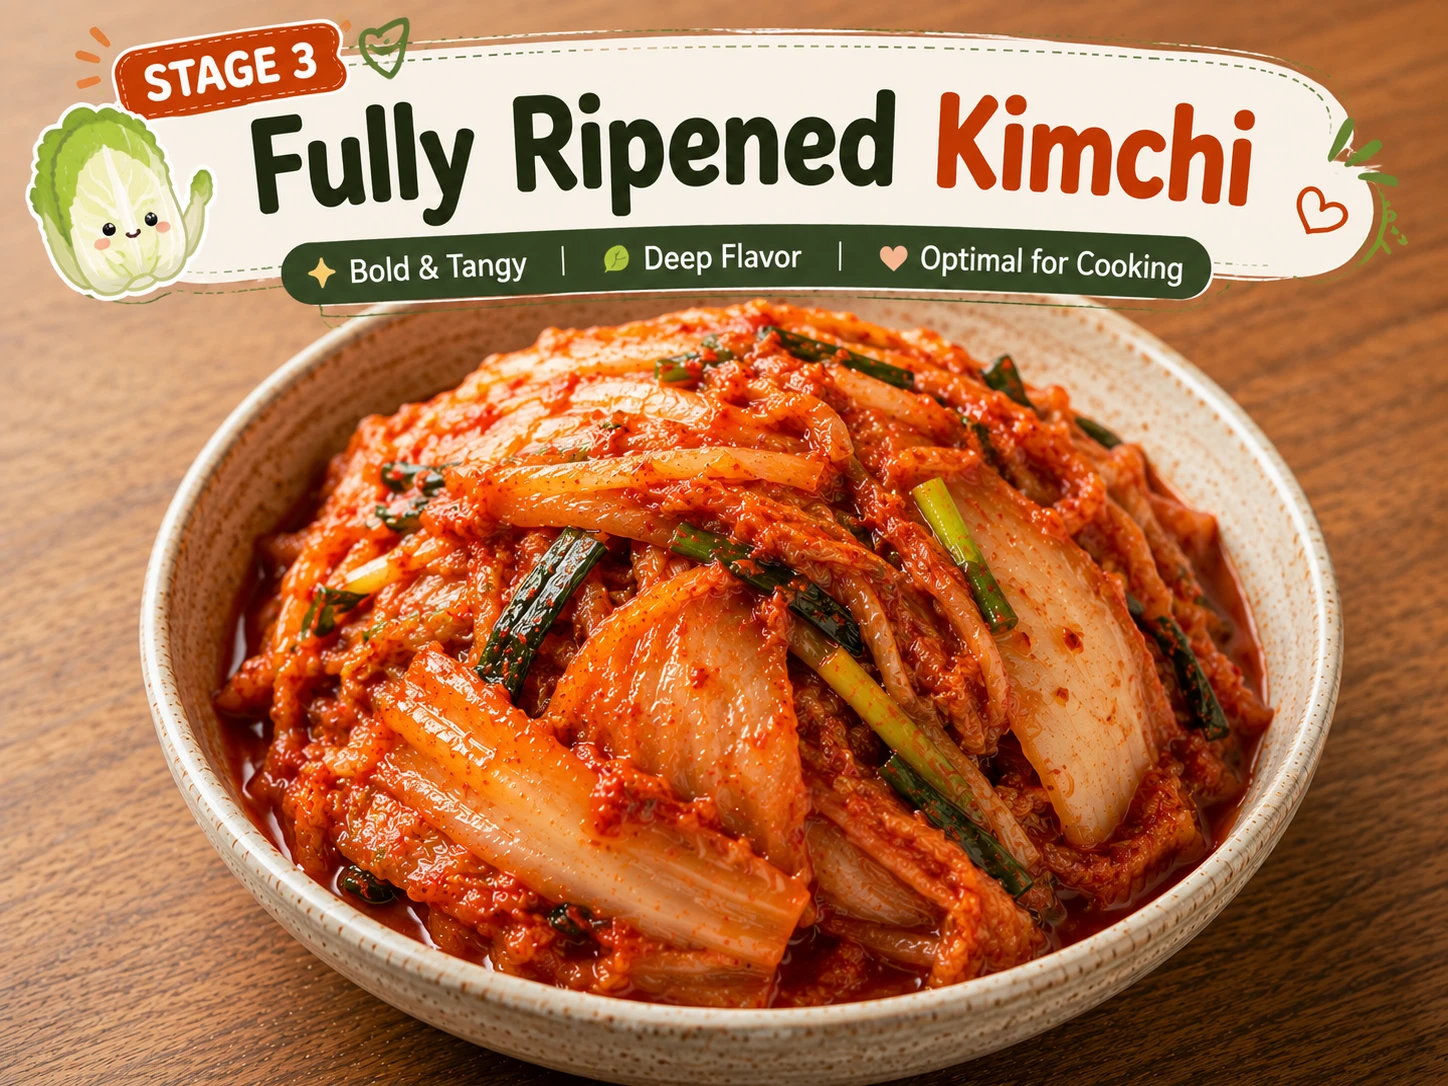
Strong enough acidity to stand up to the melted cheese, giving a broth that still reads clearly as kimchi ramen underneath the richness.
★ Correct — the only real choice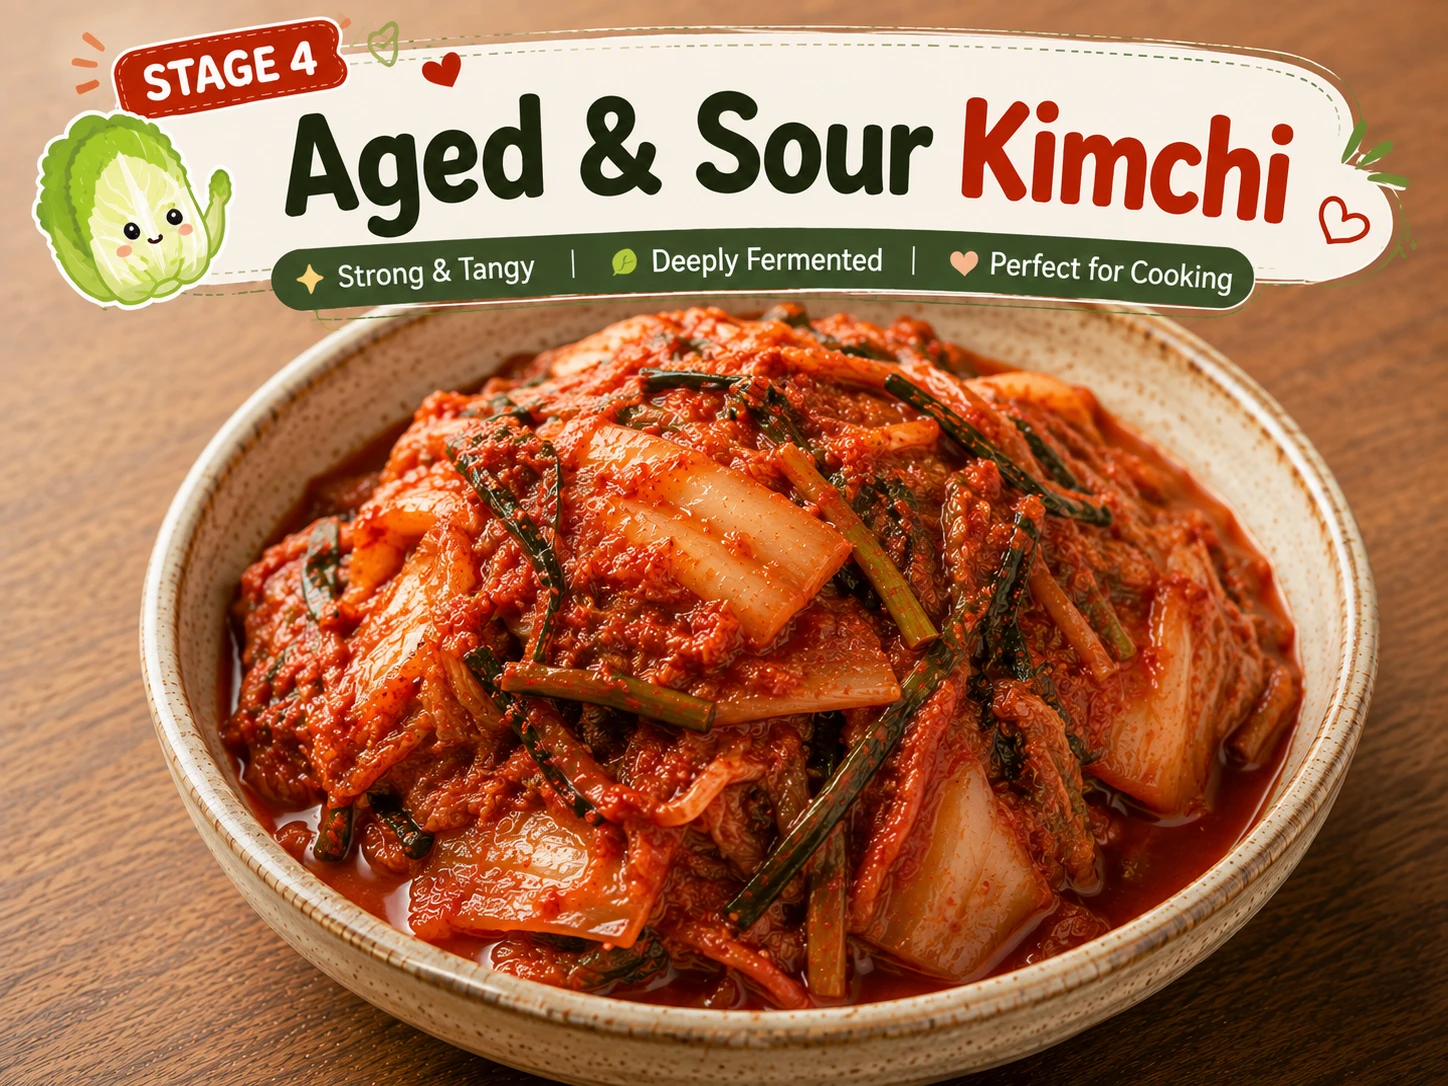
Its sharper sourness cuts nicely through the melted cheese, though the reserved brine should be reduced slightly to keep the broth from turning too tangy.
△ Usable — reduce brine slightlyHow Difficult Is Kimchi Cheese Ramen?
Still genuinely beginner-friendly — the one real skill beyond the classic version is melting the cheese off-heat instead of dropping it straight into the boiling pot.
← This Recipe
Ingredients + Scaler
The same base as the classic version, plus shredded melting cheese and a splash of reserved noodle water. The seasoning packet is still deliberately absent. Got extra brine left over after measuring out what this recipe needs? See our Leftover Kimchi Juice & Brine Uses guide for ideas.

Amounts scale automatically with the servings control above.
Common Substitutions
| Ingredient | Substitute | Notes |
|---|---|---|
| American cheese | Shredded mild cheddar + starch water | Cheddar tastes bolder but needs the off-heat technique to stay smooth |
| Stock | Bouillon cube in water | The kimchi and gochugaru carry most of the flavour anyway |
| Instant noodle blocks | Fresh or frozen ramen noodles | Shorter cook time, 1–2 minutes instead of 3–4 |
| Mozzarella cheese-pull topping | Skip it | Purely visual — the dish tastes the same without it |
How to Make Kimchi Cheese Ramen
Six steps, one pot — the same five as the classic version, plus the off-heat melt step at the end. The order still matters.

Warm a little neutral oil in a pot over medium heat — not high, gochugaru burns bitter almost instantly if the pan is too hot. Add the minced garlic and gochugaru together and stir constantly for about 30 seconds, just until the mixture turns fragrant and the oil takes on a deep red tint. This short bloom is what pulls the fat-soluble flavour compounds out of the chili flakes; skipping it leaves the broth tasting flat and one-dimensional instead of rounded.

Add the chopped kimchi and its reserved brine straight into the same pot — no separate sauté pan needed. Cook for 2–3 minutes, stirring occasionally, so the cabbage softens slightly and its fermented sourness melds into the gochugaru oil and garlic rather than sitting on top of the broth as a separate flavour. You’ll notice the kitchen smell shift from sharply sour to something rounder and more savoury; that’s the cue it’s ready for the next step.

Pour in the stock and soy sauce, bring the pot up to a full boil, then immediately drop it to a steady simmer for 5 minutes. This is where the base flavour gets set — anchovy or anchovy-kelp stock gives the closest echo of the traditional Budae-jjigae base this dish borrows its logic from (our Anchovy Kelp Stock Guide covers how to make one from scratch in under 20 minutes), while plain chicken stock gives a milder, more neutral result if you’d rather the cheese lead.

Add the noodle blocks directly into the broth and cook until just tender, about 3–4 minutes, separating the strands with tongs as they loosen so they cook evenly instead of clumping into a solid brick. This is also the step that produces the ingredient the whole technique depends on: before you drain or move anything, ladle out 2–3 tablespoons of the cloudy, starch-thickened broth into a small cup and set it aside. That reserved liquid is what keeps the cheese from breaking in the next step.

Remove the pot from the heat entirely and set it on a cool burner or trivet — this is the one step where patience matters more than speed. Add the shredded cheese in two or three small handfuls rather than dumping it all in at once, stirring continuously in one direction until each handful is fully melted and glossy before adding the next. If at any point the surface starts to look oily or the cheese clumps instead of smoothing out, stir in a tablespoon of the reserved starchy noodle water immediately — it acts as an emulsifier and will usually pull the broth back together within a few seconds.

Stir in the sesame oil — off the heat, always, since its aroma compounds break down above roughly 160°C and go bitter if added while the pot is still simmering. Divide into warmed bowls, top each with the soft-boiled egg halves and sliced scallion, and drape the optional mozzarella stick or Korean cheese ring over the top while the noodles are still hot enough to soften it for a clean cheese pull. Serve immediately — this dish does not wait well.
What We Tested for the Cheese Version
The technique that cannot be skipped: pulling the pot fully off the heat before the cheese goes in, and adding it gradually in small handfuls. Everything else follows the same reliable base as the classic version.

Ingredient Notes — What Each One Does and Why
A quick amount list only tells you how much. Here’s what each ingredient is actually doing in the pot, and where it’s safe to swap.
All 13 Kimchi Noodle Variations
Same simmer-in-broth foundation, 13 different directions.


What to Serve With Kimchi Cheese Ramen
The rich, cheese-forward broth pairs best with something crisp or plain alongside it. If you like this gochujang-and-cheese combination, our Gochujang Mayo Sauce Guide is worth trying on almost anything else in your kitchen.


Storing Kimchi Cheese Ramen
Cheese vs Classic — What Changes Nutritionally
Reviewed by Dr. Sarah Mitchell RD, PhD. The melted cheese adds calories, fat, and sodium, along with a real protein boost.
| Version | Calories | Fat | Sat. Fat | Protein | Sodium |
|---|---|---|---|---|---|
| Classic Kimchi Ramen | 410 | 14g | 4g | 16g | 980mg |
| Kimchi Cheese Ramen | 520 | 25g | 12g | 19g | 1150mg |
Kimchi Cheese Ramen — 19 Questions Answered
Yes — the broth is built the same way as classic kimchi ramen, then the pot is taken off the heat and shredded cheese is melted in gradually. Adding cheese while the broth is still boiling is the main reason it breaks into oily clumps.
This happens when cheese hits a hard-boiling, acidic broth directly — the proteins seize and the fat separates out. Take the pot off the heat first, add the cheese in small handfuls while stirring, and use a splash of reserved starchy noodle water if it starts to look oily.
American cheese slices melt the smoothest because they contain emulsifying salts and rarely break. Shredded mild or medium cheddar is the best balance of real flavour and reliable melting if you add it off-heat with a splash of starchy noodle water.
Low-moisture mozzarella stretches beautifully for a cheese-pull photo but has very little flavour and doesn’t dissolve smoothly into the broth. Use it as a topping draped over the finished bowl, not stirred in as the main melting cheese.
No, or only a small pinch. Kimchi, gochugaru, and soy sauce already provide salt and heat, and the cheese adds more sodium on top, so a full seasoning packet reliably over-salts the bowl.
Yes — Korea has paired kimchi with melting American processed cheese since the 1950s, when surplus U.S. military-base cheese near Uijeongbu was combined with kimchi and gochujang to create Budae-jjigae. Kimchi cheese ramen applies that same pairing to instant noodles.
Stage 3 aged kimchi, fermented 2-4 weeks, is optimal — its acidity cuts through the richness of the melted cheese. Fresher kimchi tastes flat once the cheese is stirred in.
Chicken or anchovy stock both work well — unlike the creamy dairy version, cheese pairs fine with anchovy stock’s savoury depth, echoing how Budae-jjigae is traditionally built on an anchovy-kelp base.
Yes — fresh or frozen ramen noodles both work well and often have a better chew than dried instant blocks. Cook time will be shorter, usually 1-2 minutes.
Toasted sesame oil has a low smoke point and turns bitter over direct heat. Stirring it in after the pot is off the heat keeps its aroma intact.
Not by default — traditional kimchi and anchovy-based stock both typically contain fish products, and some shredded cheeses use animal rennet. Use vegetable stock, a vegetarian-labelled kimchi, and a rennet-free cheese to make it vegetarian.
Lower eggs into boiling water and cook for 6.5 to 7 minutes for a jammy yolk, then transfer immediately to an ice bath for at least 3 minutes before peeling.
Yes, though the result is different — a good melting vegan cheese (one labelled specifically for stretch and melt, not just slicing) stirred in off-heat with a splash of starchy noodle water gets closest, alongside a vegan-labelled kimchi and vegetable stock.
Approximately 520 calories per serving with one soft-boiled egg. Macros: 56g carbohydrates, 19g protein, 25g fat, 12g saturated fat, 1150mg sodium, 3g fibre.
Not recommended — melted cheese in broth separates badly on freezing and thawing, and the noodles turn mushy. Refrigerate the broth alone for up to 2 days.
Reheating melted-cheese broth over high heat causes the fat to separate out again. Reheat gently over low heat, stirring often, rather than microwaving on high.
Drape a fresh, unmelted mozzarella cheese stick or Korean cheese ring over the hot noodles right before serving rather than stirring it in — the residual heat softens it enough to lift with chopsticks for a clean stretch, while the shredded cheese in the broth stays smooth and stays put.
Garlic and gochugaru first to bloom in the fat, then kimchi and its brine, then stock and soy sauce, then noodles, then the pot comes off the heat entirely before the cheese goes in last. The egg and garnish go on top at the very end.
Yes — Ottogi Real Cheese Ramyeon is the closest packaged version for a brothy cheese ramen, while Samyang’s Buldak Cheese variety gives a broth-less, stir-fried cheese noodle instead. Both use a cheese powder stirred in off-heat rather than real shredded cheese, so the flavour is milder and less complex than this from-scratch version.

Ji-Young writes the full Kimchi Ramen silo at KimchiGuide, testing each variation across multiple batches before publishing.
Full Bio →
Dr. Mitchell reviews the nutrition data and health claims across every KimchiGuide recipe for accuracy.
Full Bio →
Leave a Comment
Tried the off-heat melt method? Let us know how your bowl turned out.