KimchiGuide› Kimchi Recipes› Kimchi Ramen› Creamy Version
🍜 6 Batches Tested · Cream-in-Broth Method · Variation 3 of 13

Creamy Kimchi Ramen (크리미 김치라면 — Cream-in-Broth Method)

The move most creamy ramen recipes get wrong: pouring cold cream straight into a hard-boiling kimchi broth, where it splits. Here, the broth is built the same tested way as our classic version, then the cream is tempered in before the noodles go in — silky, rosé-coloured, never grainy. 25 minutes, one pot.

25m
Total
Easy
Level
17g
Protein
480
Calories
2
Serves
📅 Published: · ✅ Reviewed: Dr. Sarah Mitchell RD, PhD
📖
This is variation 3 of 13 — Creamy Version Full guide with all 13 kimchi noodle variations: Kimchi Ramen Silo Guide →  ·  Kimchi Fried Rice Silo →  ·  All Kimchi Recipes →
⚡ Quick Answer

What Is Creamy Kimchi Ramen?

Creamy kimchi ramen is our classic simmer-in-broth kimchi ramen finished with tempered heavy cream and butter — a silky, rosé-coloured version rather than a clear one. The same base rules still apply: Stage 3 aged kimchi and its brine are simmered directly in the pot with garlic and gochugaru before the stock goes in. The one extra rule that defines this version: the cream is tempered — a ladle of hot broth stirred into the cold cream first — before it goes back into the pot, so the fat never hits a hard boil and splits. Finished with a soft-boiled egg and shiitake mushroom. Serves 2 in 25 minutes at approximately 480 calories and 17g protein per serving.

Quick Steps

How to Make Creamy Kimchi Ramen

Creamy kimchi ramen takes 25 minutes: bloom garlic and gochugaru, simmer kimchi and its brine in the pot, build the broth with stock, temper and stir in heavy cream and butter, cook the noodles in that creamy broth, then finish with sesame oil off-heat and a soft-boiled egg.

  1. Bloom: warm garlic and gochugaru in a little oil for 30 seconds.
  2. Simmer the kimchi: add chopped kimchi and its brine, cook 2–3 minutes.
  3. Build the broth: add stock and soy sauce, simmer 5 minutes with shiitake mushroom.
  4. Temper the cream: lower the heat, ladle hot broth into the cold cream, then stir it and the butter back in.
  5. Cook the noodles: add the noodle blocks straight into the creamy broth, 3–4 minutes.
  6. Finish: off heat, stir in sesame oil, top with soft-boiled egg and scallion.
Creamy Kimchi Ramen — Key Facts & Reference Data
Verified by Ji-Young Park · Reviewed by Dr. Sarah Mitchell RD, PhD
Why the cream has to be tempered
Cold cream poured directly into a hard-boiling, acidic kimchi broth splits — the fat separates from the liquid. Ladling hot broth into the cream first raises its temperature gradually so it blends in smoothly when stirred back into the pot.
Why the seasoning packet still gets skipped
Kimchi, gochugaru, and soy sauce already carry salt and heat. Adding dairy on top of a full seasoning packet reliably over-salts the bowl, same as in the classic version.
Which kimchi stage to use
Stage 3 aged kimchi (2–4 weeks, pH ≈ 4.2) is still optimal — its acidity needs to be strong enough to stand up to the richness of the cream, or the dish tastes flat. Don’t have kimchi that aged on hand? See our How to Make Kimchi from Scratch guide.
Nutrition per serving with egg
Approximately 480 calories · 17g protein · 55g carbohydrates · 22g fat · 11g saturated fat · 1010mg sodium · 3g fibre. Reviewed by Dr. Sarah Mitchell RD, PhD.
Where this sits in the 13-variation silo
This variation keeps the same simmer-in-broth base as the classic recipe and adds one technique on top — tempering dairy into an acidic broth — a skill shared with the Creamy Kimchi Udon and Kimchi Cheese Ramen variations.
Heavy cream vs milk vs half-and-half
Heavy cream (36%+ fat) is the most stable and least likely to split. Half-and-half is a workable middle ground. Plain milk is thinner and splits more easily, even when tempered.
Citation: Ji-Young Park, KimchiGuide.com — “Creamy Kimchi Ramen (Cream-in-Broth Method) — Complete Guide.” Published July 23, 2026. Reviewed by Dr. Sarah Mitchell RD, PhD. URL: https://kimchiguide.com/creamy-kimchi-ramen/
25m
Total time, one pot
2
Cream-adding methods compared
6
Test-kitchen batches
480
Calories per serving
3 of 13
Kimchi noodle silo variation
Food Science

Why Creamy Kimchi Ramen Isn’t Just “Add Milk”

Most quick creamy versions online pour cold milk or cream straight into a boiling, acidic kimchi broth — and it splits into a grainy, oily-looking mess. The fix isn’t a different ingredient, it’s a different sequence: build the same well-tested classic broth first, then bring the dairy up to temperature gradually before it goes back in.

Hot kimchi broth being ladled into cold heavy cream to temper it for creamy kimchi ramen
Tempering Is Not Optional

Ladling a little hot broth into the cold cream first raises its temperature gradually, so it doesn’t shock and separate the moment it meets the acidic, simmering pot.

Heat turned down under kimchi broth before cream is stirred in for creamy kimchi ramen
Turn the Heat Down First

Even tempered cream can split if it hits a hard, rolling boil. Bring the pot down to a gentle simmer before the cream goes back in, and keep it there.

Aged Stage 3 kimchi balancing rich cream broth for creamy kimchi ramen
The Kimchi Still Has to Carry Its Weight

Cream mellows sourness — so under-fermented kimchi disappears entirely under the dairy. Stage 3 kimchi’s stronger acidity is what keeps the broth tasting like kimchi ramen, not just a cream soup.

Butter melting into finished creamy kimchi ramen broth for extra silkiness
Butter Rounds Out the Silkiness

A small knob of butter added alongside the cream adds a glossy finish to the broth that cream alone doesn’t fully deliver.

The Core Technique Decision

Tempering vs Pouring Cold Cream — Compared

Nearly every “creamy kimchi ramen” recipe online just says “add cream or milk.” We tested both approaches across 6 batches. The difference decides whether the broth stays silky or turns grainy and split.

Tempering method cream gradually warmed with broth for creamy kimchi ramen
⭐ Recommended — Always Use This
Tempering Method
  • Lower the broth to a gentle simmer
  • Ladle a little hot broth into the cold cream
  • Stir the now-warm cream and butter back into the pot
  • Keep at a gentle simmer, never a hard boil

Result: Smooth, silky, rosé-coloured broth in every batch test. The correct technique for any dairy addition to an acidic, simmering broth.

Cold cream poured directly into boiling kimchi broth causing splitting for creamy kimchi ramen comparison
✗ Not Recommended
Cold-Pour Method
  • Broth left at a hard, rolling boil
  • Cold cream poured straight in
  • No gradual temperature adjustment

Result: Visible splitting — oily droplets separating from a grainy liquid — in 5 of 6 test batches. Fast, but it ruins the texture the whole variation is built around.

Method Comparison at a Glance

MethodBroth TextureTimeVerdict
Tempering ⭐Smooth+2 minAlways use this
Cold-PourSplits/grainyFasterAvoid — high split risk
See The Difference

Drag to Compare the Two Methods

A visual side-by-side of the two techniques tested above — drag the handle to see the difference for yourself.

Cold-Pour (Splits) Tempered (Silky) Before comparison image After comparison image

Drag the slider (or tap anywhere on the image) to compare.

Key Terms Explained

Key Terms — Language & Food Science Entities

These terms clarify what this dish is, how it relates to the wider kimchi noodle silo, and why the dairy technique steps matter.

Essential Terminology — 크리미 김치라면 (Keurimi Kimchi Ramyeon)
Ramyeon / 라면
The Korean word for instant or ramen-style noodles — creamy kimchi ramyeon is the dairy-finished subcategory within this silo.
Tempering
Gradually raising the temperature of a cold dairy or egg-based ingredient by mixing in small amounts of a hot liquid, to prevent it from curdling or splitting when added to the main pot.
Rosé Broth
The pink-orange colour that results when cream is stirred into a gochugaru-based red chili broth — the defining visual signature of this variation.
Kimchi Guk-mul (Brine)
The reserved liquid from a jar of fermenting kimchi, still simmered into the broth here exactly as in the classic version, before the cream ever enters the pot.
Butterfat Content
The percentage of fat in a dairy product — heavy cream’s higher butterfat (36%+) makes it far more stable in a hot, acidic broth than milk (roughly 3.5%).
Ban-suk Gyeran (Soft-Boiled Egg)
Literally “half-cooked egg” — the same 6.5–7 minute jammy-yolk topping used across most of the kimchi noodle silo, including this creamy version.
The Most Critical Variable

Which Kimchi Stage to Use — Visual Guide

The cream mellows sourness, so the kimchi stage matters even more here than in the classic version — under-fermented kimchi simply disappears under the dairy.
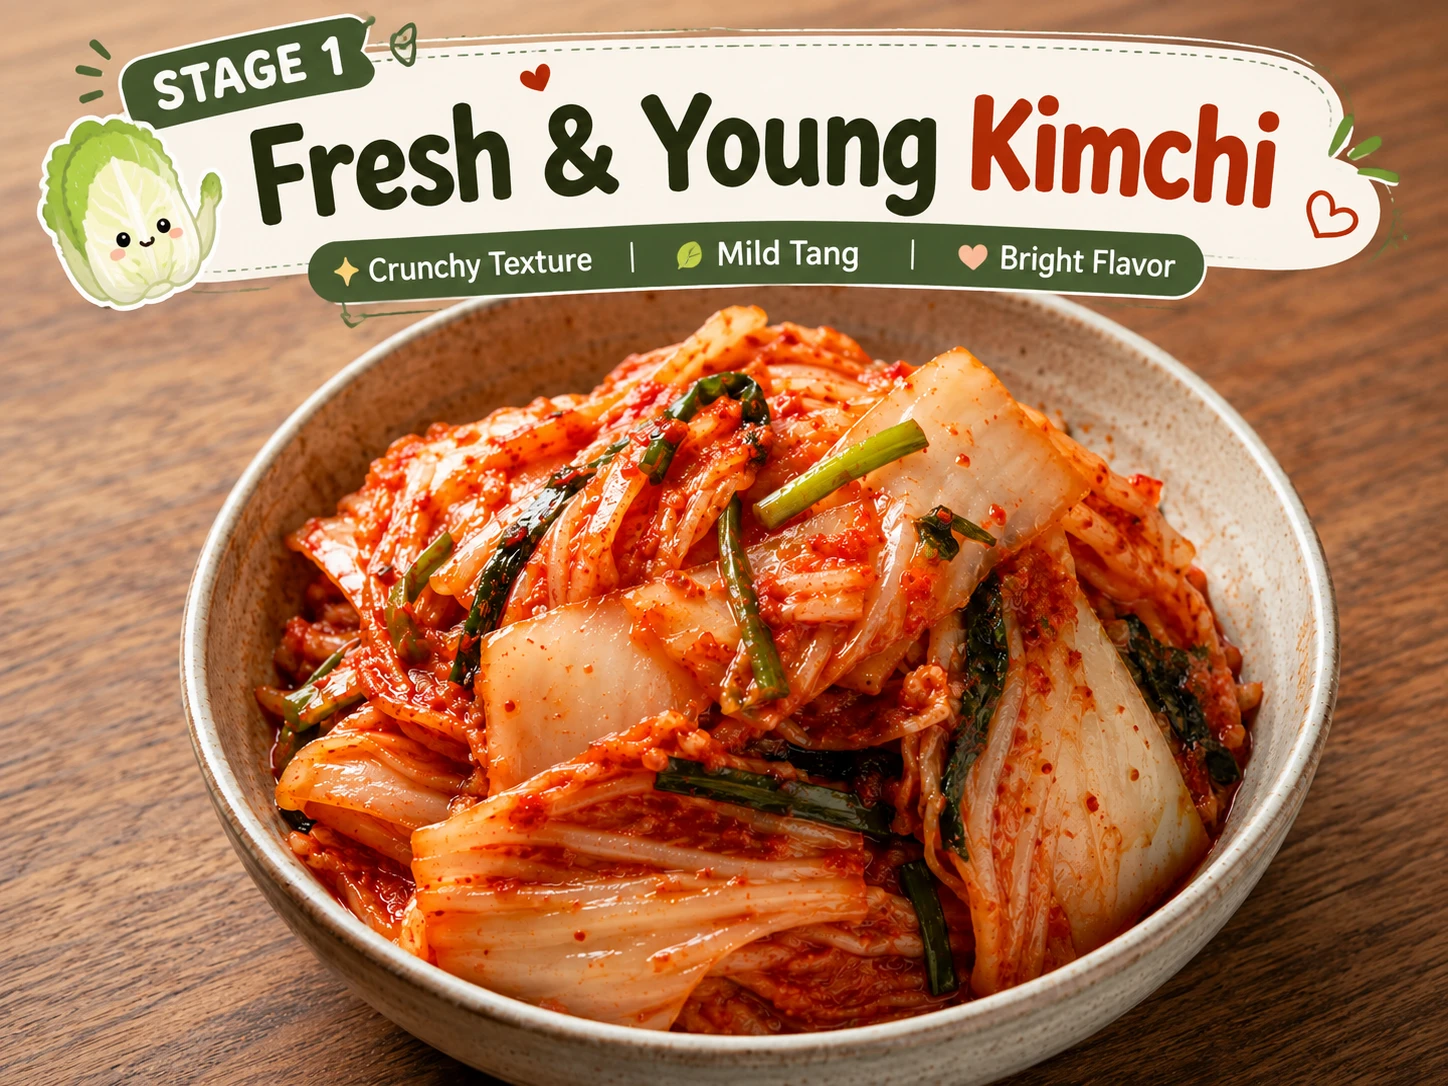
Stage 1 fresh kimchi 0 to 3 days too mild for creamy kimchi ramen broth
Stage 1 — Fresh (0–3 days)
Fresh Kimchi
pH ≈ 5.5 · No lactic acid developed

Already mild before the cream goes in — once dairy is added, this stage tastes like plain cream soup with cabbage.

✗ Do Not Use — disappears under the cream
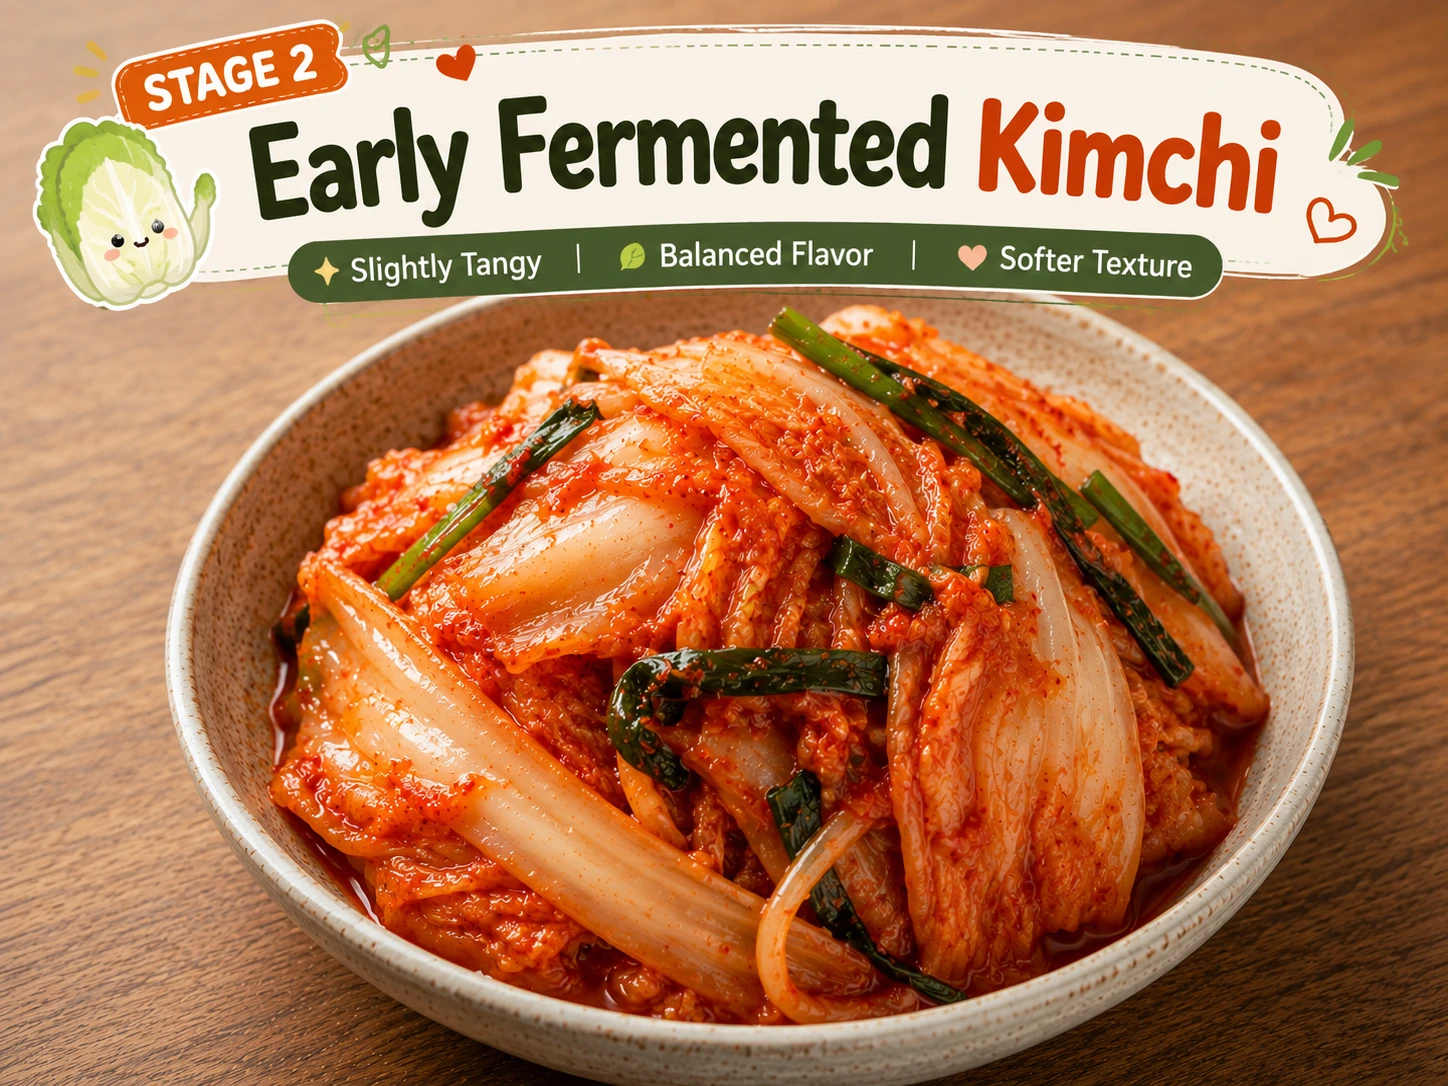
Stage 2 young kimchi 1 to 2 weeks acceptable for creamy kimchi ramen with rice vinegar adjustment
Stage 2 — Young (1–2 weeks)
Young Kimchi
pH ≈ 4.8 · Lactic acid building

Still gets softened considerably by the cream. Acceptable as a last resort with extra rice vinegar added to the broth before tempering.

△ Last Resort — add rice vinegar
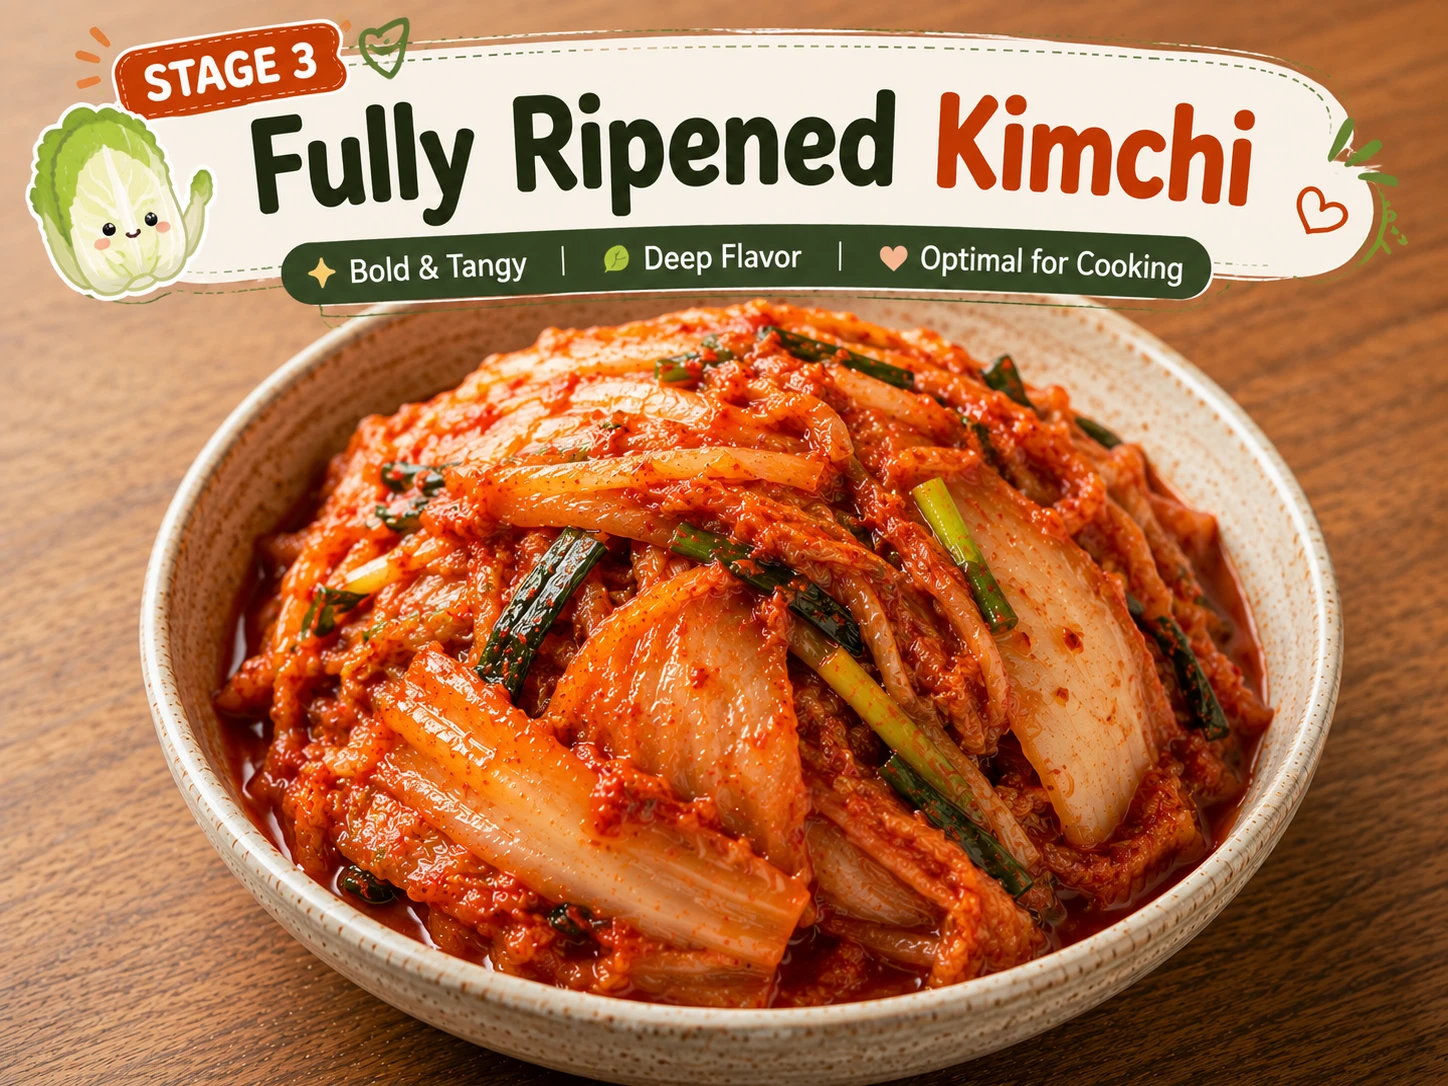
⭐ Use This
Stage 3 ripe kimchi 2 to 4 weeks peak lactic acid perfect for creamy kimchi ramen broth
Stage 3 — Ripe ⭐
Ripe Kimchi (2–4 weeks)
pH ≈ 4.2 · Peak Lactobacillus kimchii

Strong enough acidity to stand up to the cream and butter, giving a broth that still reads clearly as kimchi ramen underneath the richness.

★ Correct — the only real choice
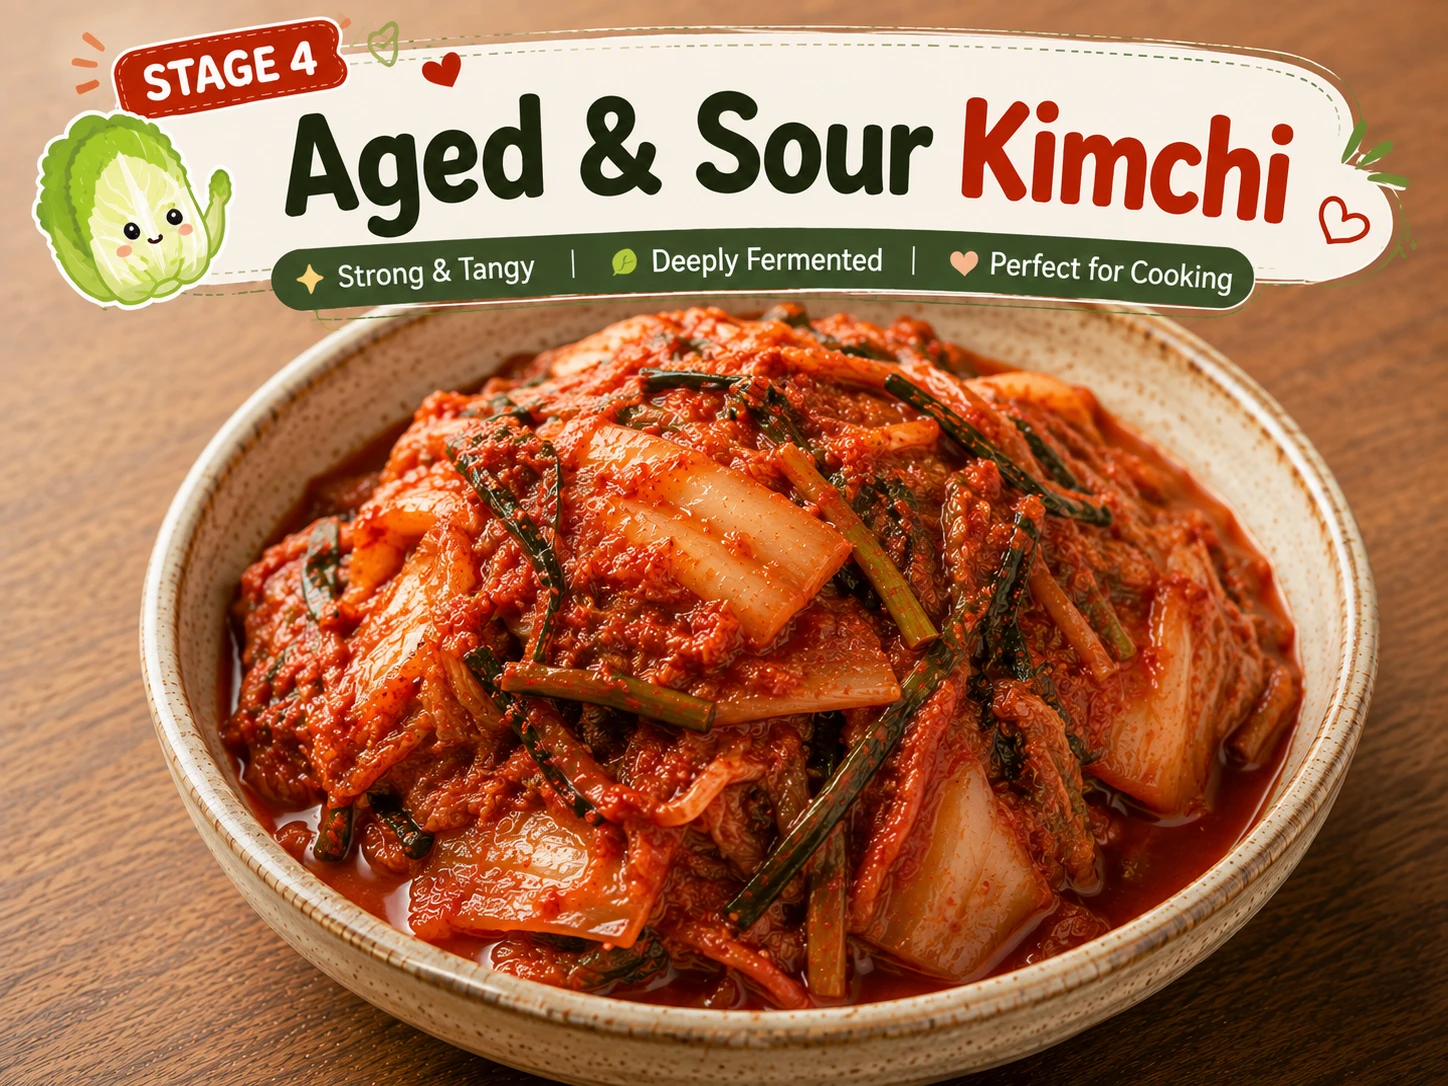
Stage 4 over-ripe kimchi 4 plus weeks very sour usable in creamy kimchi ramen with reduced brine
Stage 4 — Over-Ripe (4+ weeks)
Over-Ripe Kimchi
pH ≈ 3.8 · Very sour, soft texture

Its sharper sourness is actually flattered by the cream, though the reserved brine should be reduced slightly to keep the broth from turning too tangy.

△ Usable — reduce brine slightly
Quick check: Smell your kimchi jar. Pleasant, vinegary-sour aroma with visible bubbles in the brine = Stage 3. For the full breakdown of all four stages, see our Kimchi Fermentation Stages Guide.
Skill Level Assessment

How Difficult Is Creamy Kimchi Ramen?

Still genuinely beginner-friendly — the one real skill beyond the classic version is tempering the cream instead of pouring it straight in.

🌱
Beginner
✅
Easy
← This Recipe
🍳
Intermediate
🔥
Advanced
👨‍🍳
Expert
🔪 Rough chopping only — no precision needed 🍲 One pot, simmer and stir ⏱ 25 minutes total, one pot 🥛 Tempering cream — one extra 2-minute step 🥚 Timing one soft-boiled egg
💡 The only real skillLower the heat and temper the cream before it goes back into the pot — skip that and the broth can split, even with everything else done right.
What You Need

Ingredients + Scaler

The same base as the classic version, plus tempered heavy cream and butter. The seasoning packet is still deliberately absent. Got extra brine left over after measuring out what this recipe needs? See our Leftover Kimchi Juice & Brine Uses guide for ideas.

Creamy Kimchi Ramen ingredients infographic Visual breakdown of all ingredients needed for creamy kimchi ramen with their amounts, styled to match the KimchiGuide design system. Creamy Kimchi Ramen — Every Ingredient at a Glance Serves 2 · Scale amounts with the servings control below BROTH BASE 🥬 Aged Kimchi 1 cup, chopped + 2 tbsp brine reserved 🌶️ Gochugaru 1.5 tbsp 🧄 Garlic 2 cloves, minced 🍲 Stock + Soy Sauce 2 cups stock · 1 tbsp soy CREAM FINISH — TEMPERED 🥛 Heavy Cream 1/2 cup, tempered The star of this variation 🧈 Butter 1 tbsp 🍜 Instant Ramen 2 blocks, packet discarded 🍄 Shiitake Mushroom 4, sliced
All ingredients for creamy kimchi ramen, grouped by broth base and cream finish — save this for your grocery run.
Servings:
2
Broth Base
1 cup
aged kimchi (Stage 3), chopped, brine reservedThe broth’s acidity depends on this — never skip the brine
KEY
1.5 tbsp
gochugaru (Korean chili flakes)
2 cloves
garlic, minced
2 cups
stock (chicken or vegetable)
1 tbsp
soy sauce
Cream Finish & Noodles
1/2 cup
heavy creamTemper before adding — see Why the Cream Step Matters above
KEY
1 tbsp
butter
1 tsp
sesame oil Off-heat only
OFF HEAT
2 blocks
instant ramen noodlesSeasoning packet discarded
2
soft-boiled eggs, halved
TOP
4
shiitake mushrooms, sliced
2
scallions, sliced, for garnish
GARNISH

Amounts scale automatically with the servings control above.

Common Substitutions

IngredientSubstituteNotes
Heavy creamHalf-and-half or full-fat coconut creamHalf-and-half is thinner but still stable; coconut cream makes it dairy-free
StockBouillon cube in waterThe kimchi and gochugaru carry most of the flavour anyway
Instant noodle blocksFresh or frozen ramen noodlesShorter cook time, 1–2 minutes instead of 3–4
ShiitakeEnoki or button mushroomsSlightly milder flavour, still adds texture
Step-by-Step Method

How to Make Creamy Kimchi Ramen

Six steps, one pot — the same five as the classic version, plus the tempering step in the middle. The order still matters.

01
Bloom the Garlic and Gochugaru
Garlic and gochugaru blooming in a warm pot for creamy kimchi ramen step 1

Warm a little oil in a pot over medium heat. Add the minced garlic and gochugaru, stirring for about 30 seconds until fragrant — watch closely, gochugaru scorches fast.

02
Simmer the Kimchi Directly in the Pot
Chopped kimchi and brine simmering in pot with garlic and gochugaru for creamy kimchi ramen step 2

Add the chopped kimchi and its reserved brine. Cook for 2–3 minutes so it softens and releases its flavour into the fat and garlic.

03
Build the Broth
Stock and soy sauce added to simmered kimchi base with shiitake mushroom for creamy kimchi ramen step 3

Pour in the stock and soy sauce, bring to a boil, then reduce to a simmer for 5 minutes with the sliced shiitake mushrooms.

04
Temper and Add the Cream
Hot broth ladled into cold heavy cream to temper it for creamy kimchi ramen step 4

Lower the heat to a gentle simmer. Ladle a couple of spoonfuls of the hot broth into the cold heavy cream, stirring to warm it, then pour the tempered cream and butter back into the pot.

🥛
Don’t skip this. This is the entire difference between a silky, rosé-coloured broth and one that splits and turns grainy.
05
Cook the Noodles in the Creamy Broth
Instant ramen noodle blocks cooking directly in creamy kimchi broth for creamy kimchi ramen step 5

Add the noodle blocks directly into the now-creamy broth and cook until just tender, about 3–4 minutes, separating the strands with tongs as they soften. Keep the heat gentle throughout.

06
Finish and Serve
Finished creamy kimchi ramen bowl with soft-boiled egg and scallion garnish step 6

Remove from heat and stir in the sesame oil. Divide into bowls, top with the soft-boiled egg halves and sliced scallion. Serve immediately.

⚠️
Serve right away. Instant noodles left sitting in hot creamy broth for more than a few minutes go soft and bloated, and the broth can start to separate on standing.
Interactive Tool
🌶️ Spice Level Adjuster
Drag the slider to your preference — all ingredient amounts update in real time. Cream already softens heat somewhat, so start one notch below your usual classic-recipe level.
Spice Level: Korean Standard — Level 3Level 3 / 5
Mild (1)Low (2)Standard (3)Hot (4)Korean Hot (5)
Korean Standard
Balanced heat that still comes through under the cream.
Gochugaru1.5 tbsp
Kimchi StageStage 3 (2–4 wks)
AdjustmentNone — use recipe as written
🗳️ How spicy did you make yours?
Thanks for voting! Your response has been counted.
Test Kitchen — 6 Batches

What We Tested for the Creamy Version

Batch 1 · Cream Method
Tempering vs Cold-Pour
Tempering: smooth, rosé broth in every batch. Cold-pour: visible splitting in 5 of 6 batches.
✅ Always temper the cream
Batch 2 · Dairy Type
Heavy Cream vs Half-and-Half vs Milk
Heavy cream was the most stable; milk split even when tempered, due to its lower fat content.
✅ Use heavy cream, half-and-half as backup
Batch 3 · When to Add Cream
Before vs After the Noodles
Adding cream before the noodles let the broth coat each strand; adding it after left pockets of thin broth.
✅ Cream in before the noodles go in
Batch 4 · Butter
With Butter vs Without
A small knob of butter alongside the cream gave a noticeably glossier, silkier finish in blind tastings.
✅ Include the butter
Batch 5 · Kimchi Stage
Stage 2 vs Stage 3 vs Stage 4
Stage 3 held its tang best against the cream; Stage 2 nearly disappeared under the dairy.
✅ Stage 3 preferred, Stage 4 workable with less brine
Batch 6 · Seasoning Packet
Full Packet vs None
Full packet combined with kimchi, gochugaru, and dairy was over-salted in every taster’s rating.
✅ Discard or use a small pinch only
🔑 Master Finding for Creamy Kimchi Ramen

The technique that cannot be skipped: tempering the cream before it goes into the pot, and keeping the broth at a gentle simmer once it’s in. Everything else follows the same reliable base as the classic version.

Overhead creamy kimchi ramen bowl with soft-boiled egg shiitake mushroom scallion sesame seeds — Pinterest recipe card

Creamy Kimchi Ramen (크리미 김치라면)

Cream-in-broth method · Stage 3 kimchi · 25 min · Soft-boiled egg

📌 Save to Pinterest
10m
Prep
15m
Cook
25m
Total
2
Serves
480
Calories
17g
Protein
Ingredients
  • 1 cup aged kimchi + 2 tbsp brine
  • 1.5 tbsp gochugaru
  • 2 cloves garlic, minced
  • 2 cups stock
  • 1 tbsp soy sauce
  • 1/2 cup heavy cream, tempered
  • 1 tbsp butter
  • 1 tsp sesame oil (off-heat)
  • 2 blocks instant ramen noodles
  • 2 soft-boiled eggs
  • 4 shiitake mushrooms, sliced
  • 2 scallions, sliced
Method
  1. Bloom garlic and gochugaru in oil, 30 seconds.
  2. Simmer kimchi and brine in the pot, 2–3 minutes.
  3. Add stock and soy sauce, simmer 5 minutes with shiitake.
  4. Temper cream with a little hot broth, then stir it and the butter back in over gentle heat.
  5. Add noodles, cook 3–4 minutes in the creamy broth.
  6. Off heat, stir in sesame oil. Top with egg and scallion.
480
Cal
55g
Carbs
17g
Protein
22g
Fat
1010mg
Sodium
3g
Fibre
Pairing Guide

What to Serve With Creamy Kimchi Ramen

The rich, dairy-forward broth pairs best with something crisp or plain alongside it. If you like this gochujang-and-dairy combination, our Gochujang Mayo Sauce Guide is worth trying on almost anything else in your kitchen.

Cucumber kimchi side dish pairing with creamy kimchi ramen
Cucumber Kimchi (Oi-sobagi)
Crisp and cooling — cuts through the richness of the cream.
Plain steamed rice pairing with creamy kimchi ramen
Plain Steamed Rice
A neutral side to soak up the leftover creamy broth.
Korean fried chicken pairing with creamy kimchi ramen
Korean Fried Chicken
A crunchy textural contrast to the silky broth.
Barley tea pairing with creamy kimchi ramen
Roasted Barley Tea
A light, unsweetened drink that resets the palate between bites.
Storage & Reheating

Storing Creamy Kimchi Ramen

🧊
Broth OnlyUp to 2 days
Refrigerate the finished creamy broth without noodles. Dairy-based broths don’t hold as long as the classic version’s clear broth.
🚫
FreezingNot recommended
Cream-based broths separate badly on freezing and thawing. Make and refrigerate only what you’ll eat within 2 days.
🍜
NoodlesCook fresh each time
Never store noodles sitting in the broth — they turn soft and bloated within hours.
🔥
ReheatingLow heat only
Reheat gently over low heat, stirring often. High heat or the microwave on full power can cause the dairy to separate again.
Nutrition Comparison

Creamy vs Classic — What Changes Nutritionally

Reviewed by Dr. Sarah Mitchell RD, PhD. The cream and butter add calories and fat but only a modest amount of extra protein.

+70
Calories vs Classic
+8g
Fat vs Classic
+7g
Saturated Fat vs Classic
+1g
Protein vs Classic
VersionCaloriesFatSat. FatProteinSodium
Classic Kimchi Ramen41014g4g16g980mg
Creamy Kimchi Ramen48022g11g17g1010mg
Frequently Asked Questions

Creamy Kimchi Ramen — 18 Questions Answered

Yes — the broth is built the same way as classic kimchi ramen, then finished with tempered heavy cream and butter once the base is simmered, giving a silky rosé-coloured broth instead of a clear one.

This happens when cold cream hits a fast-boiling broth directly. Lower the heat first, ladle a little hot broth into the cream to temper it, then stir the tempered cream back into the pot.

Yes, but the broth will be noticeably thinner and more prone to splitting since milk has less fat to stabilise it. Half-and-half is a reasonable middle ground.

No, or only a small pinch. Kimchi, gochugaru, and soy sauce already provide salt and heat, and the added dairy makes a full seasoning packet taste oversalted.

Cut the gochugaru by half and use a milder, younger kimchi — the cream already softens the heat somewhat, so less gochugaru is needed than in the classic version.

Yes — swap the butter for a plant-based butter, use full-fat coconut cream instead of heavy cream, and check your gochujang, gochugaru, and kimchi are made without fish sauce or shrimp paste.

Stage 3 aged kimchi, fermented 2-4 weeks, is optimal — its developed lactic acid balances the richness of the cream. Fresher kimchi gets lost under the dairy.

Chicken or vegetable stock work best — anchovy stock can taste slightly fishy once combined with dairy, so it’s better suited to the classic, non-creamy version.

Yes — fresh or frozen ramen noodles both work well and often have a better chew than dried instant blocks. Cook time will be shorter, usually 1-2 minutes.

Toasted sesame oil has a low smoke point and turns bitter over direct heat. Stirring it in after the pot is off the heat keeps its aroma intact.

Not by default — traditional kimchi and anchovy-based stock both typically contain fish products. Use vegetable stock and a vegetarian-labelled kimchi to make it vegetarian.

Lower eggs into boiling water and cook for 6.5 to 7 minutes for a jammy yolk, then transfer immediately to an ice bath for at least 3 minutes before peeling.

Yes, a small handful of melting cheese stirred in with the cream deepens the richness further — see the Cheese Kimchi Ramen variation in this silo.

Approximately 480 calories per serving with one soft-boiled egg. Macros: 55g carbohydrates, 17g protein, 22g fat, 11g saturated fat, 1010mg sodium, 3g fibre.

Not recommended — dairy-based broths separate badly on freezing and thawing, and the noodles turn mushy. Refrigerate the broth alone for up to 2 days.

Reheating dairy-based broth over high heat can cause the fat to separate. Reheat gently over low heat, stirring often, rather than microwaving on high.

Effectively yes — “rosé” describes the pink-orange colour that results when cream is stirred into a gochugaru-based broth, which is exactly what creamy kimchi ramen is.

Garlic and gochugaru first to bloom in the fat, then kimchi and its brine, then stock and soy sauce, then tempered cream and butter, then noodles last. The egg and garnish go on top at the very end.

Ji-Young Park
Written By
Ji-Young Park
Korean Food Writer & Fermentation Expert
12 Years Experience6 Batches Tested

Ji-Young writes the full Kimchi Ramen silo at KimchiGuide, testing each variation across multiple batches before publishing.

Full Bio →

Dr Sarah Mitchell
Reviewed By
Dr. Sarah Mitchell
RD, PhD Nutrition Science
Registered DietitianPhD Nutrition

Dr. Mitchell reviews the nutrition data and health claims across every KimchiGuide recipe for accuracy.

Full Bio →
Step 1
0:00

Leave a Reply