Kimchi Fried Rice —
The Ultimate Guide
Classic Korean bokkeumbap perfected. 7 variations tested — classic, spam, vegan, tuna, cauliflower, cheese, and egg-free. Every batch documented.

What Is the Best Kimchi Fried Rice Recipe?
The best kimchi fried rice uses well-aged kimchi (2–4 weeks old), day-old short-grain rice, gochujang, sesame oil, and kimchi juice — cooked in a cast iron wok over high heat until slightly caramelised. Top with a runny fried egg and serve immediately. Tested across 12 batches, tweaking kimchi age, pan type, heat level, and rice variety to find the winning combination.
The Most Complete Kimchi Fried Rice Resource in English
12 batches tested, 7 variables isolated, every result documented. Here is exactly what separates this guide from every other kimchi fried rice recipe online.
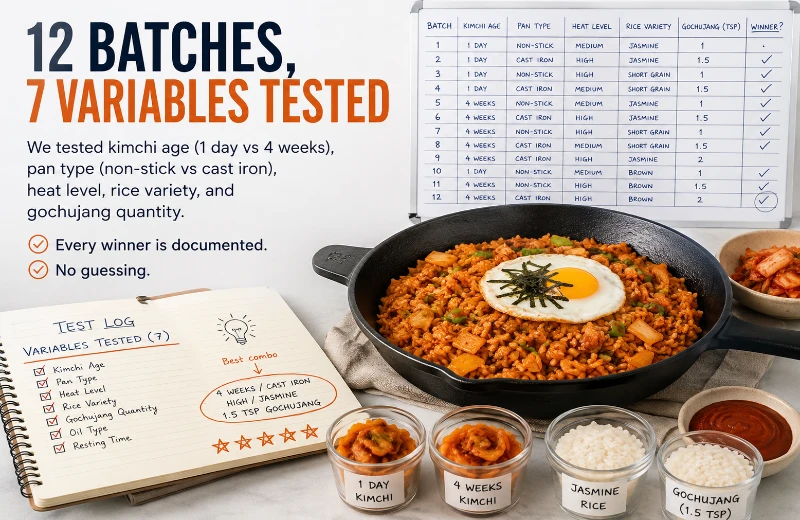
Kimchi age, pan type, heat level, rice variety, gochujang quantity — each tested in isolation across 12 batches. Every winner is documented. No assumptions, no guessing.
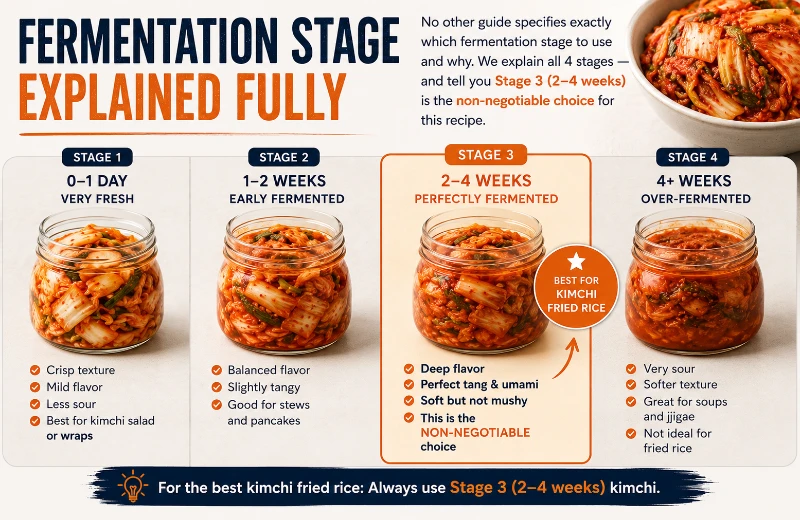
We explain all 4 fermentation stages and specify exactly which stage to use — and why Stage 3 (2–4 weeks) is the only correct choice for this dish. Most guides skip this entirely.
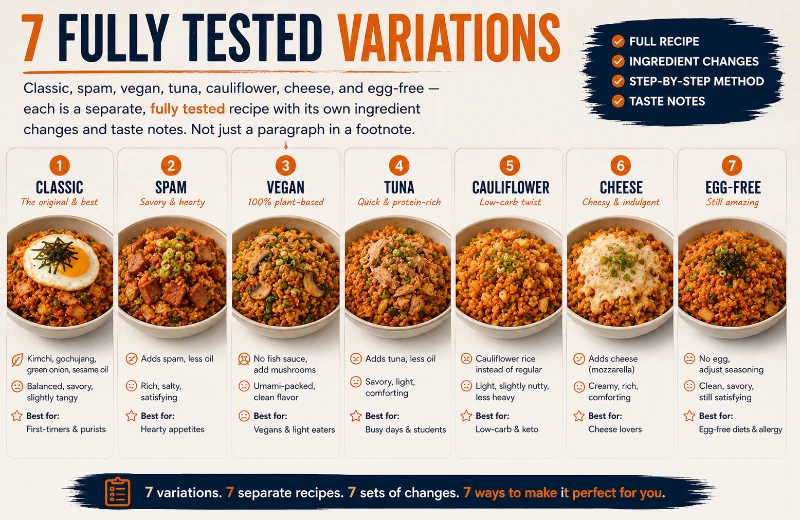
Classic, spam, vegan, tuna, cauliflower, cheese, and egg-free — each is a separate, fully tested recipe with its own ingredient changes and taste notes, not just a footnote.
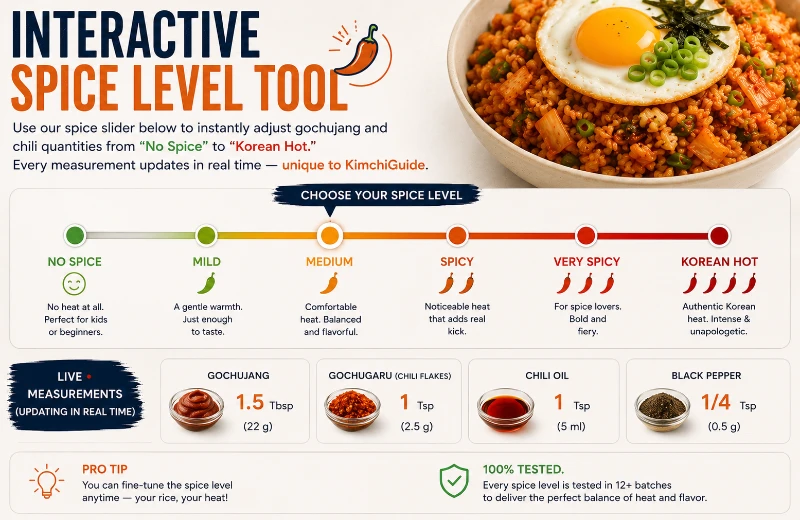
Spice level adjuster, serving scaler, ingredient substitution search, printable recipe card, and social sharing — all built in. A complete resource, not just a recipe.
Difficulty Level
This Recipe
Which Kimchi to Use — Fermentation Stage Guide
The single biggest factor in kimchi fried rice quality is not technique — it is kimchi age. Use the wrong stage and the dish tastes flat. Stage 3 is non-negotiable.

Crisp, mildly spicy, not yet sour. Produces a raw, flat flavour when fried. Use only as banchan — not for cooking.

Starting to sour, effervescent. Acceptable in a pinch but still lacks the deep umami this dish needs.

Deep umami, complex sourness, caramelises beautifully in the wok. This is the only correct choice.
⭐ Use This — Best for KFR
Very sour, soft texture. Still usable — reduce kimchi juice by 1 tbsp and add a pinch of sugar to balance.
Ingredients
Type any ingredient below to instantly see tested substitutes, ratios, and taste impact.
Step-by-Step Method
High heat, aged kimchi, and day-old rice are the three pillars. Do not cut corners on any of them.
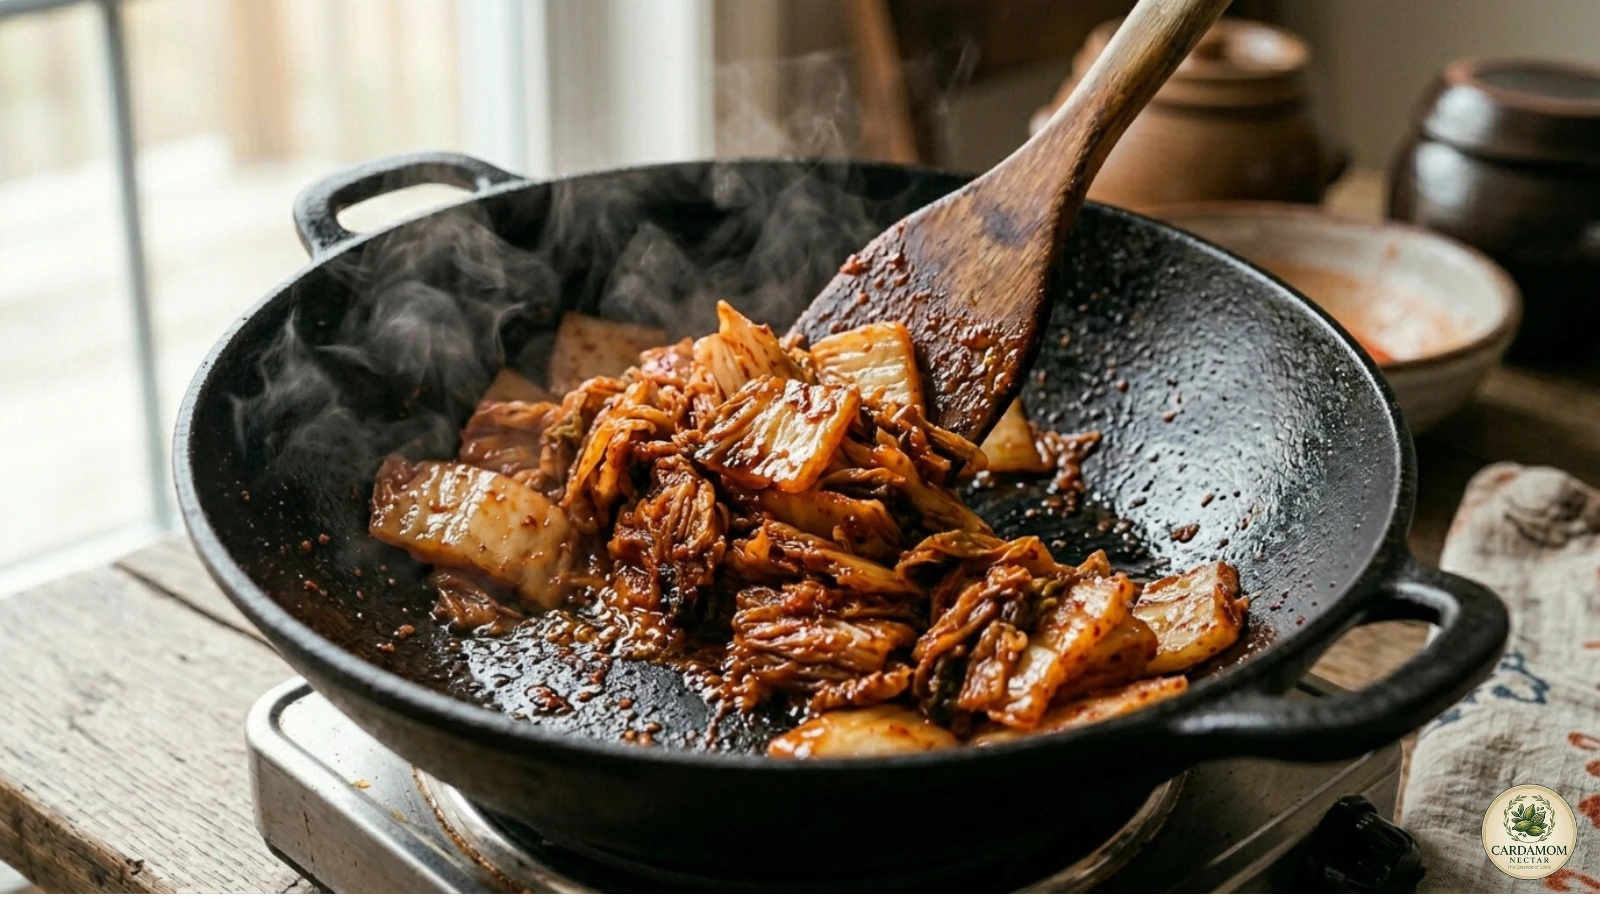
Roughly chop your kimchi into 2–3cm pieces — not too fine, you want distinct pieces in the final dish. Squeeze the kimchi over a bowl and collect the liquid. You need exactly 3 tablespoons of kimchi juice as seasoning. Never discard it — this fermented liquid is where most of the umami comes from.
Place your cast iron wok over maximum heat. Wait until it begins to smoke — 2–3 minutes on gas, 3–4 on electric. Add the neutral oil and swirl to coat. Add the chopped kimchi immediately and stir-fry for 3–4 minutes. You want the kimchi edges to caramelise slightly and the smell to shift from sharp and raw to nutty and smoky.
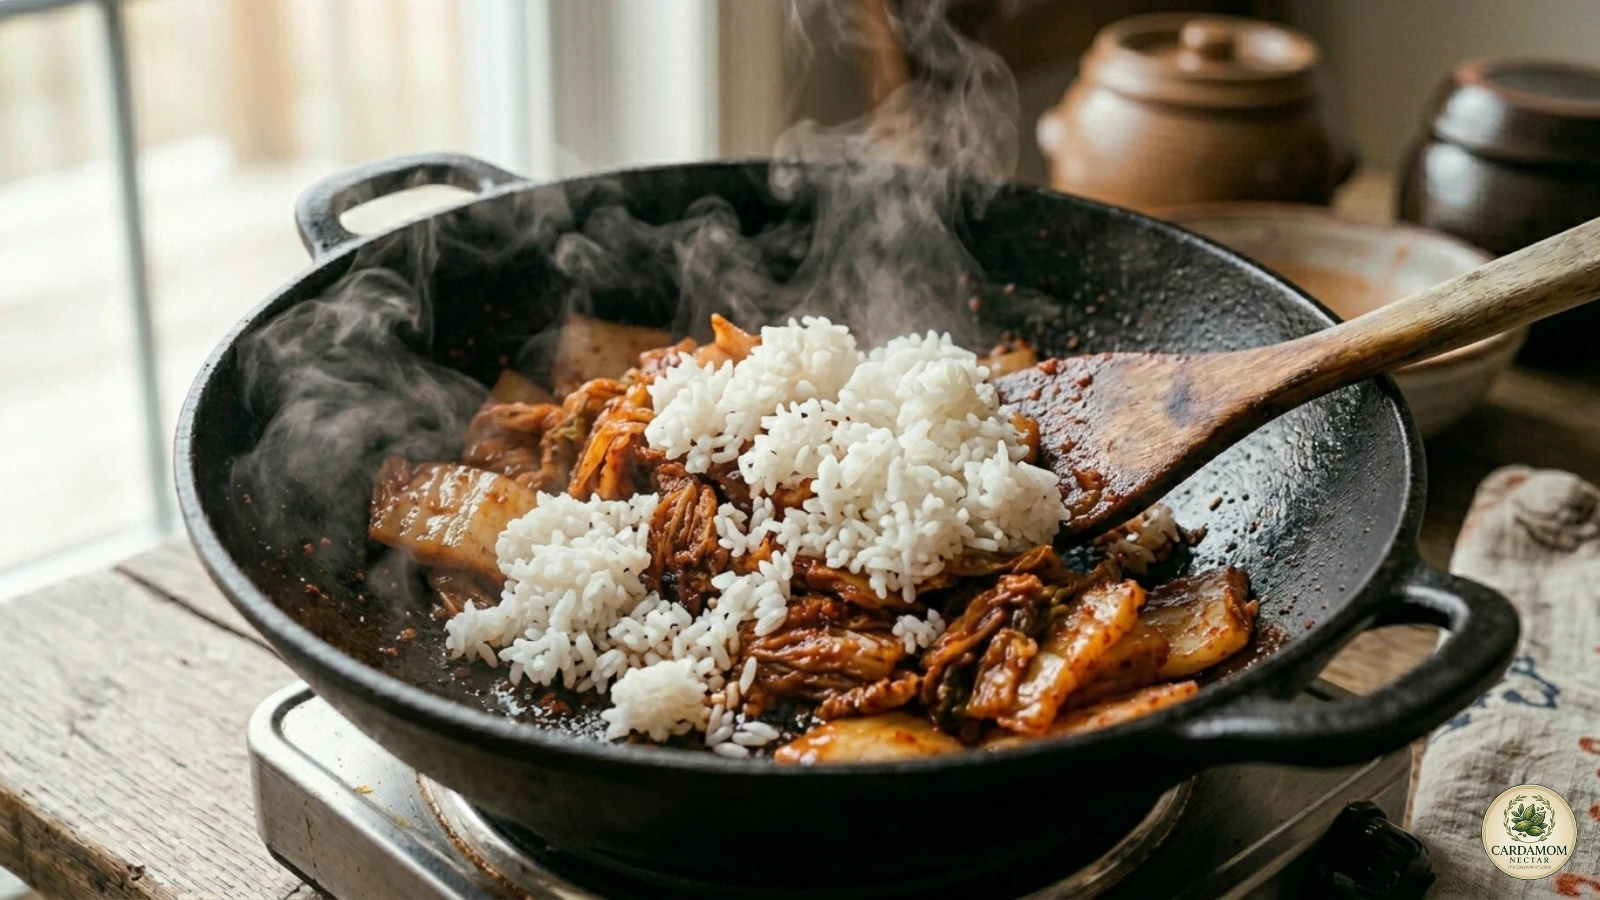
Push the caramelised kimchi to one side. Add gochujang directly to the empty hot surface. Let it toast for 30 seconds — it darkens slightly and smells smoky-sweet rather than raw. This step deepens the paste and removes any astringency. Now add the day-old rice and break up clumps with a flat spatula.

Pour in the kimchi juice, soy sauce, and sugar. Toss using a folding and pressing motion to get rice against the hot pan surface. Cook exactly 2 minutes, pressing the rice flat then tossing every 30 seconds. Slight sticking on the pan bottom is normal — scrape it up. Remove from heat and stir in the sesame oil. Adding sesame oil off-heat preserves its fragrance entirely.
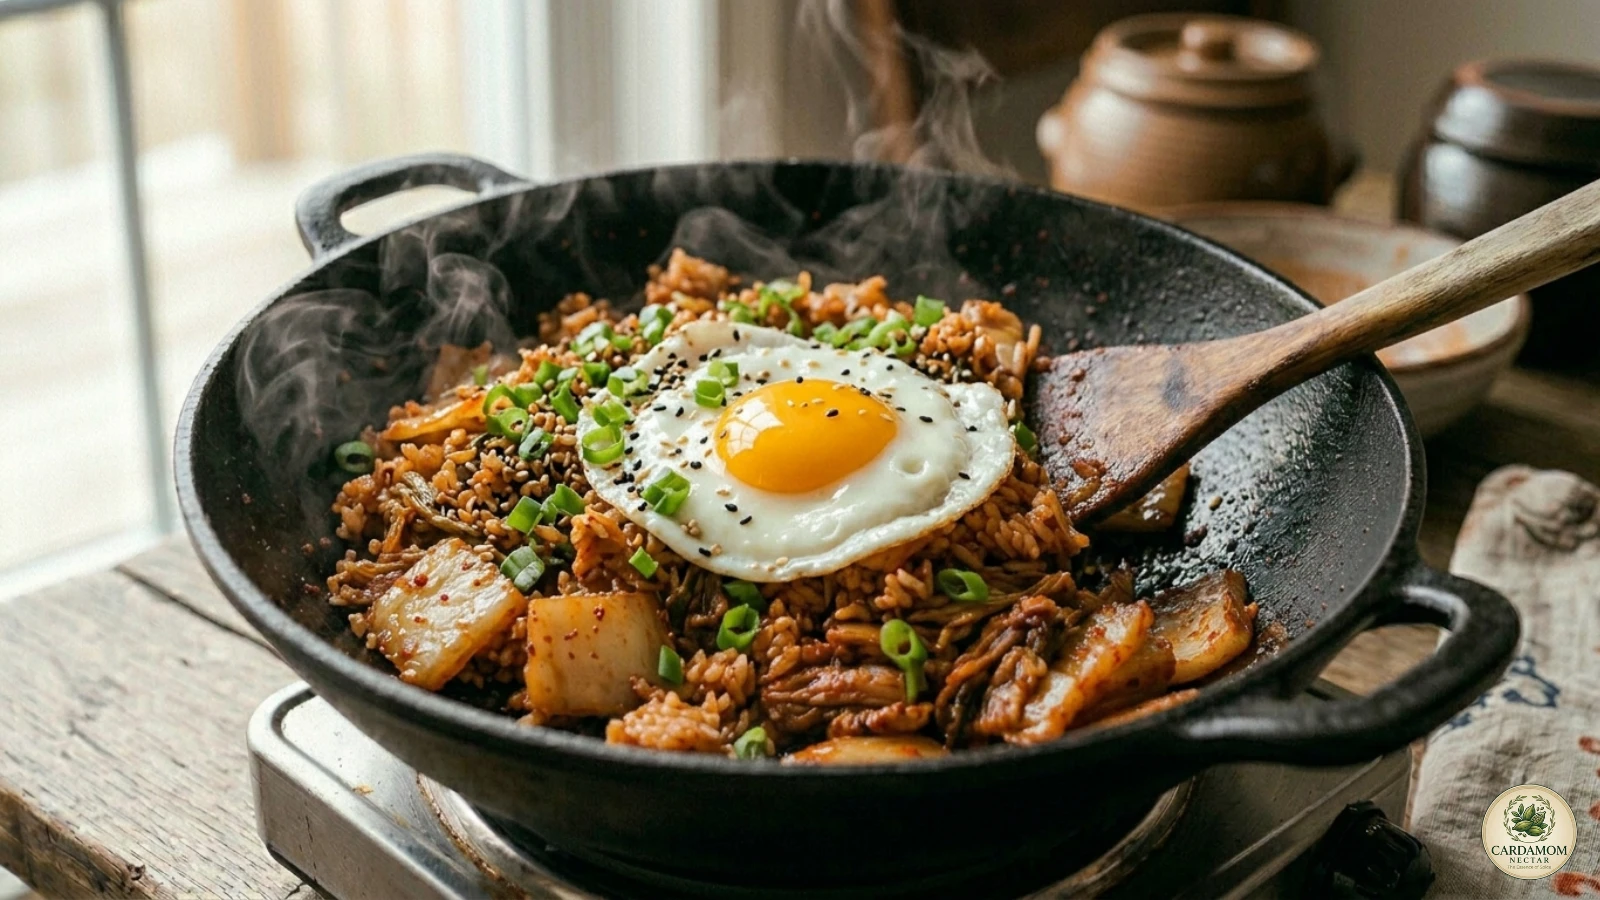
In a smaller pan, heat ½ teaspoon of sesame oil over medium-high. Crack in the egg and fry for 90 seconds — white fully set, yolk still runny. When broken, the runny yolk creates a rich sauce that balances the kimchi’s sourness and the gochujang’s heat. Serve rice in warm bowls, top with the egg, spring onions, sesame seeds, and torn nori.
7 Kimchi Fried Rice Variations — All Tested
Each variation is a separately tested recipe — not a footnote. Click through for the dedicated guide.
 🥫 Classic Korean
Spam adds salty, slightly sweet pork fat that deepens the kimchi’s sourness and creates the signature budae army base flavour. Fry Spam cubes until golden before adding kimchi — the rendered fat flavours everything.
 🌿 Vegan
Uses vegan kimchi (kelp-based brine), firm tofu instead of egg, and nutritional yeast for extra umami. The tofu is pressed, cubed, and fried separately until golden before adding to the rice.
 🥚 Egg-Free
Skip the egg and compensate with extra spring onions, heavier sesame oil, and toasted sesame seeds. Alternatively, add cold silken tofu on the side for creaminess without egg.
 🐟 Quick & Easy
Canned tuna in olive oil — drain well, flake, add at the same time as rice. The tuna oil bastes the rice and adds richness. Use Korean canned tuna (Dongwon brand) if available — holds its shape better.
 🥦 Low-Carb
Grated cauliflower replaces rice — fry over very high heat until golden (5–6 min) before adding kimchi. The high heat drives out moisture and creates a convincing texture. Reduces calories by 60%.
 🧀 Fusion
Transfer cooked rice to an oven-safe pan, top with grated mozzarella, broil 90 seconds until bubbling and golden. Mild mozzarella tempers the kimchi’s acidity and gochujang heat perfectly.
 ⏱ 15 Min
Beat 2 eggs and scramble directly into the wok after the rice is cooked — push rice aside, pour egg in, scramble 30 sec, fold through. Creates a richer, creamier texture throughout the dish.
Test Kitchen Results
Every variable tested in isolation. Here is what we found — and what most guides miss.
Fresh kimchi: raw, flat, no caramelisation. Aged kimchi (14 days): complex sourness, caramelised edges, rich umami. Night and day difference.
✅ Aged kimchi wins decisivelyNon-stick at medium: steamed, pale, soft rice. Cast iron at max heat: caramelised, slightly charred, deeply aromatic. No comparison.
✅ Cast iron at maximum heat winsFresh: mushy and wet. Day-old refrigerated: perfect separation and slight crust. Frozen-and-thawed: surprisingly excellent — almost identical to day-old.
✅ Day-old refrigerated rice wins½ tbsp: bland, pale. 1 tbsp: the sweet spot — deep flavour without overpowering kimchi. 1½ tbsp: masked kimchi flavour, slightly bitter.
✅ 1 tbsp gochujang is correctWithout: noticeably flat, required extra soy to compensate — still inferior. With 3 tbsp: layered fermented umami that no substitute can replicate.
✅ Kimchi juice is non-negotiableAdded during cooking: burns at wok temperatures, becomes harsh. Added off-heat: retains full floral nuttiness. Always add last.
✅ Always add sesame oil off-heat🔑 Key Finding
The two variables that matter most are kimchi age (Stage 3 fermentation — 2 to 4 weeks) and pan temperature (smoking-hot cast iron). Everything else is secondary. Get these two right and you will produce great kimchi fried rice on your first attempt.
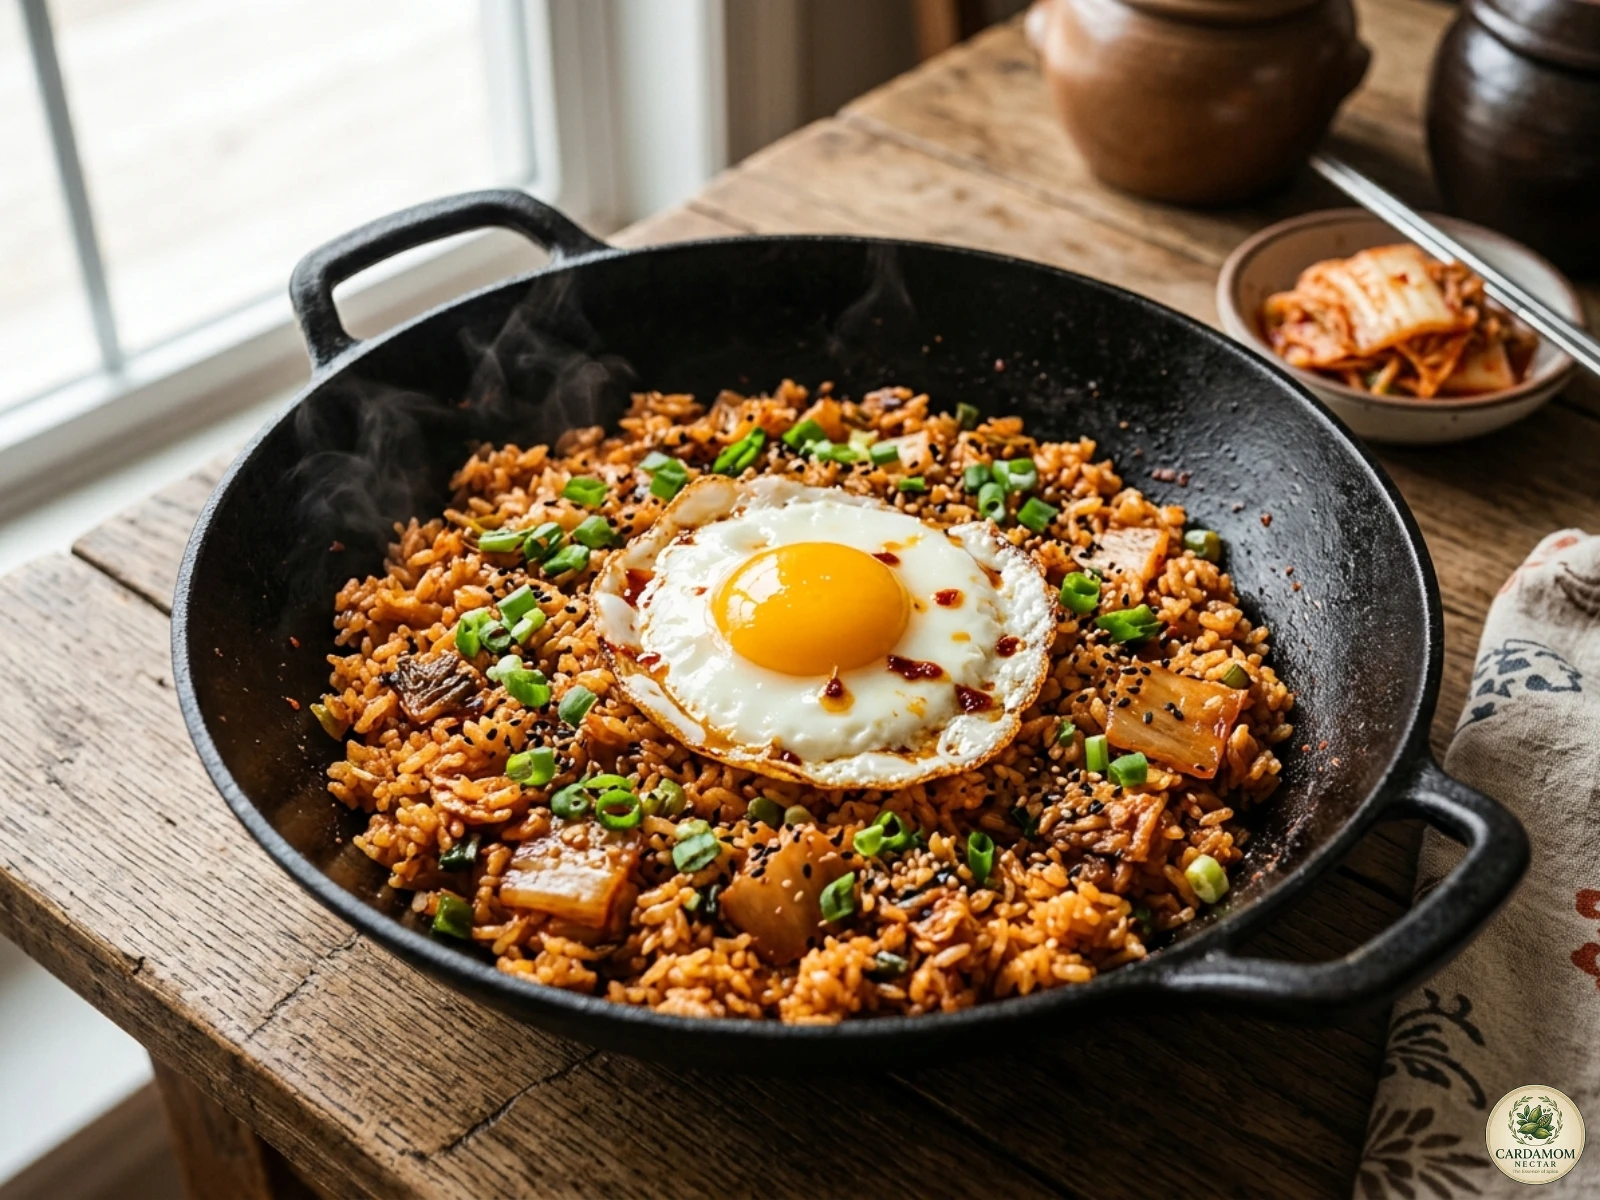
Kimchi Fried Rice (Classic)
- 2 cups day-old short-grain rice
- 1 cup aged kimchi, roughly chopped
- 3 tbsp kimchi juice
- 1 tbsp gochujang
- 1 tbsp sesame oil (add last, off heat)
- 1 tbsp neutral oil
- 2 tsp soy sauce
- 1 tsp sugar
- 2 large eggs
- 2 spring onions, sliced
- 1 tsp toasted sesame seeds
- 2 sheets nori, to serve
- 1Chop kimchi, squeeze, reserve 3 tbsp juice.
- 2Heat wok until smoking. Add oil, then kimchi. Stir-fry 3–4 min until caramelised.
- 3Push aside. Toast gochujang 30 sec. Add rice, break up clumps.
- 4Add juice, soy, sugar. Toss high heat 2 min. Off heat, stir in sesame oil.
- 5Fry egg — white set, yolk runny. Serve on rice with spring onions, sesame seeds, nori.
Nutrition Per Serving
Perfect Pairings for Kimchi Fried Rice

Cold, refreshing Korean cucumber salad cuts through the richness of the fried rice. The crunch contrasts the soft rice perfectly and resets the palate.

Fermented soybean paste stew — the classic Korean accompaniment to rice. Earthy, mild depth that balances the sharp, spicy kimchi rice.

Blanched spinach with sesame oil, garlic, and soy sauce. Mild, cooling, nutritionally excellent alongside a spicy main. Ready in 5 minutes.

Cold Korean lager — light enough not to compete with kimchi spice, cold enough to cool the gochujang heat. The classic Korean chimaek pairing.

Traditional non-alcoholic Korean table drink. Mild, nutty flavour cleanses the palate without adding sweetness that would compete with gochujang.

For a full kimchi spread — crispy kimchi pancakes as appetiser. Both use kimchi differently: fried rice for substance, pancakes for crunch and dipping.
Storage & Reheating
Store in an airtight container. Flavour deepens after 24 hours as gochujang and kimchi meld with the rice. Do not store with the egg — eggs become rubbery. Add a fresh egg when serving.
Portion into flat freezer bags and press out all air. Thaw overnight in the refrigerator. Do not microwave from frozen — always thaw first.
Heat wok over high with 1 tsp sesame oil. Add cold rice, press flat. Cook undisturbed 1 minute to re-crisp the base, then toss 2 more minutes. Restores texture and intensifies flavour.
Cover with damp paper towel, microwave in 60-second bursts, stirring between. Acceptable but softer results — use stove method when possible. Add 1 tsp water if rice seems dry.
Is Kimchi Fried Rice Healthy?
Kimchi fried rice is a nutritionally balanced meal. At 420 calories with 14g protein and 58g complex carbohydrates, it provides sustained energy. The fried egg contributes high-quality complete protein and choline, which supports brain and liver function.
The kimchi generates live Lactobacillus cultures — approximately 1 billion CFU per 100g serving — supporting gut microbiome health. A 2024 study in BMJ Open found daily kimchi consumption associated with a 5% reduction in abdominal fat over 12 weeks. Gochugaru contains capsaicin, linked to a modest thermogenic effect and improved insulin sensitivity.
Kimchi Fried Rice FAQ — 20 Questions Answered
Use well-fermented kimchi that is at least 2–4 weeks old (Stage 3 fermentation). The sourness and depth of aged kimchi creates the signature flavour. Fresh kimchi produces a flat, raw taste. Always squeeze out excess liquid before cooking.
Yes — day-old refrigerated rice is essential. Fresh rice is too moist and steams instead of frying, making the dish mushy. Day-old rice has lower moisture content so it separates and crisps properly in the wok. If you only have fresh rice, spread it on a tray and refrigerate for 2 hours.
Short-grain Korean or Japanese rice is the best choice. It has the right starch content to clump slightly yet still separate when fried. Jasmine rice is an acceptable substitute. Long-grain rice produces a drier, less cohesive result. Avoid basmati.
Yes — kimchi fried rice is delicious without egg. Skip the fried egg topping and use silken tofu or extra spring onions instead. The rice itself does not require egg. See our dedicated Kimchi Fried Rice Without Egg guide for a full egg-free recipe.
Three reasons: (1) Your kimchi is too fresh — aged kimchi is essential for depth. (2) You skipped the kimchi juice — 3 tablespoons adds massive umami. (3) Your heat was too low — kimchi fried rice needs high heat to caramelise and develop wok hei flavour.
Yes — use vegan kimchi (made without fish sauce or shrimp paste), skip the egg, and substitute soy sauce for any non-vegan condiments. See our full Vegan Kimchi Fried Rice guide for a completely plant-based version.
Kimchi fried rice keeps well for 3 days in an airtight container. The flavour deepens after a day as the gochujang and kimchi juices meld with the rice. Reheat in a hot wok with a teaspoon of sesame oil.
Yes — kimchi fried rice freezes well for up to 2 months. Portion into freezer bags and press flat. Thaw overnight in the fridge then reheat in a hot wok. Do not freeze with the fried egg.
Kimchi fried rice uses fermented kimchi and kimchi juice as the primary seasoning, giving it a tangy, spicy, and deeply umami flavour that regular fried rice lacks. Regular fried rice relies on soy sauce and neutral flavours. Kimchi fried rice is bolder and needs aged kimchi to be authentic.
Gochujang adds deep colour, fermented sweetness, and complexity that kimchi juice alone cannot provide. If unavailable, use 1 tbsp gochugaru + ½ tsp miso. Never substitute with sriracha — the flavour profile is completely different.
A cast iron wok or heavy carbon steel pan gives the best result. It retains high heat and creates the slight char (wok hei) that defines great kimchi fried rice. A non-stick pan at low heat produces a steamed, pale result.
Classic kimchi fried rice is moderately spicy — a 3 out of 5 on most spice scales. Control heat by adjusting gochujang (reduce to ½ tbsp for mild) and choosing a less spicy kimchi. Use the interactive spice tool above to adjust all quantities in real time.
Spam is the most traditional Korean addition. Other great options: canned tuna, leftover chicken, pork belly (slice thin and fry first), shrimp, or silken tofu for vegetarians. Add protein after the kimchi is caramelised and before adding rice.
Yes — leftover rice from a rice cooker is perfect, especially if refrigerated overnight. The cooker’s steam cycle produces slightly drier rice, ideal for fried rice. Just break up any large clumps before adding to the wok.
Kimchi fried rice is a nutritionally balanced meal — 420 calories per serving with 14g protein. The kimchi adds approximately 1 billion CFU probiotics per 100g and antioxidants from gochugaru. Reduce calories by using cauliflower rice or reducing sesame oil to 1 teaspoon.
Kimchi fried rice tastes tangy, slightly spicy, umami-rich, and savoury with a subtle smoky note from wok caramelisation. The gochujang adds fermented sweetness, the kimchi brings tartness and heat, and the sesame oil adds nuttiness. The runny egg yolk adds richness that balances the sourness.
Use ½ cup of chopped kimchi per serving (1 cup rice per serving). This ratio ensures every bite has kimchi flavour without the rice becoming too wet. For bolder kimchi flavour, increase to ¾ cup and reduce kimchi juice to 2 tablespoons.
You can, but the result will be noticeably less sour, less complex, and less aromatic. Fresh kimchi has not yet developed the fermented umami that makes this dish exceptional. If only fresh kimchi is available, add 1 tsp rice vinegar and ½ tsp soy sauce to compensate.
Kimchi bokkeumbap (김치볶음밥) is the Korean name for kimchi fried rice. Bokkeumbap means “stir-fried rice.” It is one of Korea’s most beloved weekday meals — traditionally made with leftover kimchi and day-old rice. Every Korean household has its own version.
Kimchi fried rice is a complete one-bowl meal on its own. If serving as part of a larger Korean spread, pair it with doenjang jjigae, a simple cucumber side salad (oi muchim), or spinach namul. For drinks, a cold Korean beer or barley tea complements the spice perfectly.